How To Create a Custom Console Command in Magento 2.x

There are following below steps to create custom console command or custom command to perform some complex data manipulation operation.

custom console command by using custom module

Here, we are considering as
Namespace / ModuleName = Mage2db/John

Magento 2 Custom Module

Step [1.1] – Create registration.php file under your module [ Namespace / ModuleName ]

File Path=Mage2db/John/registration.php

Add below content in this file.

<?php
\Magento\Framework\Component\ComponentRegistrar::register(
    \Magento\Framework\Component\ComponentRegistrar::MODULE,
    'Mage2db_John',
    __DIR__
);

Step [1.2] – Create module.xml file under your module [ Namespace / ModuleName ]

File Path=Mage2db/John/etc/module.xml

Add below content in this file.

<?xml version="1.0"?>
<config xmlns:xsi="http://www.w3.org/2001/XMLSchema-instance" xsi:noNamespaceSchemaLocation="urn:magento:framework:Module/etc/module.xsd">
    <module name="Mage2db_John" setup_version="1.0.0" />
</config>

Step [2] – Create di.xml file under your module etc directory. Add below content in this file.

File Path=Mage2db/John/etc/di.xml

<?xml version="1.0"?>

    <config xmlns:xsi="http://www.w3.org/2001/XMLSchema-instance" xsi:noNamespaceSchemaLocation="urn:magento:framework:ObjectManager/etc/config.xsd">

    <type name="Magento\Framework\Console\CommandList">

       <arguments>

           <argument name="commands" xsi:type="array">

               <item name="Mage2dbHelloCustomer" xsi:type="object">Mage2db\John\Console\Hellocustomer</item>

           </argument>

       </arguments>

   </type>

</config>

Step [3] – Create Hellocustomer.php class file under your module Console directory. Add below code in this file.

File Path=Mage2db/John/Console/Hellocustomer.php

<?php
namespace Mage2db\John\Console;


use Symfony\Component\Console\Command\Command;

use Symfony\Component\Console\Input\InputInterface;

use Symfony\Component\Console\Output\OutputInterface;


class Hellocustomer extends Command

{

   protected function configure()

   {

       $this->setName('mage2db:hellocustomer');

       $this->setDescription('Demo Custom command line');


       parent::configure();

   }

   protected function execute(InputInterface $input, OutputInterface $output)

   {

    $output->writeln("Hello Customer,Custom Module For Custom Console Command");

   }

}

Step[4] – Finally, Custom module with Console Command has been done.

Run command

php bin/magento list

Once execute command, it is displaying custom command from list of all command as below.

mage2db:hellocustomer

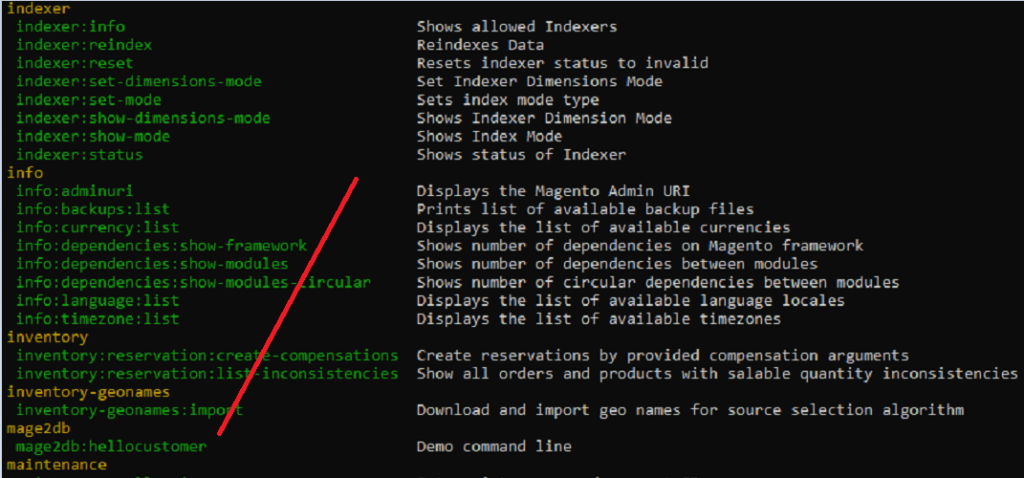
Once execute command, mage2db:hellocustomer

php bin/magento mage2db:hellocustomer

Output will be as

Hello Customer, Custom Module For Custom Console Command

How To Create Events & Observer Using Custom Module in Magento / Adobe Commerce 2.x


How To Create Preference Using Custom Module in Magento / Adobe Commerce 2.x


How To Create Plugin Using Custom Module in Magento / Adobe Commerce 2.x


How To Get Base URL in Magento 2.x / Adobe Commerce 2.x


How To Create Custom Module in Magento 2.x / Adobe Commerce 2.x


How To Add Custom Block on Cart Page in Magento 2.x / Adobe Commerce 2.x


How To Create a Custom Log File in Magento 2.x / Adobe Commerce 2.x


How To Create Custom Controller in Magento 2.x / Adobe Commerce 2.x


How To Create a Custom Console Command in Magento 2.x / Adobe Commerce 2.x


How To Add Customer Groups Dropdown in Magento 2.x Admin Form and Grid By UI Component in Magento 2.x / Adobe Commerce 2.


How To Get all Customers Data in Magento 2.x / Adobe Commerce 2.x


How To Set Tier Price With Percentage Value Programmatically in Magento 2.x / Adobe Commerce 2.x


How To Add Tier Price Programmatically in Magento 2.x / Adobe Commerce 2.x


How To Add Websites Dropdown in Admin Form and Grid By UI Component in Magento 2.x / Adobe Commerce 2.x


Magento 2 All Database Tables [500 & more Tables]


How To Set Multi Shipping Settings In Magento 2


How To Set Origin Shipping in Magento 2


Difference Between Offline Shipping Method and Online Shipping Method


Magento 2 Online Customers Options


How To Apply Customer Group Price of Products in Magento 2


How To Add Customer Groups Dropdown in Magento 2 Admin Form and Grid By UI Component


How To Get all Customers Data in Magento 2


How To Create Customer Order in Magento 2 Admin Panel


Magento 2 Login As Customer Not Enabled


How To Configure Customer Account Sharing Options in Magento 2


Magento 2 Redirect To Customer Dashboard After Login


Which Magento 2 database table store customer shipping and billing address


How To Remove Sales Order Data & Customer Data in Magento 2


Which Magento 2 database table store customer’s Email Data


Which Magento 2 Database Table Store Customer Newsletter Data


Which Magento 2 database table store customer’s shipping and billing address


How To Remove Sales Order Data & Customer Data in Magento 2


Which Magento 2 Database Tables Store Customer Rating


Which Magento 2 Database Tables Store Customer Wishlist Products


Magento 2 Increase Customer Session Time


Which Magento 2 Database Table Store Patches

Magento 2.x Allowed memory size of XXXX bytes exhausted (tried to allocate XXXX bytes)

The cause of the error “allowed memory size of bytes exhausted” due to shortage of memory

There are following two type solution to resolve this issue

Solution [1] – Quick solution or Temporary solution

Add memory limit in the current running command

php -d memory_limit=-1 bin/magento deploy:mode:set developer
php -d memory_limit=-1 bin/magento setup:upgrade
php -d memory_limit=-1 bin/magento setup:di:compile
php -d memory_limit=-1 bin/magento setup:static-content:deploy -f
php -d memory_limit=-1 bin/magento indexer:reindex
php -d memory_limit=-1 bin/magento cache:clean
php -d memory_limit=-1 bin/magento cache:flush

Solution [2] – This is  Permanent solution.

Disadvantages of Magento 2.x

There are following below disadvantages of Magento 2

  1. Magento 2 Complexity Structure
  2. Magento 2 Higher Costing & License Fee
  3. Magento 2 Development & Design Time Consuming
  4. Magent 2 Higher Hosting Cost
  5. Magento 2 Higher Maintenance Cost

[1] – Magento 2 Complexity Structure ::

Magento 2 Directories / Files structure is too complicated, It is extensions [Modules, Plugins, Dependency Injection, Events & Observers] are very sophisticated and difficult to understand.

[2] – Magento 2 Higher Costing & License Fee :: Magento 2 availability as three format

Magento 2 Community Edition :: completely free eCommerce open source.

Magento 2 Enterprise Edition :: highly customizable, scalable, and considerably simplifies integration with third-party systems.

It is costing [between $22000 To $75000.00 ] + additional annual License Cost

Magento 2 Enterprise Solutions Cloud Edition :: Cloud hosting & more highly customizable, scalable, and considerably simplifies integration with third-party systems.

It is costing [between $40000 To $120000.00 ] + additional annual License Cost

[3] – Magento 2 Development & Design Time Consuming ::

Magento 2 development / design is highly complex and can be time consuming. It can do things like no other CMS can, but simple things can be much harder to accomplish, It is always require expert & dedicated team.

[4] – Magent 2 Higher Hosting Cost ::

Magento 2 require high configuration dedicated & cloud hosting server as AWS, Google Cloud hosting server etc.

[5] – Magento 2 Higher Maintenance Cost ::

Magento 2 maintenance cost very high & maintenance experts keep track your Magento 2 store running and up to date, they provide support for development, site speed, security, version upgrade, integration, extension customization, patch installations and much more

Magento 2.x Commerce- Cloud Error Logs

There are following erros log with path are mentioned

  • Deployment log: var/log/cloud.log
  • Last deployment error log: var/log/cloud.error.log
  • Debug log: var/log/debug.log
  • Exception log: var/log/exception.log
  • System log: var/log/system.log
  • Support log: var/log/support_report.log
  • Reports: var/report/

Environment specific logs

[1] – Starter and Pro Integration:

/var/log/deploy.log

[2] – Pro Staging:

 /var/log/platform/<project_id>_stg/deploy.log

[3] – Pro Production:

var/log/platform/<project_id>/deploy.log

<project_id> depends on the project ID and whether the environment is Staging or Production

Magento 2.4.x Commerce Cloud or Adobe Commerce Cloud Edition Features

There are following list of Magento 2 Commerce Cloud Features

  1. Advanced Catalog Search
  2. Gift Cards/Gift Registries
  3. Google Tag Manager
  4. Dynamic Blocks
  5. Content Staging
  6. Customer Segments
  7. Rewards & Loyalty
  8. Shopping Assistance
  9. Customer Email Reminders
  10. Advance Payment Methods / Shipping Methods
  11. Private Sales, Countdown Sales & Events
  12. Visual Merchandiser
  13. Advance Wishlists
  14. Scheduled Import/Export
  15. Sales report
  16. Tax report
  17. Abandoned shopping cart report
  18. Best viewed products report
  19. Best purchased products report
  20. Low stock report
  21. Search terms report
  22. Product reviews report
  23. Coupon usage report
  24. Total sales invoiced report
  25. B2B Features
  26. Cloud Hosting Service
  27. Expert Support
  28. Live Search
  29. Product Recommendations
  30. Business Intelligence
  31. Customer Quote Price, Quick Orders, Shared Catalog

Download Magento 2.4.x Commerce Cloud Feature List

Other important Magento 2.4.x issue as below

Magento 2.3 To Magento 2.4.5 Comptibility For PHP, MYSQL, Composer, Apache etc


Magento 2.4.3-p1 Installation Steps


Magento 2.4.3 Installation Steps


Magento 2.4.3 Features


Magento 2.4.3 – p1 Features


Magento 2.4 Two Factor Authentication


Magento 2.4.1 Features


Magento 2.4 Features


Magento 2.4 Installation


Magento 2.2, Magento 2.3, Magento2.4 Installation Issue on Windows 10, XAMPP


Magento 2 Installation at 51% Error: (Wrong file in Gd2.php:64) Module ‘Magento_Theme’

Difference Between composer.json and composer.lock in Magento 2.x

composer. json file to manage Magento 2 / Extensions installations and upgrades while The composer.lock file stores a set of exact version dependencies that satisfy all of the version constraints of every requirement for every package in the dependency tree of the project.

The composer.lock file is generated after your first composer install. It saves a copy of your dependencies/version that you can commit to your source control

composer.json is the list of required set of libraries and versions for your project.

It contains information such as the name of the project, version constraints for Magento and its dependencies, autoload configurations, scripts to execute during installation and updates, and other project-specific settings.


composer.lock is what set of extensions/modules/components are currently installed for your project. Compoer.lock is a file generated by Composer during dependency resolution and installation, It ensures that all developers working on the same project use the same versions of dependencies

The composer.json is the list of required libraries and versions of your project

What is Declarative Schema in Magento 2.x

Before Release Magento 2.3 we are using in custom module development, Tables created by InstallSchema & upgraded by UpgradeSchema, similarly InstallData to install data in tables & UpgradeData to upgrade data in tables, this process was time-consuming

Once Release Magento 2.3 [ 25th Nov, 2018 ], introduced new concept of Database Creation is declarative schema

Replacement of [ InstallSchema / InstallData ,UpgradeSchema / UpgradeData] is declarative schema

“Instead of using Four Files [InstallSchema.php / InstallData.php ,UpgradeSchema.php / UpgradeData.php], Using Single File (db_schema.xml) used inside app/code/vendorname/module/etc/db_schema.xml”

sample db_schema.xml created as below

<schema xmlns:xsi="http://www.w3.org/2001/XMLSchema-instance" xsi:noNamespaceSchemaLocation="urn:magento:framework:Setup/Declaration/Schema/etc/schema.xsd">
 <table name="Emp_Records" resource="default" engine="innodb" comment="Employee Records">
 <column xsi:type="int" name="id" padding="7" unsigned="false" nullable="false" identity="true" comment="ID" />
	  
<column xsi:type="varchar" name="emp_name"  nullable="false" length="100"  comment="Employee Name" />
		
 <column xsi:type="varchar" name="emp_dept"     nullable="false" length="200"  comment="Employee Department" />
	  
 <column xsi:type="varchar" name="emp_address"       nullable="false" length="200"  comment="Employee Address" />
	 
<column xsi:type="decimal" name="emp_salary" nullable="false" scale="2" precision="10" comment="Employee Salary"/>
	  
<column xsi:type="smallint" name="is_active"   nullable="false"  comment="Employee Records Is Active or not" />

<column xsi:type="datetime" name="created_at"   comment="Employee Records Created Date" />

<column xsi:type="datetime" name="updated_at"   comment="Employee Records Updated Date" />
	  
      <constraint xsi:type="primary" referenceId="PRIMARY">
         <column name="id" />
      </constraint>
	  
    </table>
</schema>

How To Add Customer Groups Dropdown in Magento 2.x Admin Form and Grid By UI Component

There are following below steps need to follow to add Customer Groups drop down in Magento 2 Custom module Admin Entry Form & Grid Listing by using UI Component.

Here we are considering you have already created custom module by using UI Component.

Step [1] – Create Customergroup.php file inside Admin UI Component Listing Column

File Path as below

app/code/ Mage2db/John/Ui/Component/Listing/Column/Customergroup.php
<?php

namespace Hni\Ebsgroupmapping\Ui\Component\Listing\Column;

use Magento\Framework\View\Element\UiComponent\ContextInterface;
use Magento\Framework\View\Element\UiComponentFactory;
use Magento\Ui\Component\Listing\Columns\Column;
use Magento\Framework\UrlInterface;
use Magento\Cms\Block\Adminhtml\Page\Grid\Renderer\Action\UrlBuilder;
use Magento\Framework\Pricing\PriceCurrencyInterface;
use Magento\Store\Model\StoreManagerInterface;
/**
 * Class ProductActions
 */
class Customergroup extends Column
{

    /**
     * @var UrlInterface
     */
    protected $urlBuilder;
    /**
     * @var PriceCurrencyInterface
     */
    protected $priceFormatter;
    /**
     * @var actionUrlBuilder
     */
    protected $actionUrlBuilder;
    /**
     * @var $_storeManager
     */
    protected $_storeManager;


    /**
     * @param ContextInterface $context
     * @param UiComponentFactory $uiComponentFactory
     * @param UrlInterface $urlBuilder
     * @param array $components
     * @param array $data
     */
    public function __construct(
        ContextInterface $context,
        UiComponentFactory $uiComponentFactory,
        UrlInterface $urlBuilder,
        UrlBuilder $actionUrlBuilder,
        PriceCurrencyInterface $priceFormatter,
        StoreManagerInterface $storeManager,
		\Magento\Customer\Ui\Component\Listing\Column\Group\Options $groups,
        array $components = [],
        array $data = []
    ) {
        $this->urlBuilder = $urlBuilder;
        $this->actionUrlBuilder = $actionUrlBuilder;
        $this->priceFormatter = $priceFormatter;
        $this->_storeManager = $storeManager;
		$this->groups = $groups;
        parent::__construct($context, $uiComponentFactory, $components, $data);
    }


    /**
     * Prepare Data Source
     *
     * @param array $dataSource
     * @return array
     */
    public function prepareDataSource(array $dataSource)
    {
        if (isset($dataSource['data']['items'])) {
			
            foreach ($dataSource['data']['items'] as & $item) {
	
   	            $customergroups = $this->groups->toOptionArray();
			    $p=0;
				  foreach ($customergroups as $group) {
					  
				  if($customergroups[$p]['value']==$item['customer_groupid']){
							$groupname = $customergroups[$p]['label'];
						}
				  $p++;		
				  }

                $item[$this->getData('name')] = $groupname;
				
            }
        }
        return $dataSource;
    }
}

Step [2] – Add below code in Admin UI Component Grid Listing.

File Path as below [Instead of UIGridListing.xml use your UI Admin Grid Listing file name]

app/code/ Mage2db/John/view/adminhtml/ui_component/UIGridListing.xml

<column name="customer_groupid" class="Hni\Ebsgroupmapping\Ui\Component\Listing\Column\Customergroup">
<argument name="data" xsi:type="array">
<item name="config" xsi:type="array">
<item name="component" xsi:type="string">Hni_Ebsgroupmapping/js/ui/grid/columns/html</item>
<item name="align" xsi:type="string">left</item>
<item name="sortable" xsi:type="boolean">false</item>
<item name="label" xsi:type="string" translate="true">Customer Group</item>
<item name="sortOrder" xsi:type="number">60</item>
</item>
</argument>
</column>

Step [3] – Add below code in Admin UI Component Grid Entry Form

File Path as below [Instead UIGridEntryForm .xml use your UI Admin UI Form file name]

app/code/ Mage2db/John/view/adminhtml/ui_component/UIGridEntryForm.xml

<field name="customer_groupid" sortOrder="40" formElement="select">
<settings>
<label translate="true">Customer Group</label>
</settings>
  <formElements>
   <select>
   <settings>
   <options  class="Magento\Customer\Model\Customer\Source\GroupSourceInterface"/>
   </settings>
   </select>
  </formElements>
</field>		 

Finally Customers drop down has been added in Magento 2 Admin Grid Entry Form as well as It’s corressponding value displaying in Magento 2 Admin Grid Listing by using UI Component.

How To Create Events & Observer Using Custom Module in Magento / Adobe Commerce 2.x


How To Create Preference Using Custom Module in Magento / Adobe Commerce 2.x


How To Create Plugin Using Custom Module in Magento / Adobe Commerce 2.x


How To Get Base URL in Magento 2.x / Adobe Commerce 2.x


How To Create Custom Module in Magento 2.x / Adobe Commerce 2.x


How To Add Custom Block on Cart Page in Magento 2.x / Adobe Commerce 2.x


How To Create a Custom Log File in Magento 2.x / Adobe Commerce 2.x


How To Create Custom Controller in Magento 2.x / Adobe Commerce 2.x


How To Create a Custom Console Command in Magento 2.x / Adobe Commerce 2.x


How To Add Customer Groups Dropdown in Magento 2.x Admin Form and Grid By UI Component in Magento 2.x / Adobe Commerce 2.


How To Get all Customers Data in Magento 2.x / Adobe Commerce 2.x


How To Set Tier Price With Percentage Value Programmatically in Magento 2.x / Adobe Commerce 2.x


How To Add Tier Price Programmatically in Magento 2.x / Adobe Commerce 2.x


How To Add Websites Dropdown in Admin Form and Grid By UI Component in Magento 2.x / Adobe Commerce 2.x


Magento 2 All Database Tables [500 & more Tables]


How To Set Multi Shipping Settings In Magento 2


How To Set Origin Shipping in Magento 2


Difference Between Offline Shipping Method and Online Shipping Method


Magento 2 Online Customers Options


How To Apply Customer Group Price of Products in Magento 2


How To Add Customer Groups Dropdown in Magento 2 Admin Form and Grid By UI Component


How To Get all Customers Data in Magento 2


How To Create Customer Order in Magento 2 Admin Panel


Magento 2 Login As Customer Not Enabled


How To Configure Customer Account Sharing Options in Magento 2


Magento 2 Redirect To Customer Dashboard After Login


Which Magento 2 database table store customer shipping and billing address


How To Remove Sales Order Data & Customer Data in Magento 2


Which Magento 2 database table store customer’s Email Data


Which Magento 2 Database Table Store Customer Newsletter Data


Which Magento 2 database table store customer’s shipping and billing address


How To Remove Sales Order Data & Customer Data in Magento 2


Which Magento 2 Database Tables Store Customer Rating


Which Magento 2 Database Tables Store Customer Wishlist Products


Magento 2 Increase Customer Session Time


Which Magento 2 Database Table Store Patches

What is Cybersource Payment Gateway

CyberSource is a payment gateway. It is used by online payment and fraud management services for medium and large-sized merchants

Cybersource is an E-commerce credit card payment system management company. Customers process online payments, streamline online fraud management, and simplify payment security, It is introduced in Ecommerce market on December, 2016

How To Add Websites Dropdown in Magento 2.x Admin Form and Grid By UI Component

There are following below steps need to follow to add websites drop down in Magento 2 Custom module Admin Entry Form & Grid Listing by using UI Component.

Here we are considering you have already created custom module by using UI Component.

Step [1] – Create Store.php file inside Admin UI Component Listing Column

File Path as below

app/code/ Mage2db/John/Ui/Component/Listing/Column/Store.php

<?php
namespace Mage2db\John\Ui\Component\Listing\Column;

use Magento\Framework\View\Element\UiComponent\ContextInterface;
use Magento\Framework\View\Element\UiComponentFactory;
use Magento\Ui\Component\Listing\Columns\Column;
use Magento\Framework\UrlInterface;
use Magento\Cms\Block\Adminhtml\Page\Grid\Renderer\Action\UrlBuilder;
use Magento\Framework\Pricing\PriceCurrencyInterface;
use Magento\Store\Model\StoreManagerInterface;
/**
 * Class ProductActions
 */
class Store extends Column
{

    /**
     * @var UrlInterface
     */
    protected $urlBuilder;
    /**
     * @var PriceCurrencyInterface
     */
    protected $priceFormatter;
    /**
     * @var actionUrlBuilder
     */
    protected $actionUrlBuilder;
    /**
     * @var $_storeManager
     */
    protected $_storeManager;


    /**
     * @param ContextInterface $context
     * @param UiComponentFactory $uiComponentFactory
     * @param UrlInterface $urlBuilder
     * @param array $components
     * @param array $data
     */
    public function __construct(
        ContextInterface $context,
        UiComponentFactory $uiComponentFactory,
        UrlInterface $urlBuilder,
        UrlBuilder $actionUrlBuilder,
        PriceCurrencyInterface $priceFormatter,
        StoreManagerInterface $storeManager,
        array $components = [],
        array $data = []
    ) {
        $this->urlBuilder = $urlBuilder;
        $this->actionUrlBuilder = $actionUrlBuilder;
        $this->priceFormatter = $priceFormatter;
        $this->_storeManager = $storeManager;
        parent::__construct($context, $uiComponentFactory, $components, $data);
    }

    /**
     * Prepare Data Source
     *
     * @param array $dataSource
     * @return array
     */
    public function prepareDataSource(array $dataSource)
    {
        if (isset($dataSource['data']['items'])) {
			
            foreach ($dataSource['data']['items'] as & $item) {
	
 	            $Websites = $this->_storeManager->getWebsites();
				
                $WebsiteName="-";
			
                foreach ($Websites as $website) {
                    if($website->getId()==$item['website_id']){
                      /*put your custom column name instead of website_id */
                        $WebsiteName = $website->getName();
                    }
                }
                $item[$this->getData('name')] = $WebsiteName;
            }
        }
        return $dataSource;
    }
}

Step [2] – Add below code in Admin UI Component Grid Listing.

File Path as below

app/code/ Mage2db/John/view/adminhtml/ui_component/UIGridListing.xml

<column name="website_id" class="Mage2db\John\Ui\Component\Listing\Column\Store">
 <argument name="data" xsi:type="array">
 <item name="config" xsi:type="array">
 <item name="component" xsi:type="string">Mage2db_John/js/ui/grid/columns/html</item>
<item name="align" xsi:type="string">left</item>
 <item name="sortable" xsi:type="boolean">false</item>
<item name="label" xsi:type="string" translate="true">Store View</item>
<item name="sortOrder" xsi:type="number">60</item>
 </item>
 </argument>
</column>

Step [3] – Add below code in Admin UI Component Grid Entry Form

File Path as below

app/code/ Mage2db/John/view/adminhtml/ui_component/UIGridEntryForm.xml

<field name="website_id" formElement="select">
   <settings>
   <dataType>text</dataType>
    <label translate="true">Website</label>
    <dataScope>data_title</dataScope>
   </settings>
 <formElements>
  <select>
  <settings>
 <options>
 <option name="1" xsi:type="array">
    <item name="value" xsi:type="string">1</item>
    <item name="label" xsi:type="string">Main Website</item>
 </option>
 <option name="2" xsi:type="array">
 <item name="value" xsi:type="string">2</item>
 item name="label" xsi:type="string">Firstwebsite</item>
 </option>
 <option name="3" xsi:type="array">
 <item name="value" xsi:type="string">3</item>
 <item name="label" xsi:type="string">secondsite</item>
 </option>
 </options>
 <caption translate="true">-- Select Website --</caption>
 </settings>
 </select>
 </formElements>
 </field> 

Finally Website drop down has been added in Magento 2 Admin Grid Entry Form as well as It’s corressponding value displaying in Magento 2 Admin Grid Listing by using UI Component.