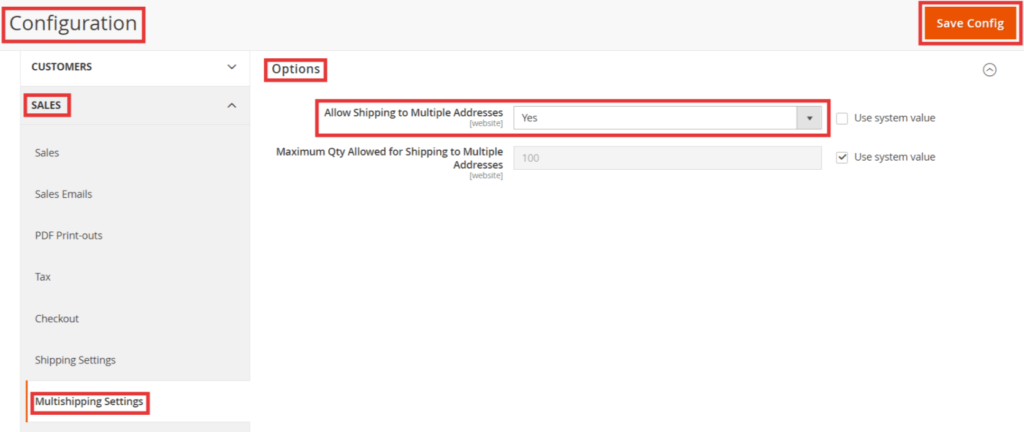
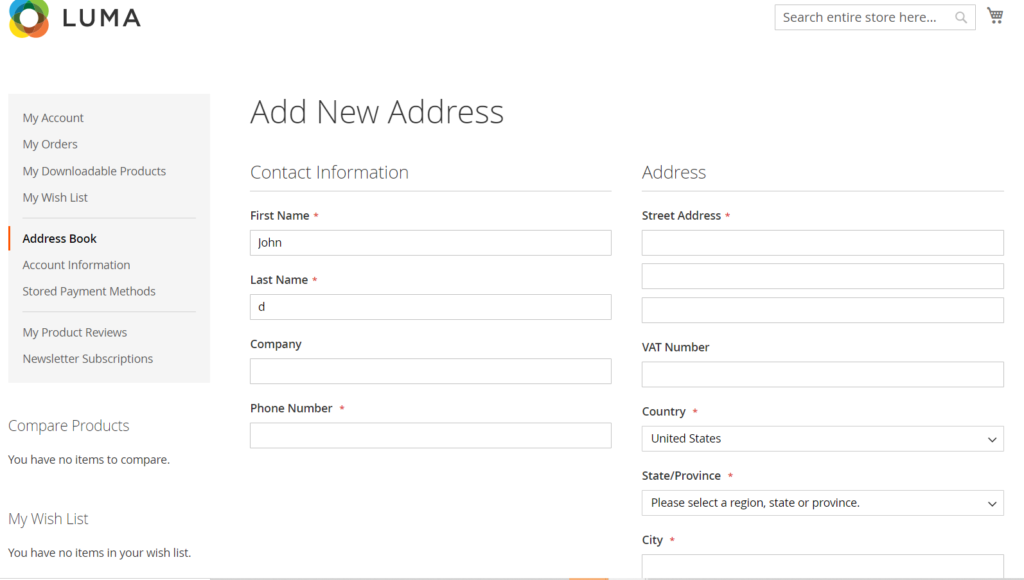
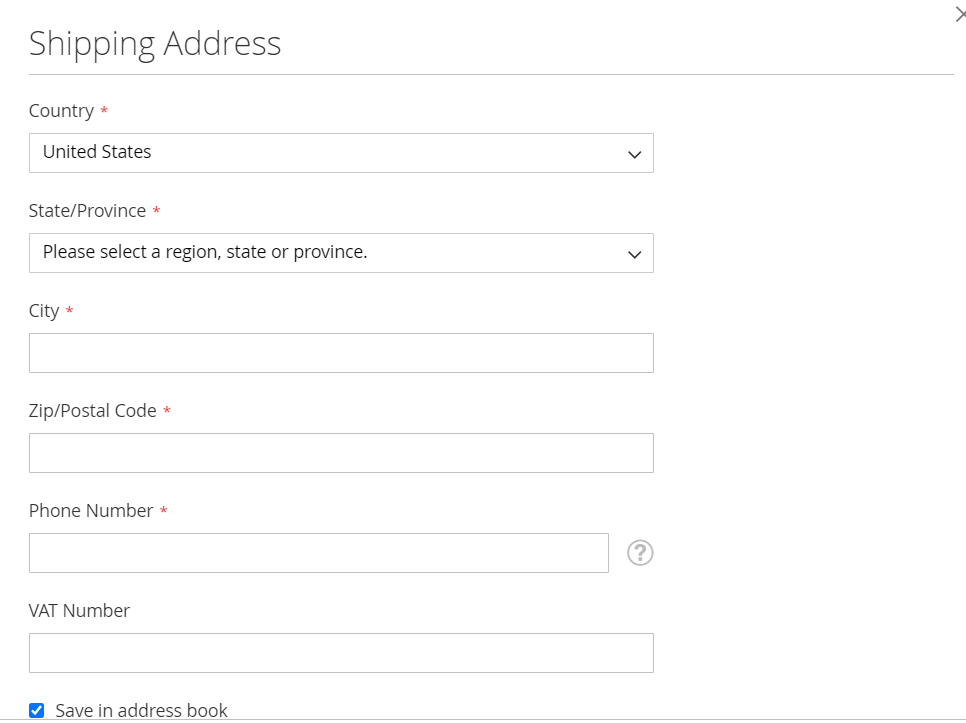
Shipping Address is used to ship products at customer’s address, Magento 2 allow Multiple Shipping Addresses to ship multiple address during checkout process.
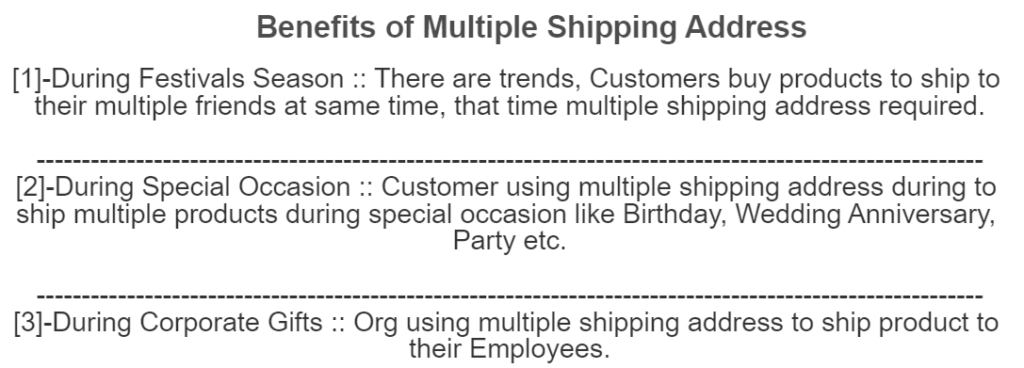
The following below Benefits of Multiple Shipping Address in Magento 2
During Festivals Season :: There are trends, Customers buy products to ship to their multiple friends at same time, that time multiple shipping address required.
During Special Occasion :: Customer using multiple shipping address during to ship multiple products during special occasion like Birthday, Wedding Anniversary, Party etc.
During Corporate Gifts :: Org using multiple shipping address to ship product to their Employees.
This is a common error while upgrading Magento 2.x To Magento 2.4.3
Deprecated Functionality: Class Laminas\Hydrator\Reflection is deprecated, please use Laminas\Hydrator\ReflectionHydrator instead in /pathToMagento/web/vendor/laminas/laminas-hydrator/src/Reflection.php on line 17
The following below solution
Solution [1] – After Upgrade Magento 2.x To Magento 2.4.3
Once you successfully upgraded Magento 2.x To Magento 2.4.3 and issue occurs as above-mentioned.
The laminas class might be used in some of the extensions, need to update the specific code of these extensions.
Using below command we can find which extensions, using laminas class.
grep -r 'class to search' app/
Solution [2] – Before Upgrade Magento 2.x To Magento 2.4.3
Copy below code from Magento 2.4.3 & Paste in Magento 2.x
Magento 2 Origin Shipping Setting need to calculate the shipping costs for the shipments made from your store as well as calculate product tax cost.
The following below admin settings need to follow.
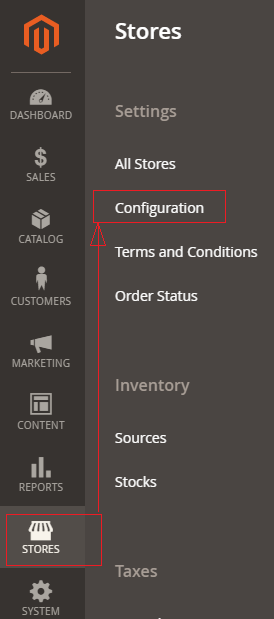
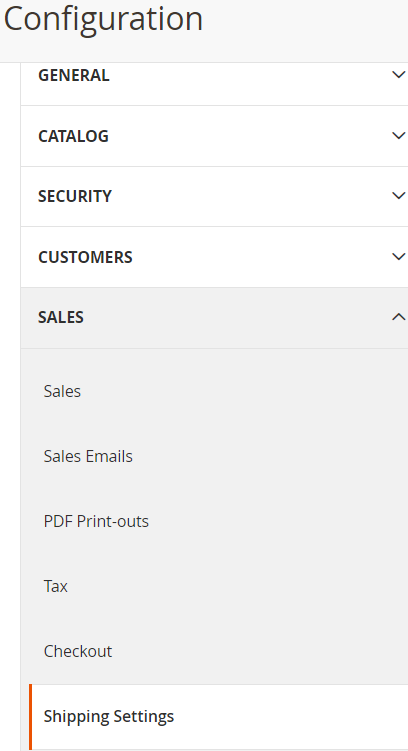
Step [1] – Go STORES > Configuration, redirects Configuration section.
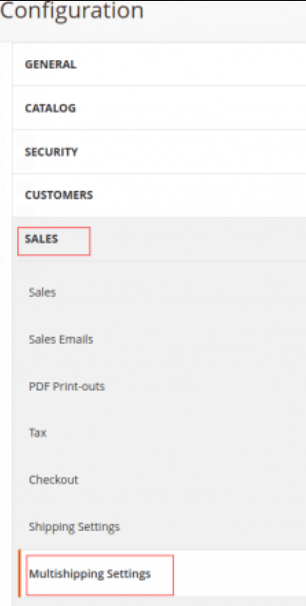
Step [2] – Left panel, choose SALES > Shipping Settings.
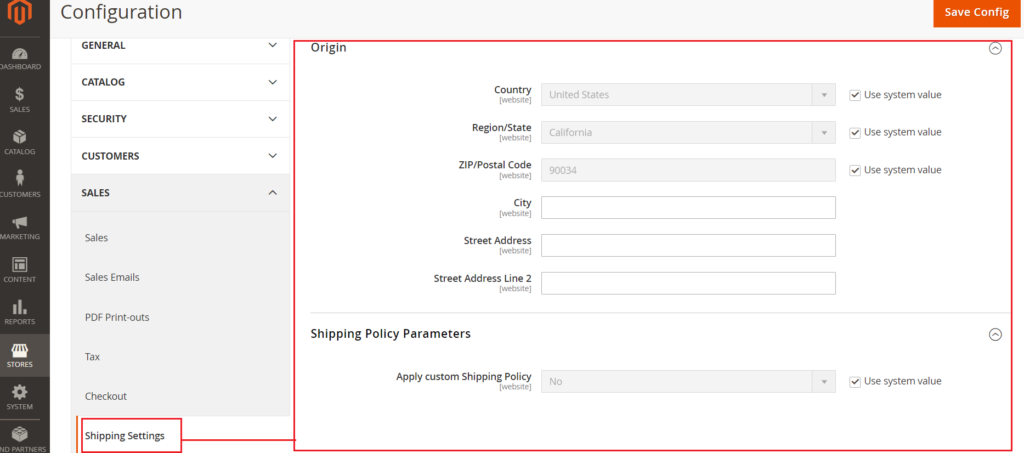
Step [3] – Right panel, Expand the
Origin section
&
Shipping Policy Parameters section
Step [4] – Origin section having the following below fields.
Before filling any input field, need to uncheck Use System Value
Country :By default, United States, fill as per Store Origin need. Region/State : By default California, fill as per Store Origin need. ZIP/Postal Code : By default 90034, fill as per Store Origin need. City : fill City as per Store Origin need. Street Address : fill Street Address as per Store Origin need. Street Address Line 2 : fill Street Address Line 2 as per Store Origin need.
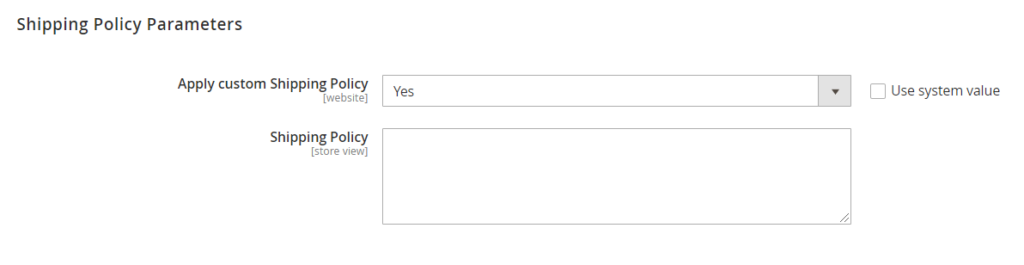
Shipping Policy Parameterssection having Apply custom Shipping Policy, By default No selected
Once Yes selected , new input field Shipping Policy displaying to fill shipping policy content as per StoreShipping Policy need
Click on Save Config button & run CLI command Flush
There are two options Online Minutes Interval & Customer Data Lifetime inside Online Customers Options.
The following below steps need to follow.
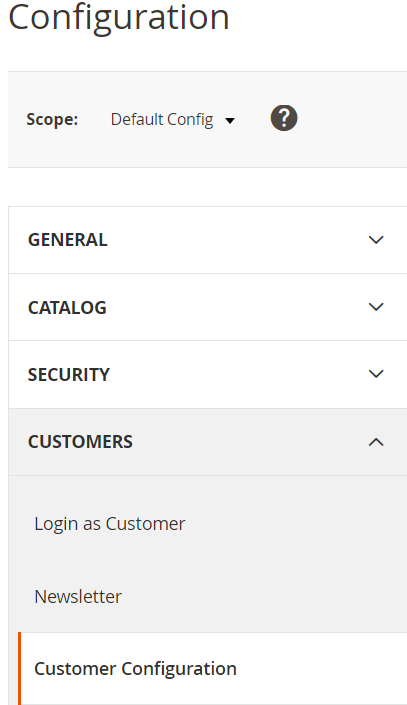
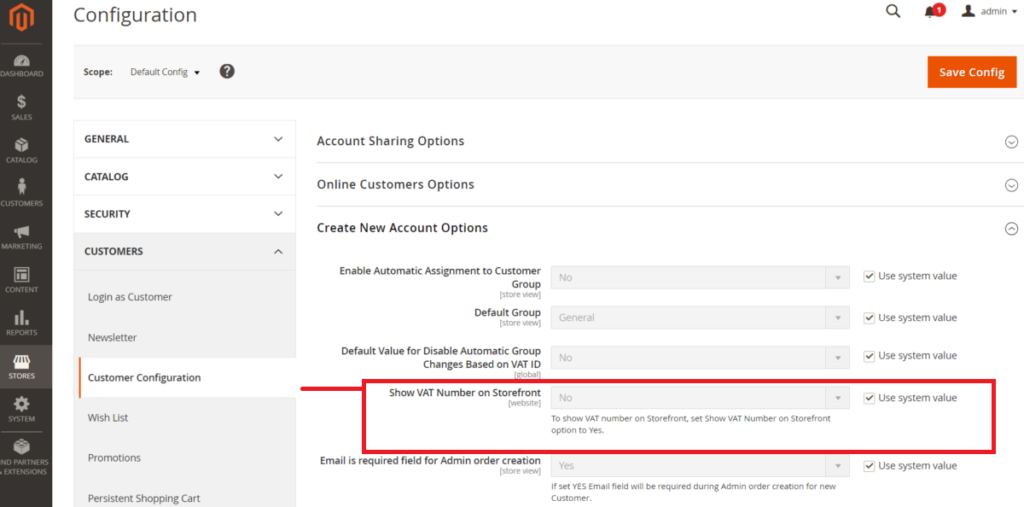
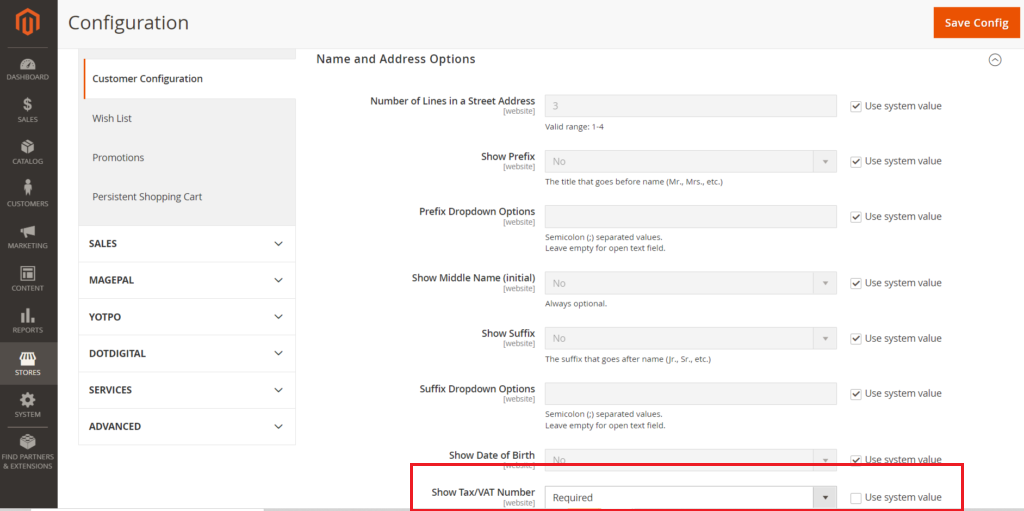
Step [1] – Go STORES > Configuration, redirects Configuration section.
Step [2] – Left panel, choose CUSTOMERS > Customer Configuration.
Step [3] – Right panel, Expand the Online Customers Options section.
Step [4] – Two options as below
Online Minutes Interval: Enter the number of minutes allowed for a Customer’s Session time on the site. 15 minutes default time, if you leave this field blank, it is considered as 15 minutes.
Customer Data Lifetime: Enter the number of minutes before unsaved customer’s data. 15 minutes default time.
Step [5] – Click on Save Config button & run CLI command Flush
Finally, Online Minutes Interval (Customer Session time period in minute) & Customer Data Lifetime (in minute) has been set.
<?php
namespace  Mage2db\John\Helper;
use Magento\Store\Model\StoreManagerInterface;

class Data extends \Magento\Framework\App\Helper\AbstractHelper
{
	protected $storeManager;

	/**
     * @param \Magento\Framework\App\Helper\Context $context
     */
	public function __construct
	(
   \Magento\Framework\App\Helper\Context $context,   StoreManagerInterface $storeManager
	)
	{
	    $this->storeManager = $storeManager;
		parent::__construct($context);
	}

	public function getStoreManagerData()
    {
          //return $storeUrl = $this->storeManager->getStore()->getBaseUrl();
         // get Store Url without index.php
        return $storeUrl = $this->storeManager->getStore()->getBaseUrl(\Magento\Framework\UrlInterface::URL_TYPE_WEB);
           // get Link Url of store
          // $storeLinkUrl = $this->storeManager->getStore()->getBaseUrl(\Magento\Framework\UrlInterface::URL_TYPE_DIRECT_LINK);
         // get media Base Url
        //  $storeMediaUrl = $this->storeManager->getStore()->getBaseUrl(\Magento\Framework\UrlInterface::URL_TYPE_MEDIA);
      // get Static content Url
      // $storeStaticUrl = $this->storeManager->getStore()->getBaseUrl(\Magento\Framework\UrlInterface::URL_TYPE_STATIC);
    }
}
Step [6] – Create Block under your module.
Add below content in this file.
app/code/Mage2db/John/Block/Index/Index.php
<?php
namespace  Mage2db\John\Helper;
use Magento\Store\Model\StoreManagerInterface;

class Data extends \Magento\Framework\App\Helper\AbstractHelper
{
	protected $storeManager;

	/**
     * @param \Magento\Framework\App\Helper\Context $context
     */
	public function __construct
	(
	 \Magento\Framework\App\Helper\Context $context, StoreManagerInterface $storeManager
	)
	{
	    $this->storeManager = $storeManager;
		parent::__construct($context);
	}

	public function getStoreManagerData()
    {
          //return $storeUrl = $this->storeManager->getStore()->getBaseUrl();
         // get Store Url without index.php
        return $storeUrl = $this->storeManager->getStore()->getBaseUrl(\Magento\Framework\UrlInterface::URL_TYPE_WEB);
           // get Link Url of store
          // $storeLinkUrl = $this->storeManager->getStore()->getBaseUrl(\Magento\Framework\UrlInterface::URL_TYPE_DIRECT_LINK);
         // get media Base Url
        //  $storeMediaUrl = $this->storeManager->getStore()->getBaseUrl(\Magento\Framework\UrlInterface::URL_TYPE_MEDIA);
      // get Static content Url
      // $storeStaticUrl = $this->storeManager->getStore()->getBaseUrl(\Magento\Framework\UrlInterface::URL_TYPE_STATIC);
    }

}
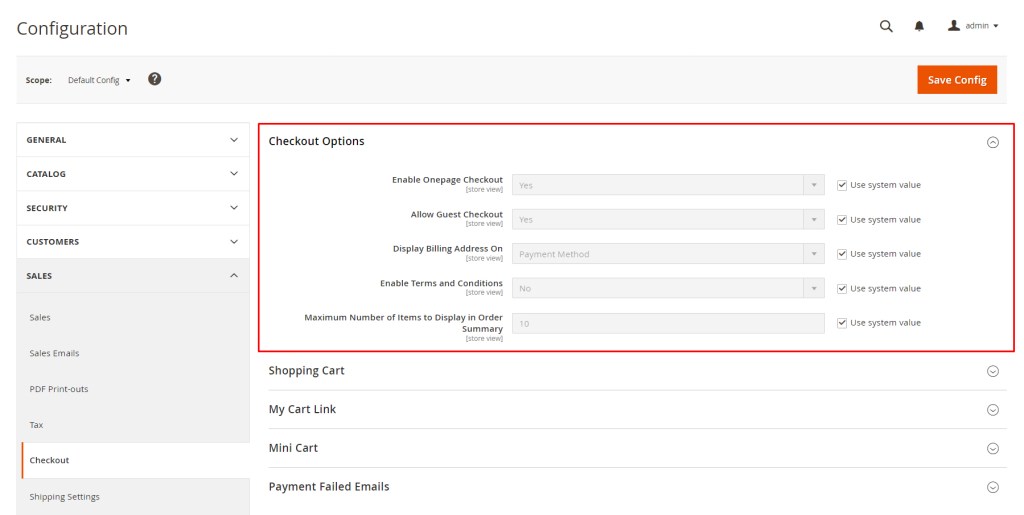
Magento 2 One-Page Checkout, all required checkout information will be put on a single page. When On-Page Checkout is enabled, the entire checkout process takes place on a single page. Each section of the checkout information is expanded as needed Accordingly, Shoppers won’t be directed to another page to complete their checkout process, It is much more time-saving than the normal checkout process.
On-Page Checkout is enabled by default, if the Store Owner wants to integrate another third party checkout extension, it is necessary to disable One-Page Checkout.
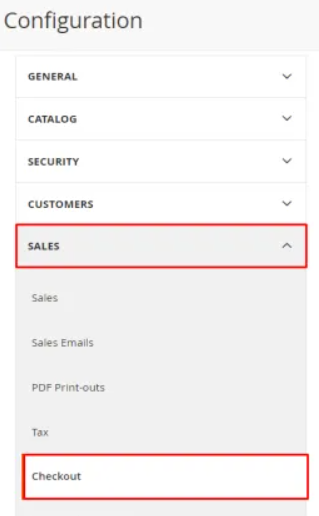
There are following below Admin setting required to disable One-Page Checkout
Step [1] – Go STORES > Configuration, redirects Configuration section.
Step [2] – Click on Left Panel Sales>Checkout
Step [3] – Once Right Panel (Checkout Options) expanded
Step [4] – Set Enable On-Page Checkout to No, after unchecked Use system value