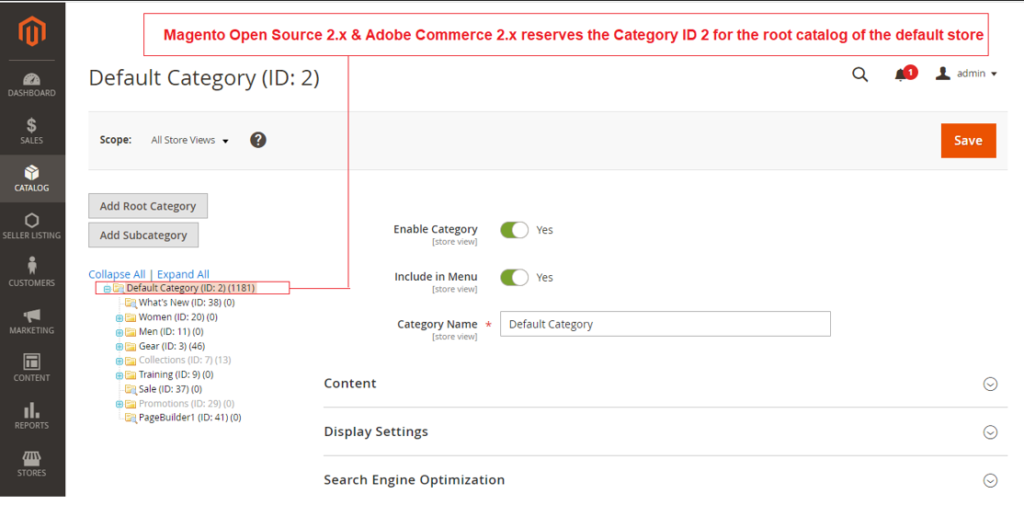
Magento Open Source 2.x & Adobe Commerce 2.x (Enterprise Edition / Commerce Cloud Edition) new Installation done, once you checked, you noticed , It reserves the Category ID 2 for the Root Catalog of the default store
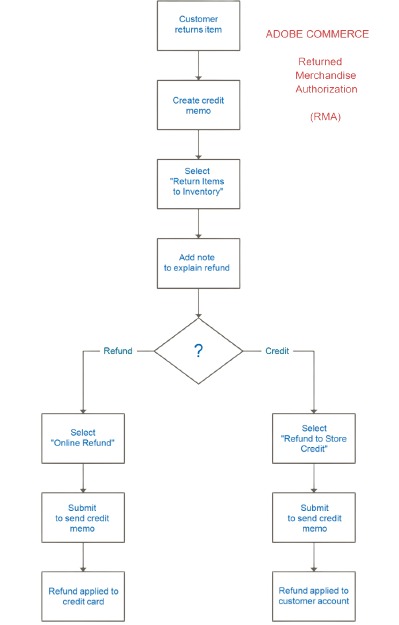
Returned Merchandise Authorization (RMA):: RMA can be granted to customers who request to return an item for replacement or refund. Typically, the customer contacts the merchant / seller to request a refund. If approved, a unique RMA number is assigned to identify the returned product.
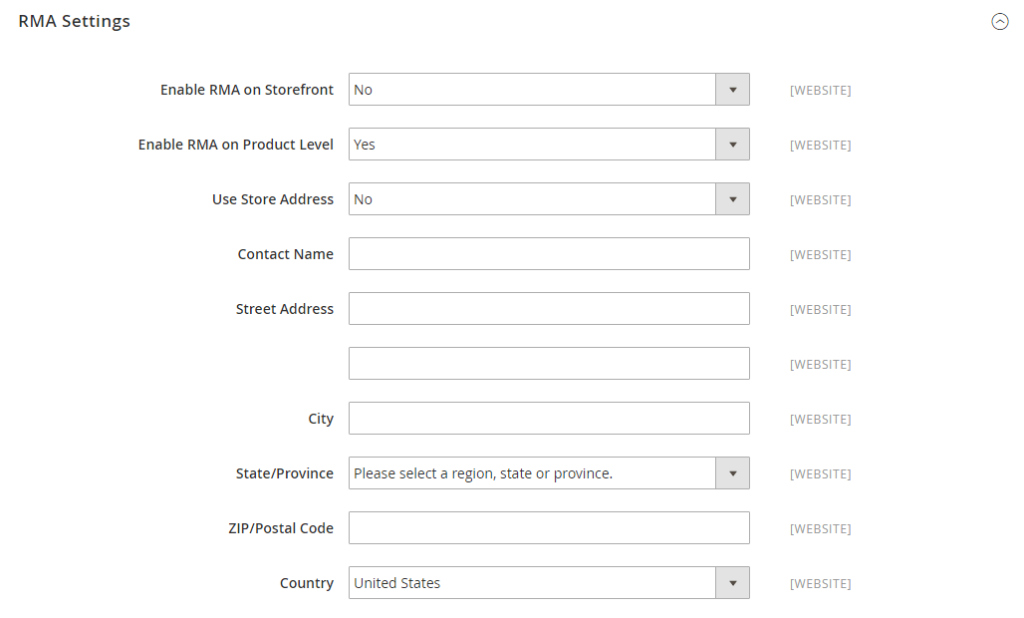
Enable RMAs for your store
Step [1] – On the Admin sidebar, go to Stores > Settings > Configuration.
Step [2] – In the left panel, expand Sales and choose Sales underneath.
Step [3] – Expand Expansion selector the RMA Settings section.
Step [4] – Set Enable RMA on Storefront to Yes.
This setting determines if customers can create and view RMA requests from the storefront. RMAs can be applied to both new and existing orders.
Step [5] –Set Enable RMA on Product Level to Yes.
This setting determines the behavior for the Enable RMA attribute for individual products on the storefront:
When Enable RMA on Product Level is set to Yes, customers on the storefront can return all individual products. It includes both Enable RMA = Yes and Enable RMA = No product attribute values. When Enable RMA on Product Level is set to No, customers on the storefront can return only the products with an Enable RMA = Yes product attribute value.
Step [6] – Set Use Store Address to one of the following values:
Yes – Send returned products to the store address. No – Enter an alternate address for product returns.
Step [7] – Finally Click on Save Config Button
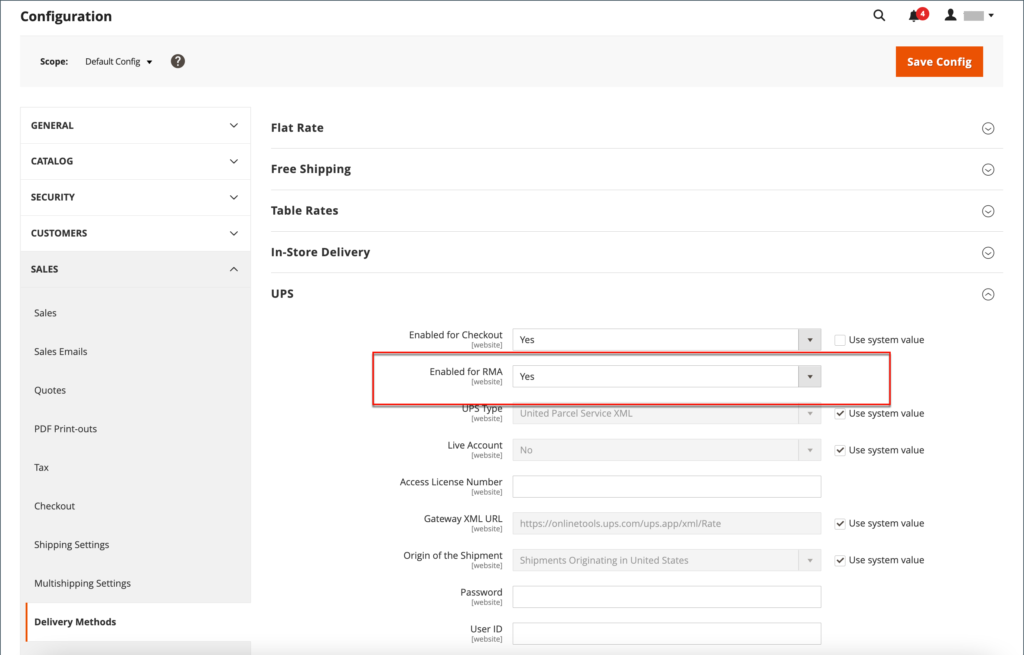
Configure shipping methods for returns
Step [1] – On the Admin sidebar, go to Stores > Settings > Configuration.
Step [2] – In the left panel, expand Sales and choose Delivery Methods.
Step [3] – Expand the section for the carrier that you want to use for return service, such as UPS.
Step [4] – Set Enabled for RMA to Yes.
Step [5] – Finally Click on Save Config Button
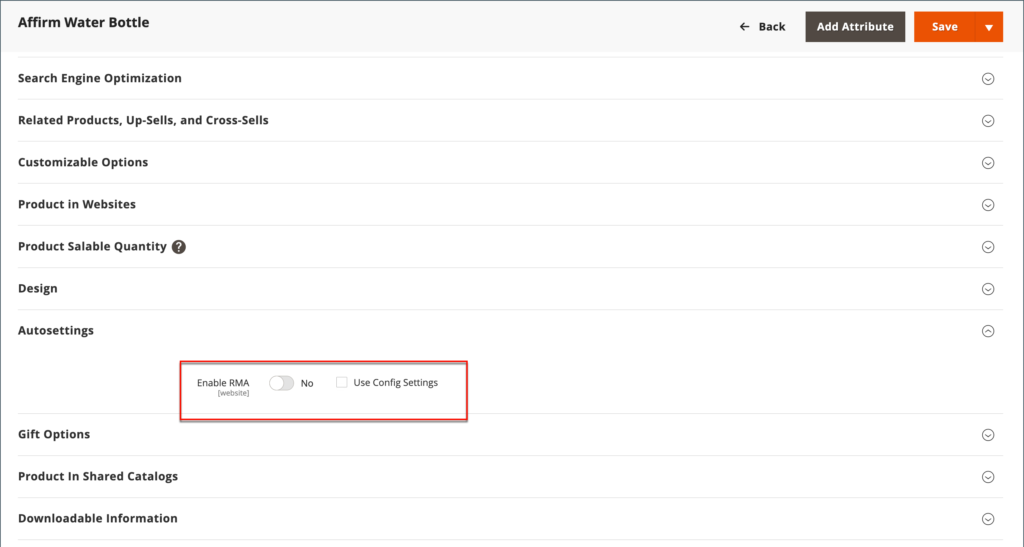
Change allowed RMAs at a product level
If you enable RMAs for your store and your catalog contains some products that should not be allowed for return, you can modify the setting at the product level,
Step [1] – Open the product in edit mode.
Step [2] – Scroll down and expand Expansion selector the Autosettings section.
Step [3] – Clear the Use Config Setting checkbox, if needed.
Step [4] – Toggle the Enable RMA setting to No.
Ste [5] – Finally click on Save Config Button
Finally click on Save Config Button
Customer Returns storefront experience
Customers can use either of the following to request an RMA from the storefront:
Orders and Returns Widget in the sidebar
Orders and Returns link in footer
As a best practice, make sure to include a description of your RMA requirements and process in the Customer Service policy.
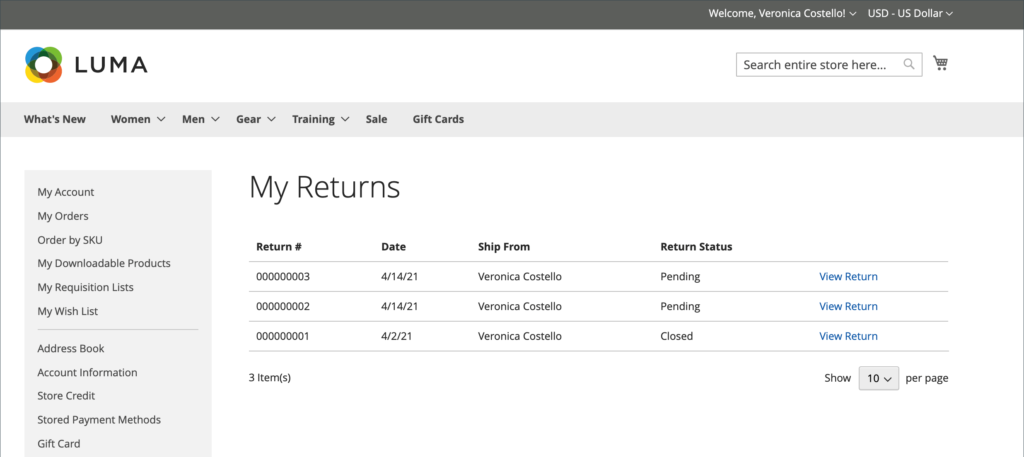
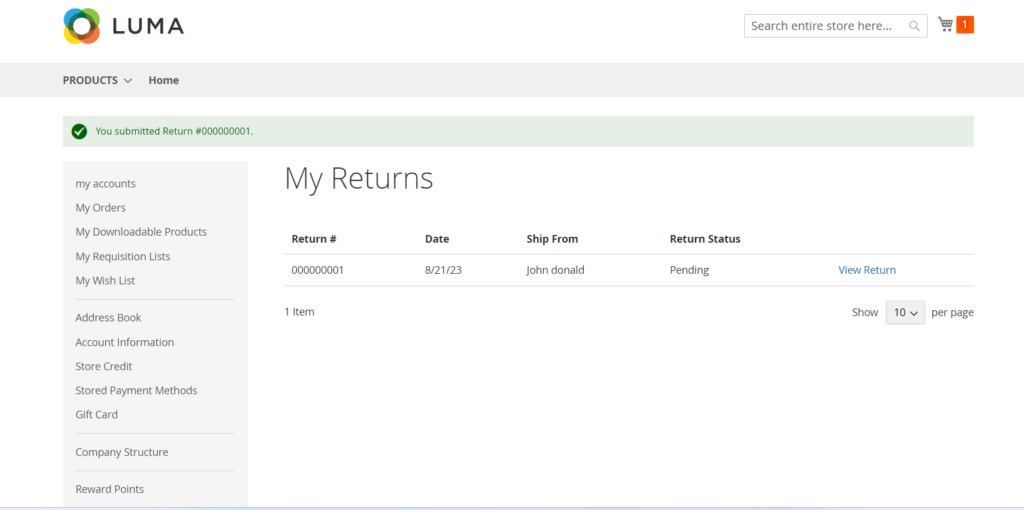
All customer RMA information is displayed on the My Returns page in the customer account dashboard.
Customer Request an RMA
The customer completes the following steps on the storefront to submit an RMA:
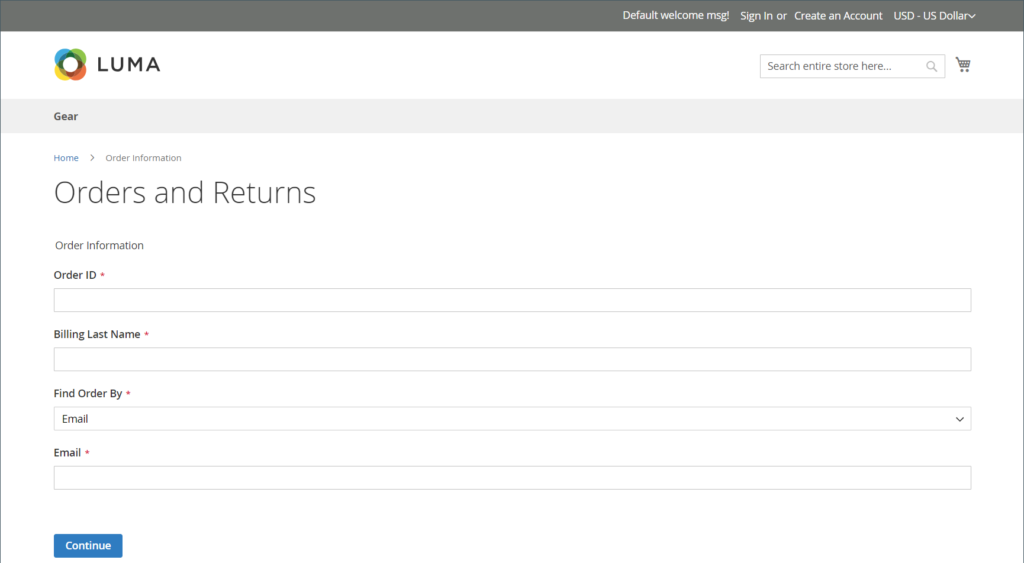
Step [1] – In the footer, clicks Orders and Returns.
Step [2] – Enters the order information:
Order ID Billing Last Name Email
Step [3] – Clicks Continue.
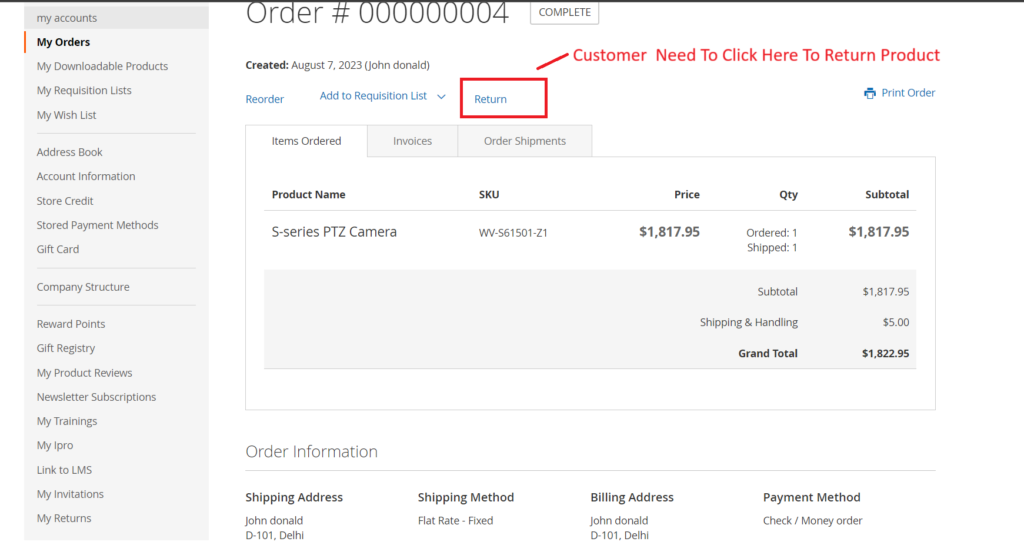
Step [4] – Below the order date, clicks Return.
Once Customer logged in, GoTo → MyDashBoard → My Orders
Displaying all Orders Listing – all Columns Details as below
Click on Return Button to return the product return request.
Once click on Return Button –> Redirects on Create New Return Request Page
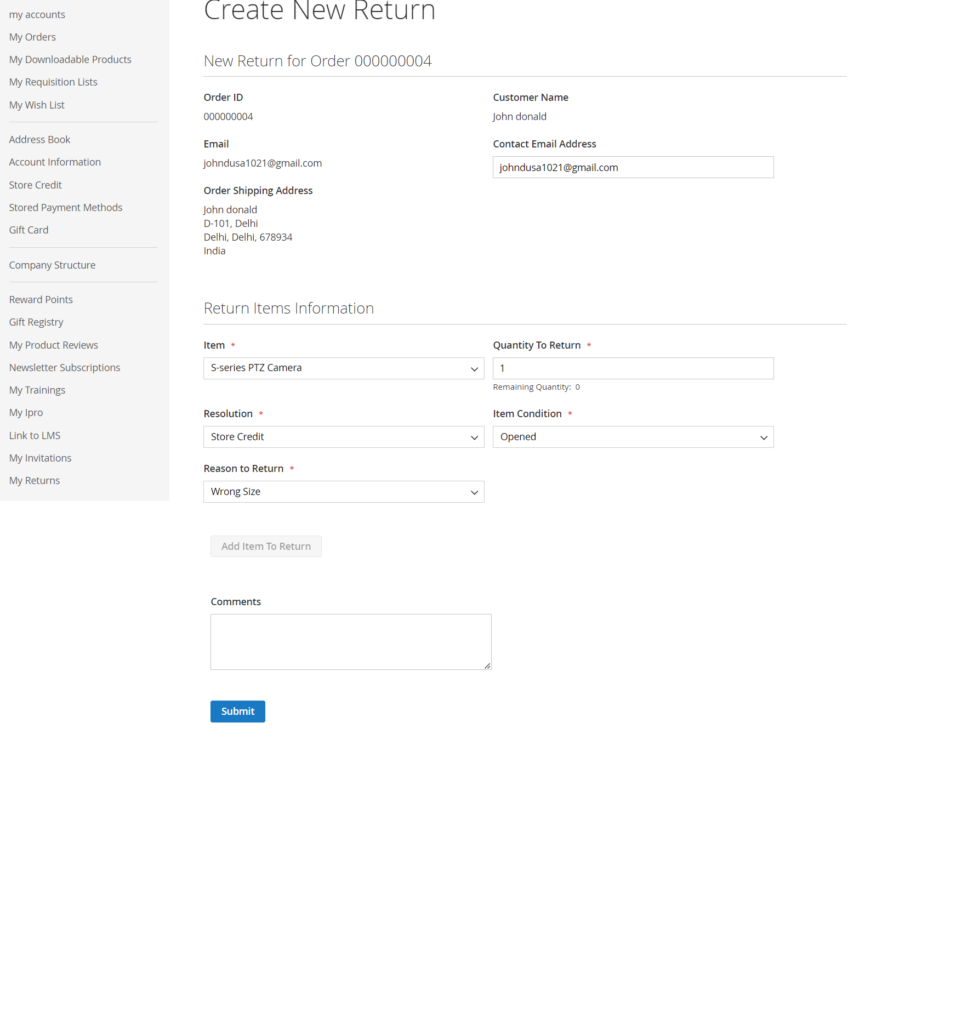
Enter all required information as per need
After filling in all the required info, once click on Submit Button
Your Product Return request has been generated
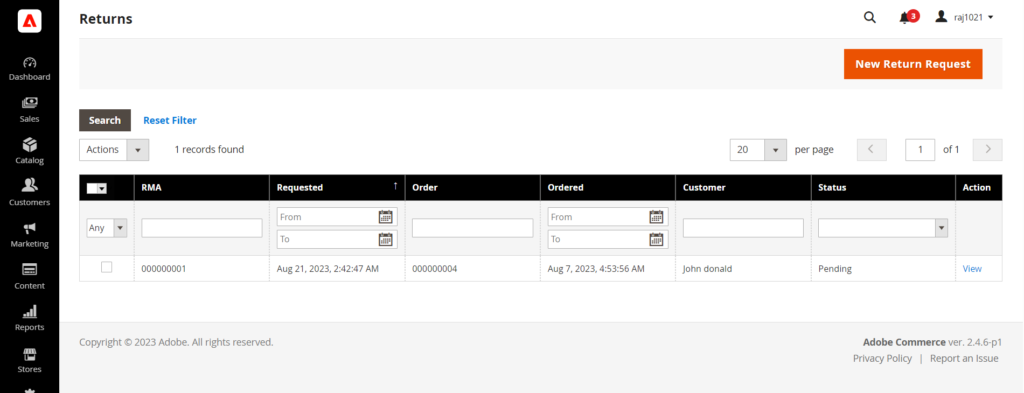
Admin need to approve this request –> Go To Admin
Sales –> Return –> Listing of Return Items
Click on View Button
Once fill in all required fields and click on Save Button → redirects to RMA Listing
Step [5] – Chooses the item to return and enters the Quantity to Return.
Step [6] – Sets Resolution to one of the following:
Exchange Refund Store Credit
Step [7] – Sets Item Condition to one of the following:
Unopened Opened Damaged
Step [8] – Sets Reason to Return to one of the following:
Wrong Color Wrong Size Out of Service Other
Step [9] – If needed, sets Contact Email Address and Comments.
If Customer ordered several items and the customer wants to return one product or set of specific product, they can click Add Item To Return, select the item, and then set all mentioned options.