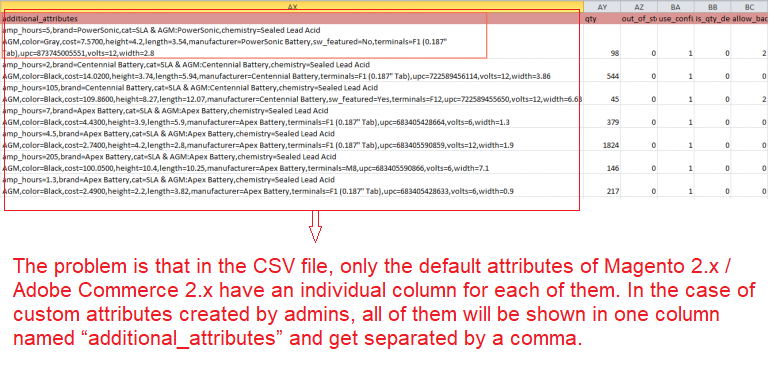
The Security. txt file format is used to provide security researchers the information they can use to report their findings. Merchants can enter their contact information regarding security issue reporting from the Magento 2.x / Adobe Commerce Admin
Security. txt is set of Security standard to define the process for security researchers to disclose security vulnerabilities securely. security. txt files have been implemented by Google, Bling, Yahoo, Facebook, GitHub, the UK government, and many other organizations.
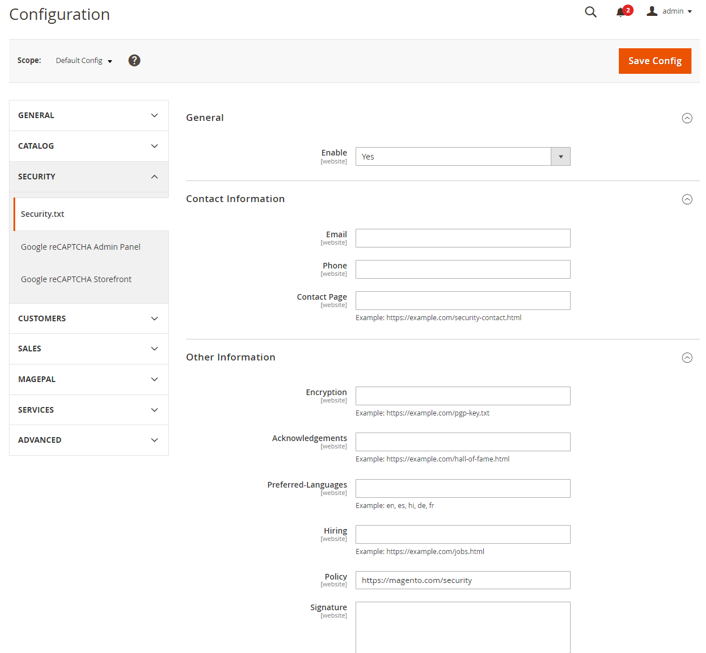
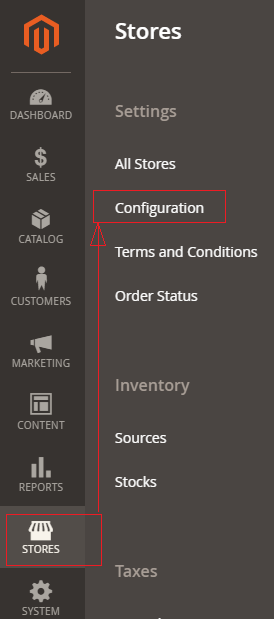
Step [1] – Go STORES > Configuration, redirects Configuration section.
Step [2] – Left Side Panel Click on SECURITY > security.txt
By Default Security.txt disabled
Step [3] – Once Click Enable (Select from drop down) below Tab display
“once enable, Creates the security.txt file based on information entered in the Contact information and Other information sections”
Contact Information:: Need to enter below information
Email
Phone
Contact Page
Other Information:: Need to enter below information
Encryption
Acknowledgements
Preferred-Languages
Hiring
Policy
Signature
If you want to create the signature file, then you have to use the command line:
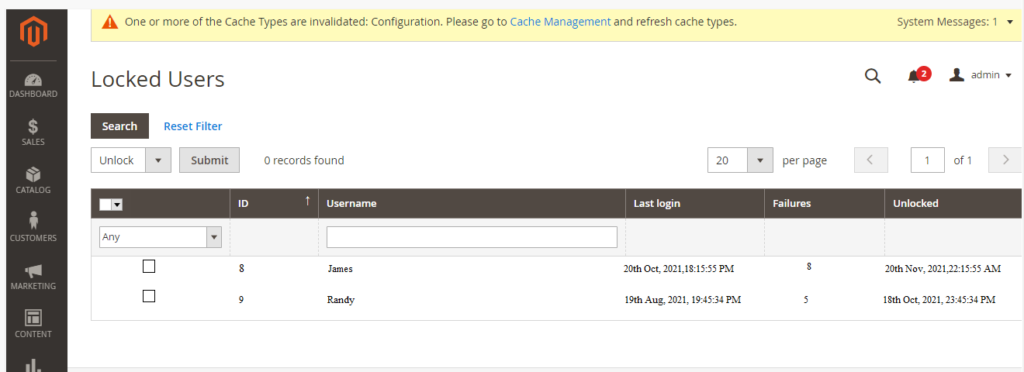
Once authorize admin users are trying to login, due to some login credentials / Re Captcha issue , unable to admin login, after that multiple time unsuccessful login, authorize admin user has been locked.
The following below steps need to follow.
Step [1] – Go To Admin, System > Permissions > Locked Users
Step [2] –Redirects on below Locked Admin User Listing Page
Step [3] – Select check box those admin users, you want to unlock & In the upper-left corner, set Unlock from the Actions dropdown box
Step [4] – Finally Click Submit to unlock the account.
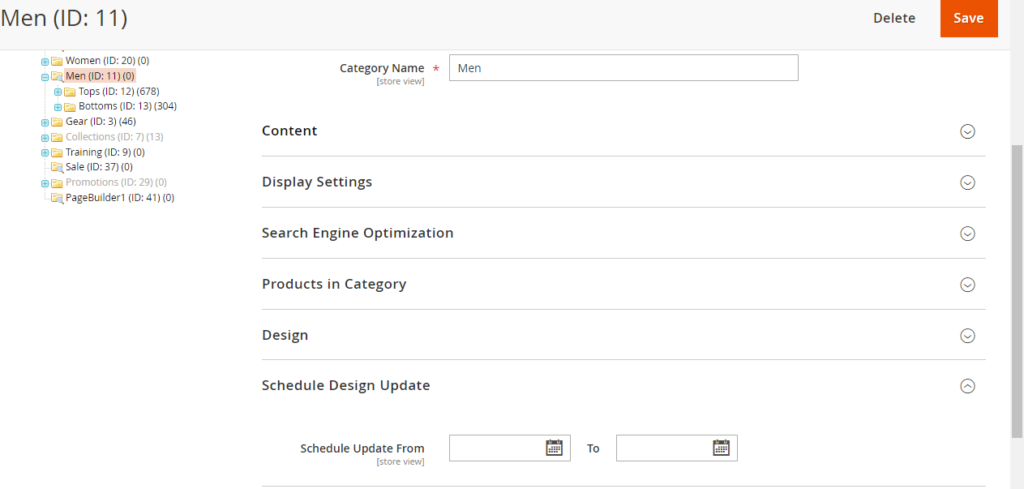
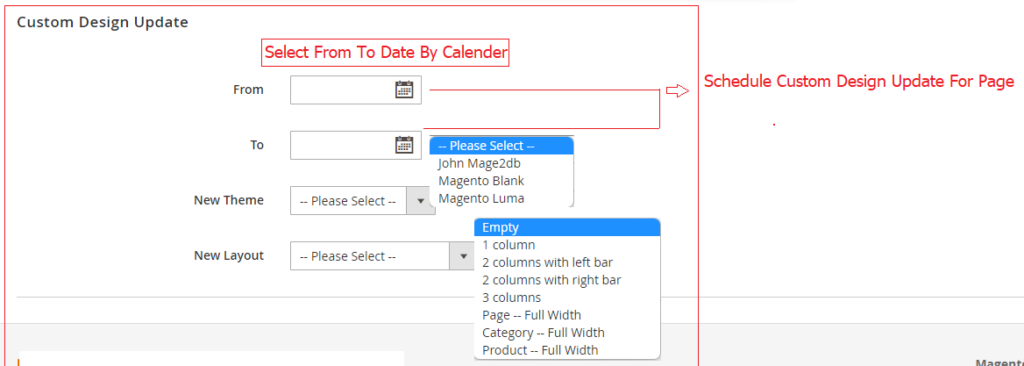
Schedule Design Update specific duration period between Start Date & End Date, specify design /page /product / category / sore view theme must be display.
Schedule Design Update For Specific Page:: It is called on Page as Custom Design Update
Date From & To:: Select From & To Date
New Theme:: Select specific store view as per your Business Need
New Layout:: Select theme as per your Business Need
Schedule Design Update For Specific Product:: The following below things need to be set
Date From & To:: Select From & To Date
New Theme:: Select specific store view as per your Business Need
New Layout:: Select theme as per your Business Need
Schedule Design Update For Specific Page or Product follow same process
Schedule Design Update For Specific Category:: The following below thing need to be set
Date From & To:: Select From & To Date
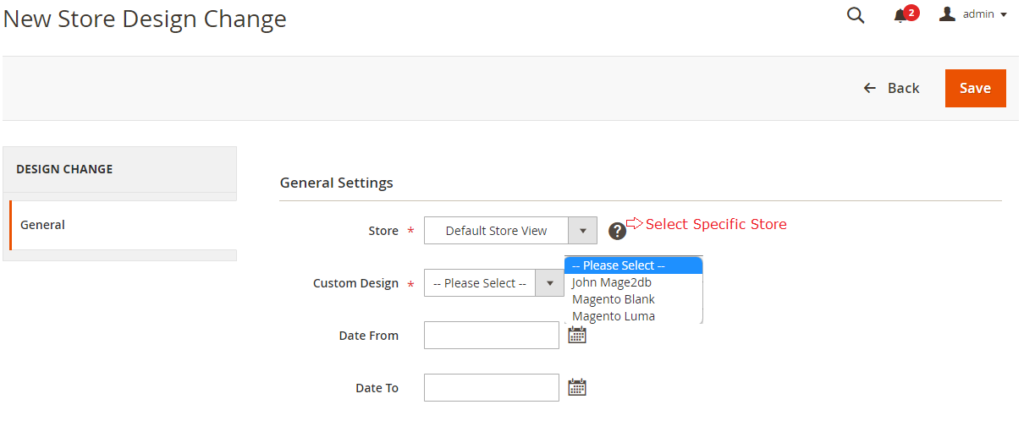
Custom Design Update For Specific Theme:: The following below things need to be set
Store:: Select specific store view as per your Business Need Custom Design:: Select theme as per your Business Need Date From & To:: Select From & To Date
“Create pages with set of text, images, blocks, variables, and widgets, these pages can be incorporated into the navigation (Top Navigation, Footer Navigation etc.) of your store as well as linked with other pages / catalog pages”
“Pages can be created by using Page Builder”
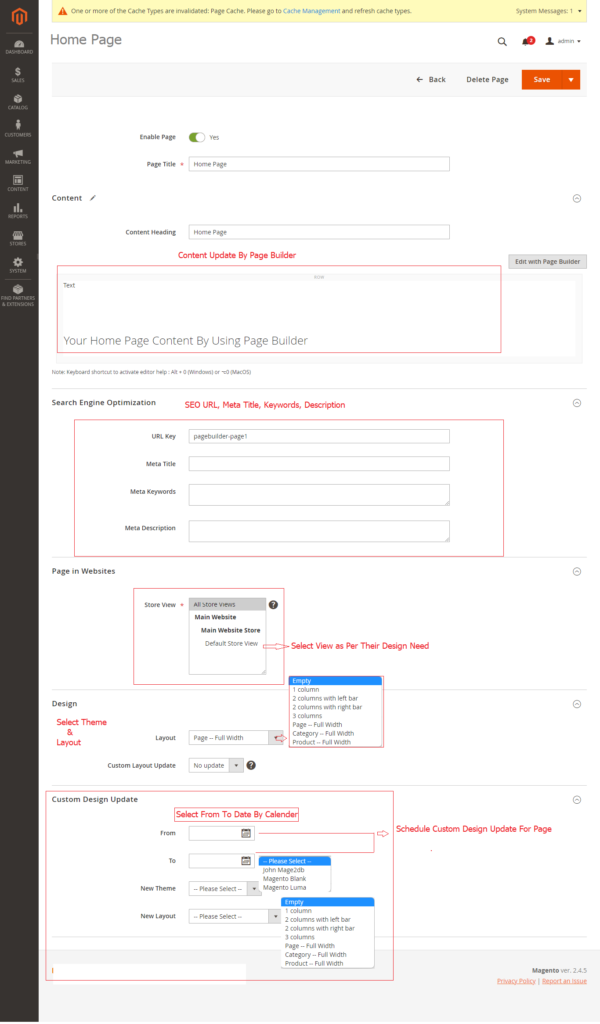
Enable Page::
Page Title:: Required Fields, need to enter Title of Page
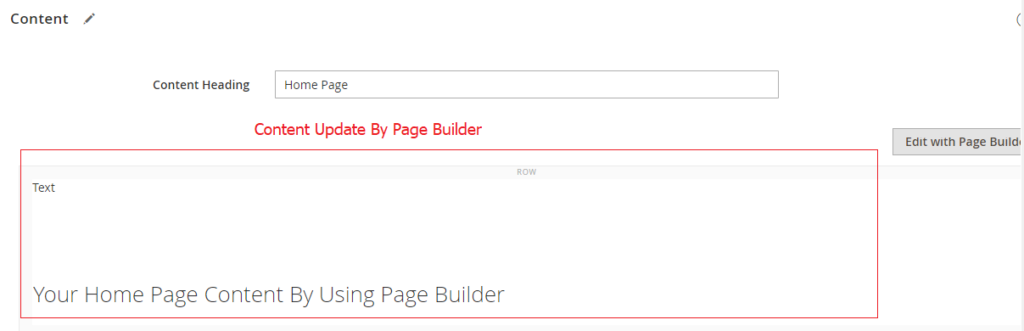
Content Heading:: Need to enter content heading of Page
Content of Page:: Need to enter content of page by using Page Builder
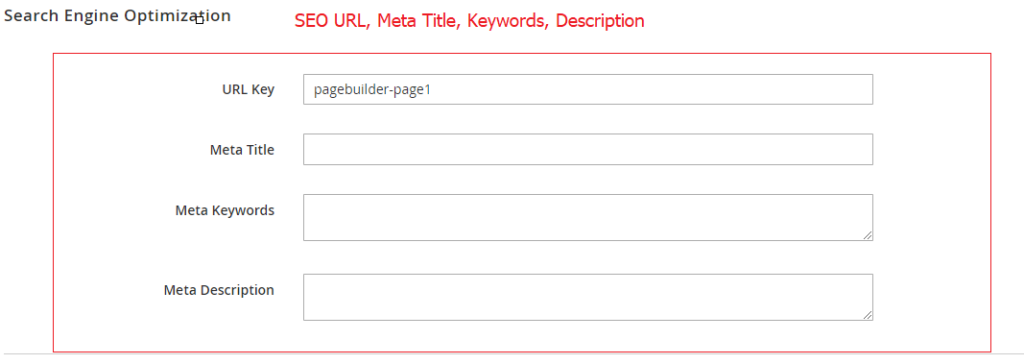
Search Engine Optimization:: need to enter SEO URL, Meta Title, Meta Description, Meta Keywords
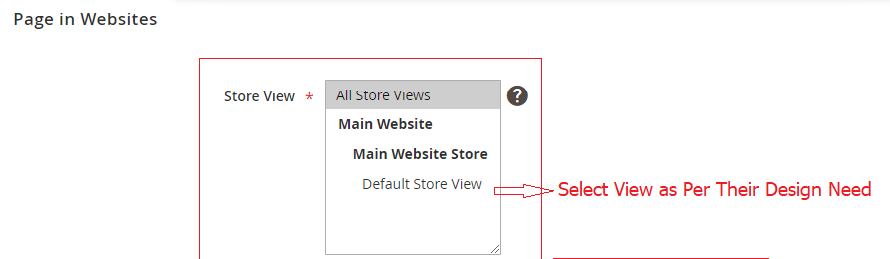
Pages is Website:: Select store view as per your Business need.
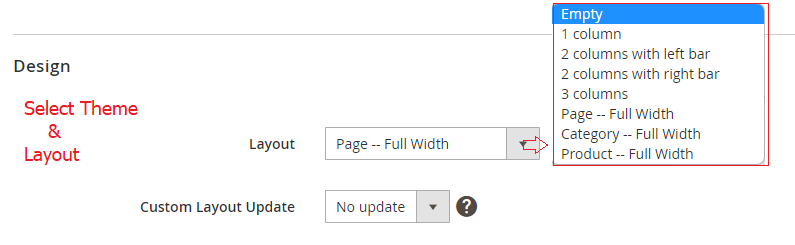
Design:: Select Layout & Custom Layout Update
Custom Design Update:: Schedule custom design update for future date, need to enter Start & End Date with selection of Theme & Layout
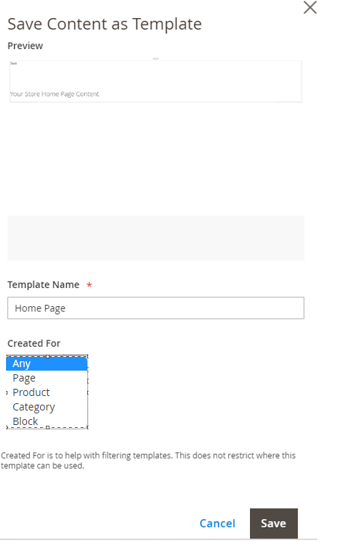
Once page created by using Page Builder, asking for which purpose want to save Page Template created for (Page, Block, Category, Product)
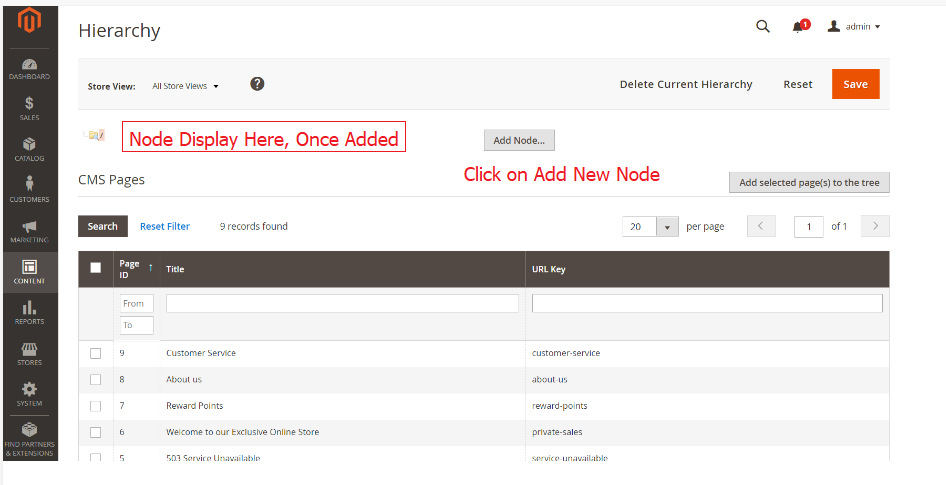
Step [2.2] – Elements > Hierarchy
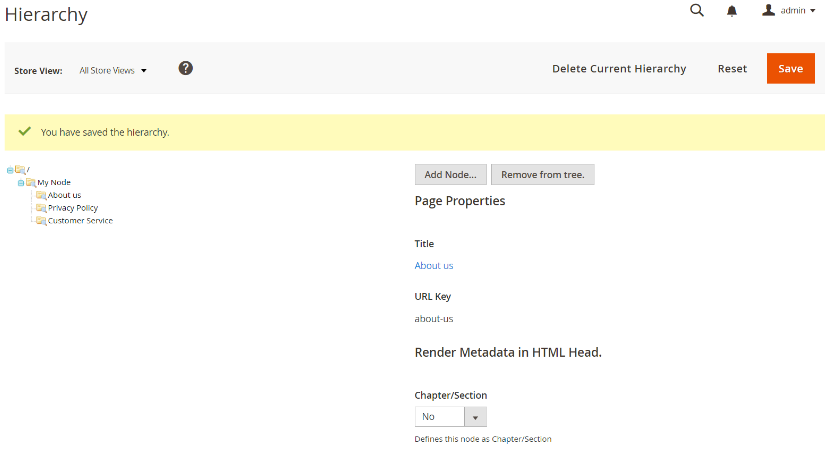
“Hierarchy is set of content pages with pagination, navigation, and menus”
[2.2.1] Display Listing of Nodes
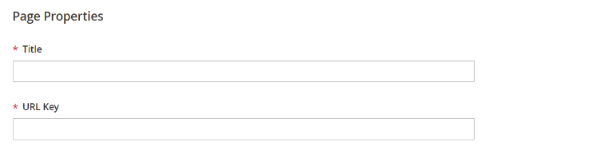
[2.2.2] – Once Click on Add New Node & enter Title & URL Key as below
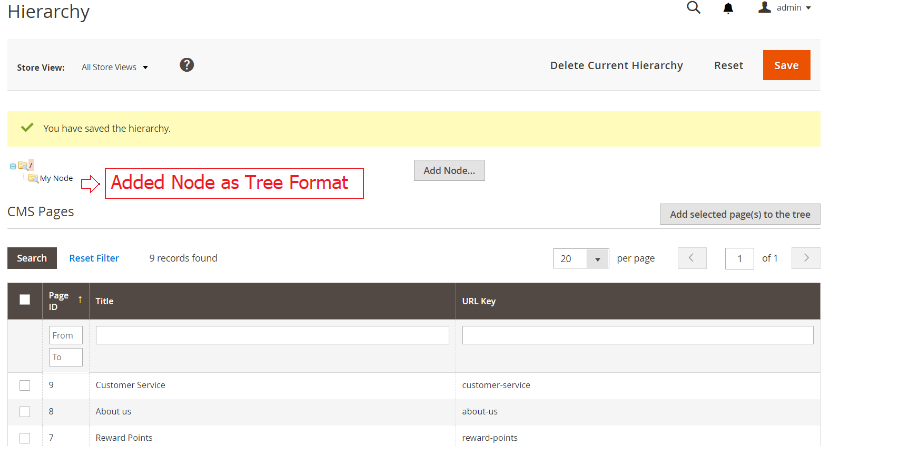
[2.2.3] – Once click on Save Button, The node appears as a folder in the tree on the left of the page
[2.2.4] – How To Add Pages To The Node
Select Pages, you want to add in specified created node.
Click on My Node as edit mode
Finally click on Button Add Selected Page(s) to the tree
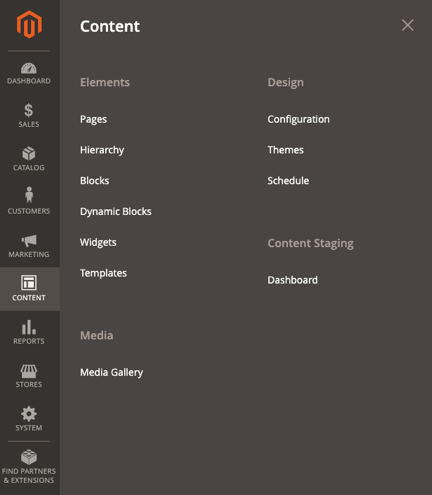
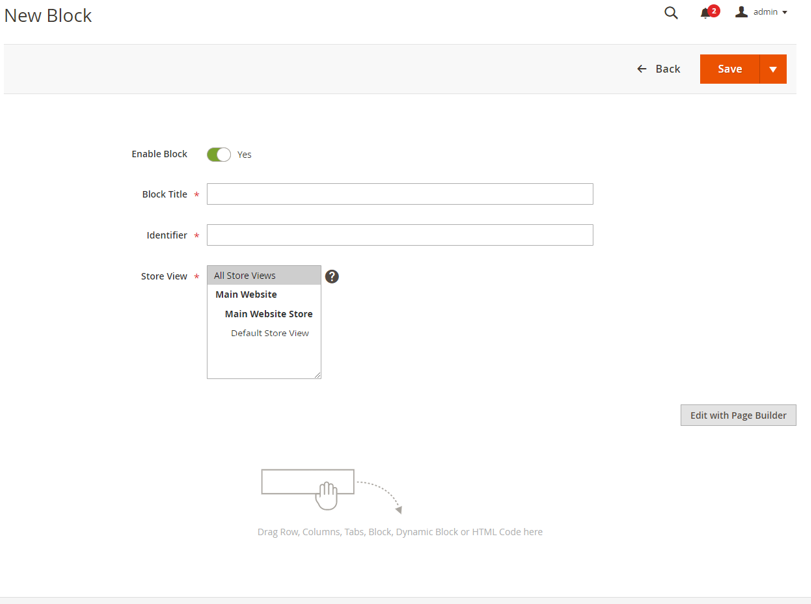
Step [2.3] – Elements > Blocks
“Create block with set of text, images, and video and can be included to any part of the page layout / catalog page layout.“
“Blocks can be created by using Page Builder“
Block Title:: Need to enter Title of Block
Block Identifier:: Need to enter Identifier of Block, It must be always unique
Store View:: Select the store view as per your Business Need
Block Content:: Need To selected content of block by Page Builder
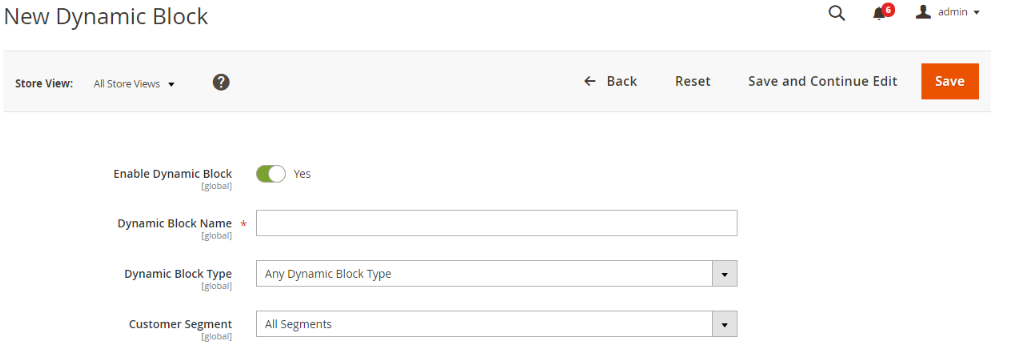
Step [2.4] – Elements > Dynamic Block–Only Support By Adobe Commerce
“Create block with set of dynamic & interaction content as by using logic with price rules (Cart Price Rules and Catalog Prices Rules) & customer segments.”
“Dynamic Blocks can be created by using Page Builder“
How To Create Dynamic Block:: The following below steps need to follow
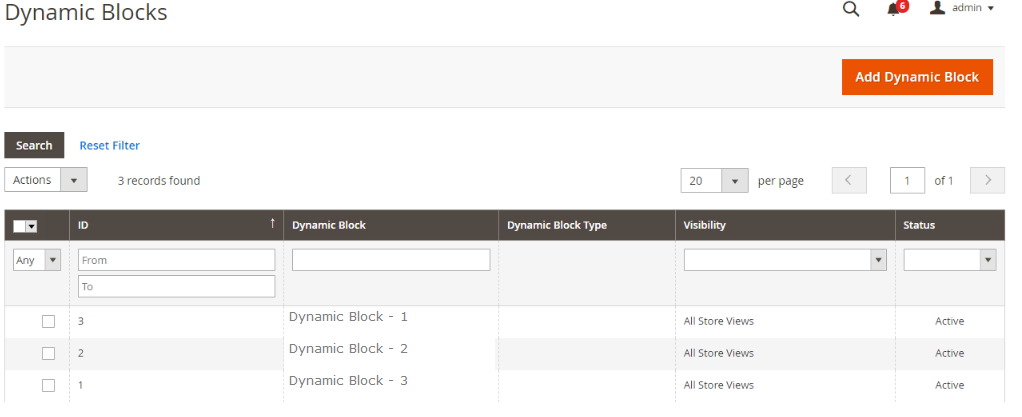
Step [2.4.1] – Go to Content > Elements > Dynamic Blocks.
Display Listing of all Dynamic Blocks
Step [2.4.2] – Click on Button Add Dynamic Block
– Set Enable as Yes to activate the dynamic block
– Enter Dynamic Block Name
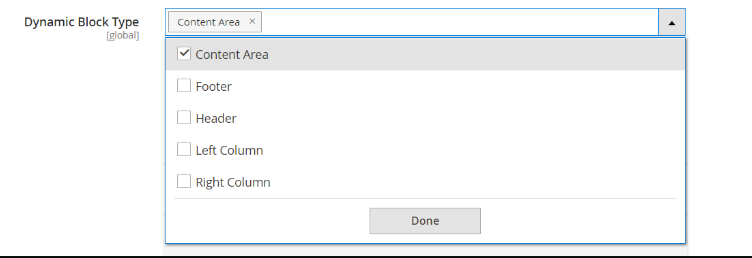
– Select Dynamic Block Type:: where you want to display dynamic block
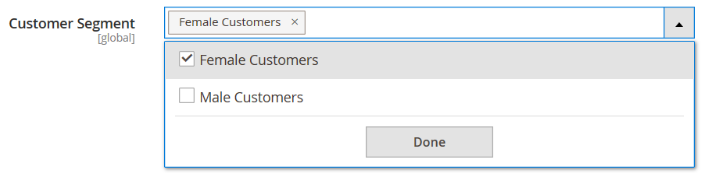
– Select Customer Segmentation:: Which customer gender you are going to target Promotion
– If applicable, set Store View to a specific store view as per your Business need where the dynamic block is to appear
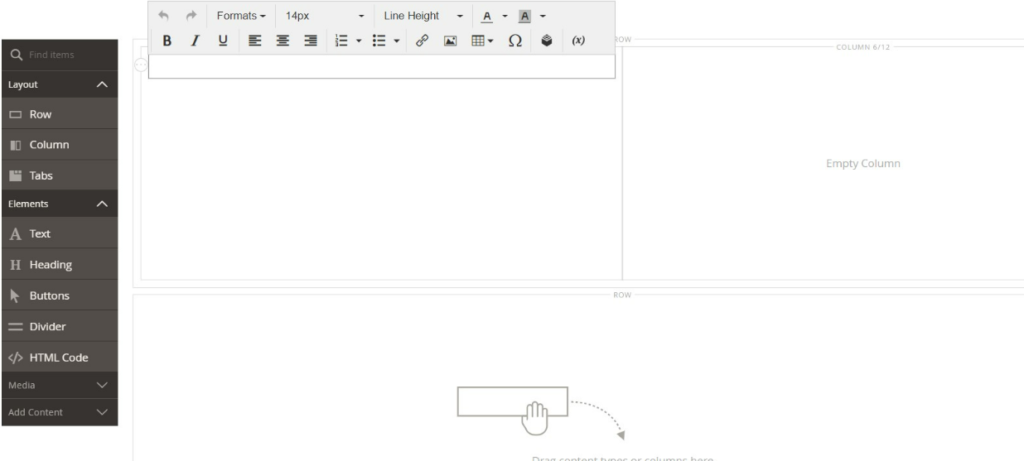
Step [2.4.3] – Enter Content by using Page Builder
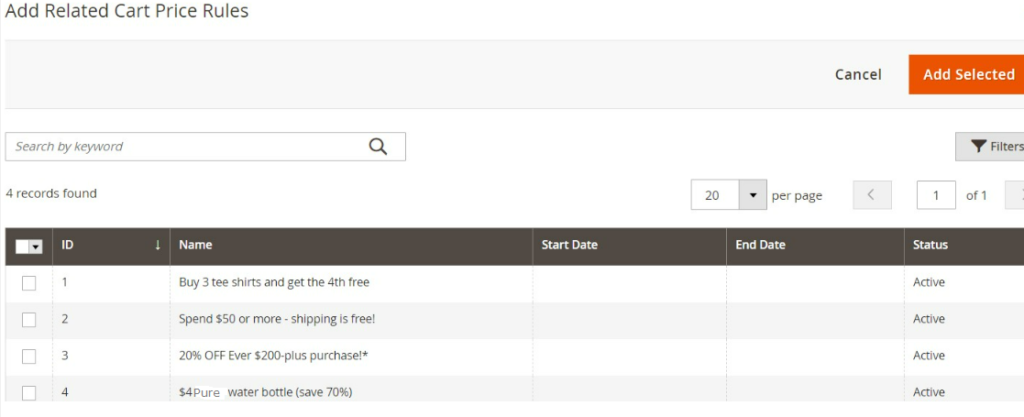
Step [2.4.4] – Integrate Cart Price Rules or Catalog Price Rules as per your business need
You should select the checkbox of each rule you want to add, no matter what rule option is selected. Don’t forget to click Add Selected and save the block when finished.
Select checkbox below Cart Price Rules, that you planning to apply,
Same process need to apply for Catalog Price Rules
Step [2.4.5] – Finally click on Save Button
Step [2.4.6] – How To apply Dynamic Blocks on Pages.
Go to Content > Elements > Pages , select dynamic block that is recently created by using Add Dynamic Block content type
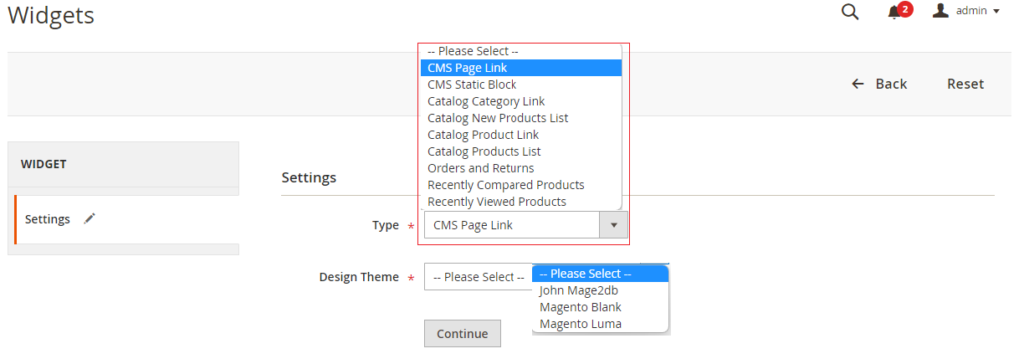
Step [2.5] – Elements > Widgets
” Widget is a snippet of code or dynamic data that allows you to display dynamic content on your store frontend.“
“Widget is set of following below Dynamic data, users can be used as per their need. “
CMS Page Link CMS Static Block Catalog Category Link Catalog New Products List Catalog Product Link Catalog Products List Orders and Returns Recently Compared Products Recently Viewed Products
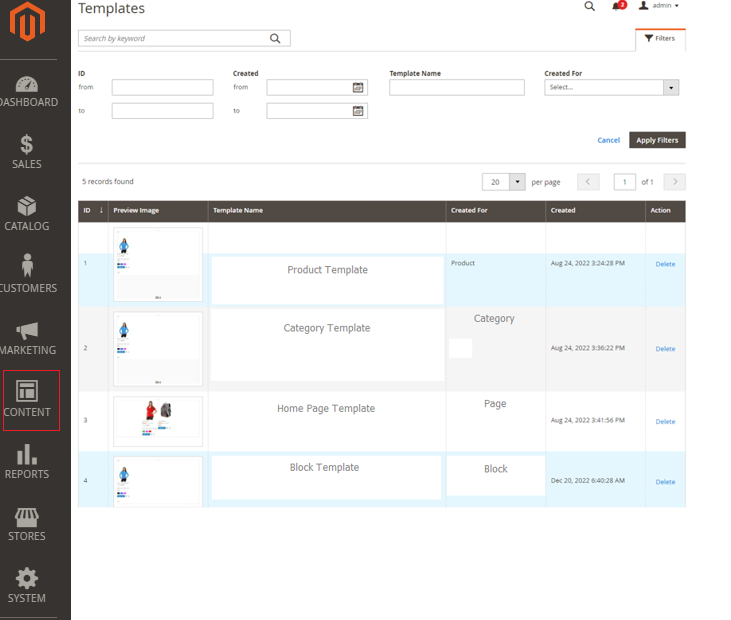
Step [2.6] – Elements > Templates:: Display listing of all templates those are created by Page Builder for Pages, Products, Categories, Blocks etc.
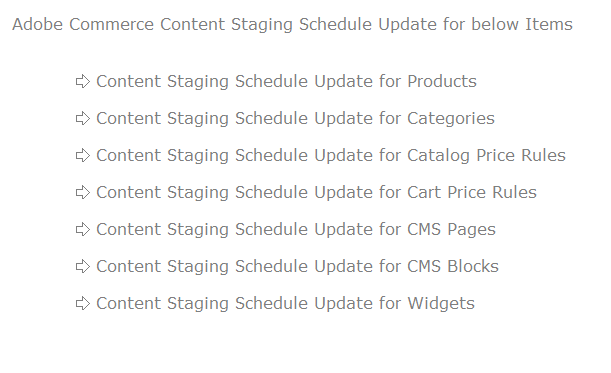
Step [3] – Content Staging — Only Support By Adobe Commerce
Content Staging provides facility for Admin User to easily Create, Preview & Schedule a wide range of content updates directly from the Admin of your store.
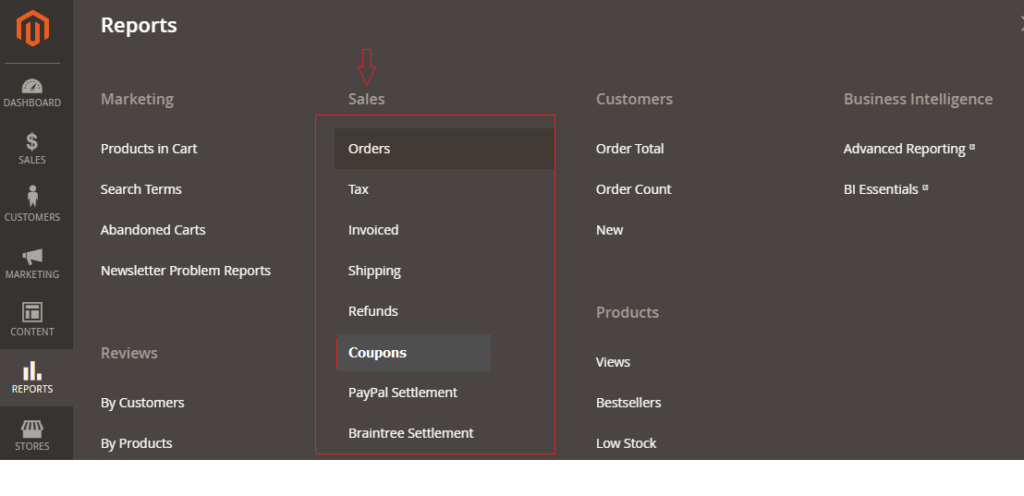
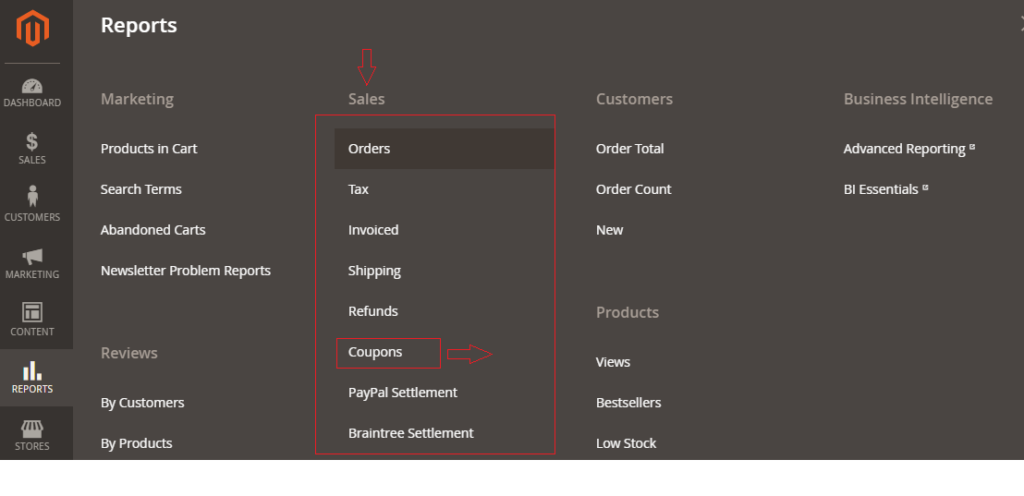
The following below steps need to follow to generate each above Sales Reports
Step [1] – In Admin Panel, Go To Reports > Sales
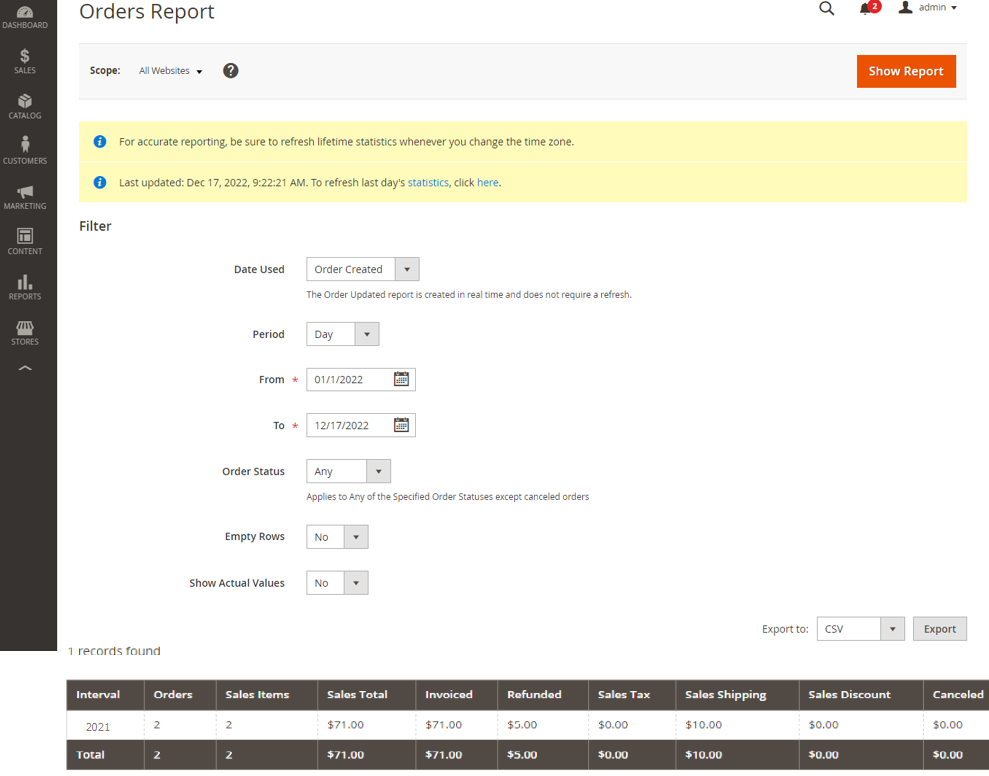
Admin can generate a report for a whole website or specific store, within a time interval or a date. To filter a sales report, set the following options:
Option
Description
Date Used
Indicates Sets the data to be used for the report.
Period
Indicates The period for which the data is used: Day/Month/Year.
From/To
Indicates Used to define search data by start and end date.
Order Status
Indicates the order status
Empty Rows
Indicates whether to add blank rows to the report.
Step [2] – To Generate Sales Orders Report
It is filtered by time interval, date, and status. The report includes the number of orders placed and canceled, with totals for sales, amounts invoiced, refunded, tax collected, shipping charged, and discounts.
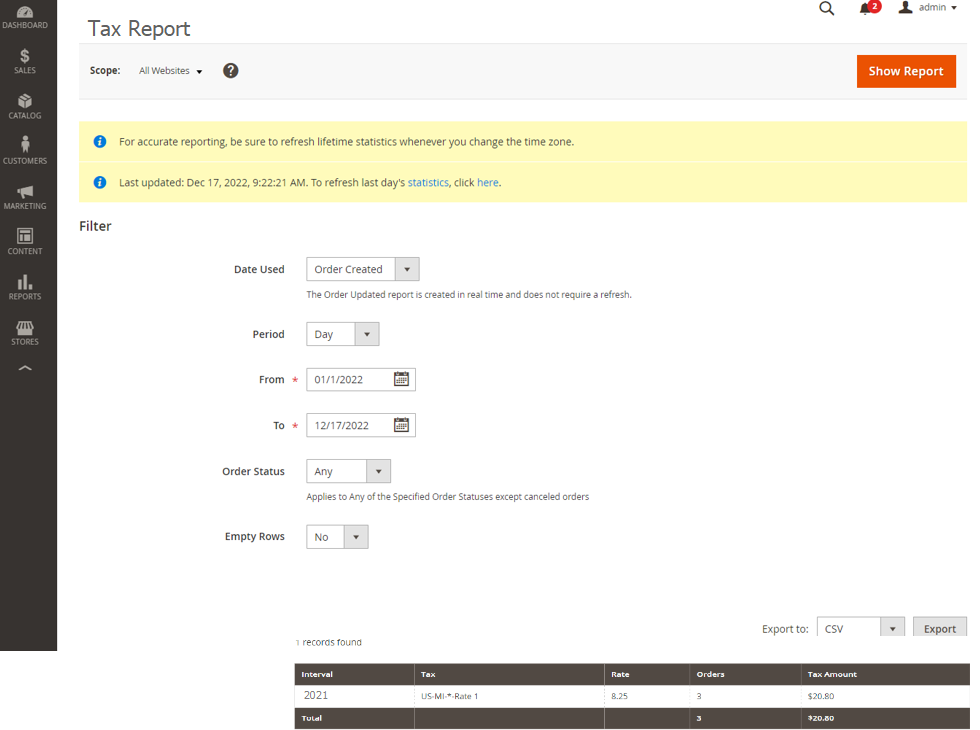
Step [3] – To Generate Sales Tax Report
It is being filtered by time interval, date, and status. The report includes the tax rule applied, tax rate, number of orders, and amount of tax charged.
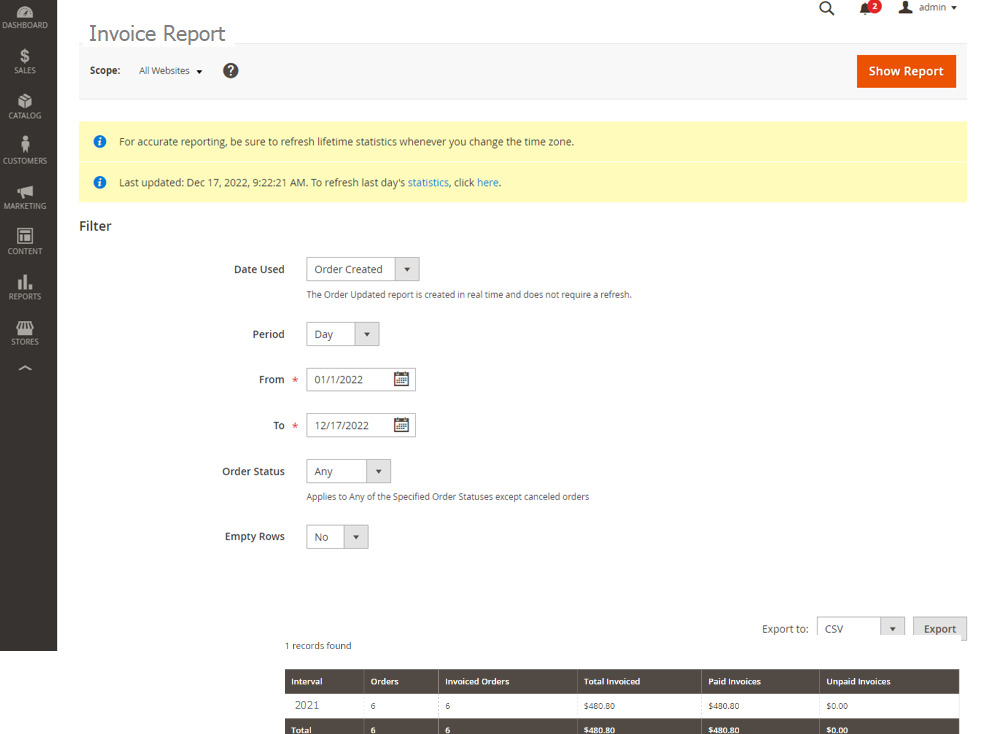
Step [4] – To Generate Invoiced Report
It is being filtered by time interval, date, and status. The report includes the number of orders and invoices during the time period, with amounts invoiced, paid, and unpaid.
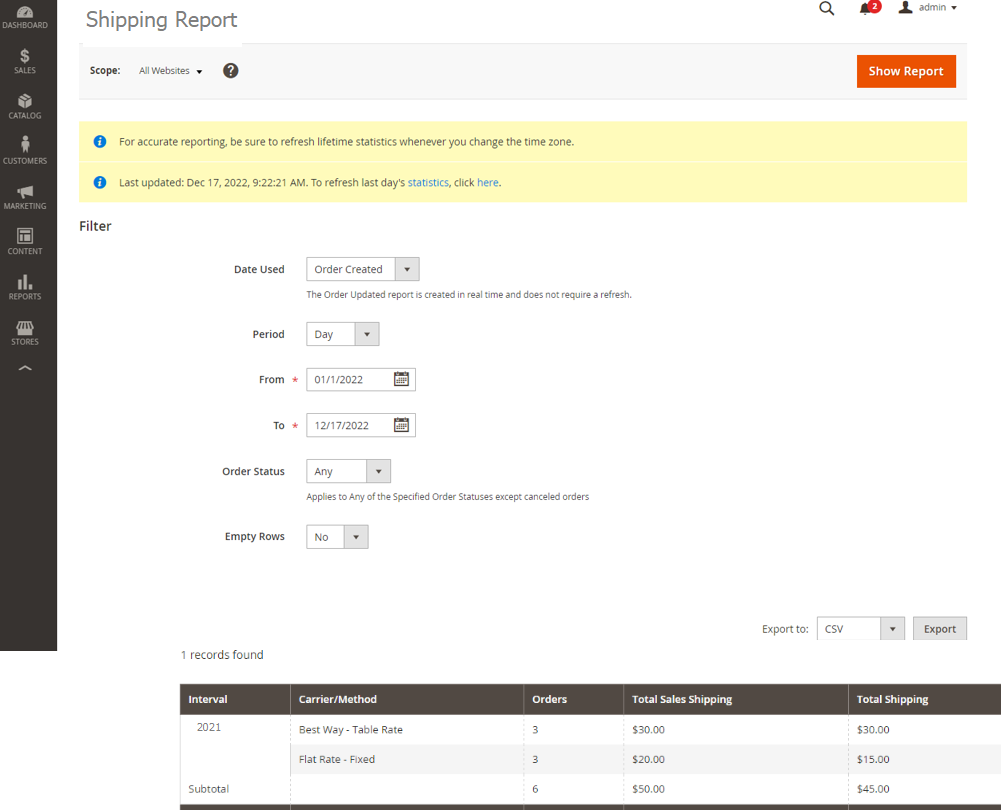
Step [5] – To Generate Sales Shipping Report
It is being filtered by time interval, date, and status. The report includes the number of orders for carrier or shipping method used, with amounts for total sales and total shipping.
Step [6] – To Generate Sales Refunds Report
It is being filtered by time interval, date, and status. The report includes the number of refunded orders, and total amount refunded online and offline.
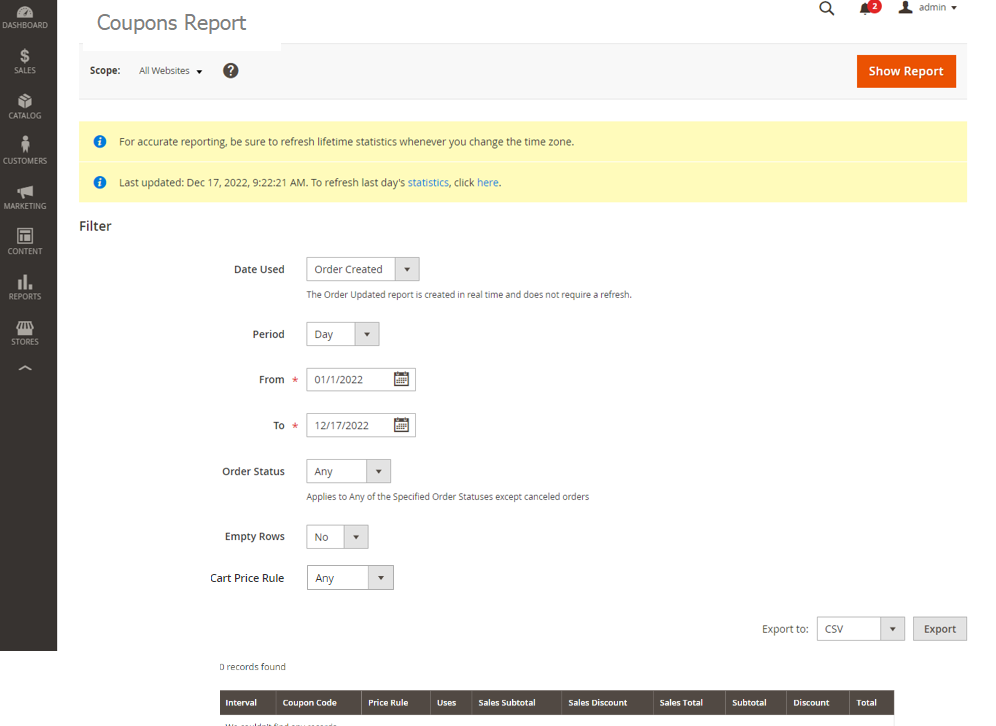
Step [7] – To Generate Sales Coupons Report
It is being filtered by time interval, date, and status. The report includes each coupon code used during the specified time interval, related price rule, and number of times used, with totals and subtotals for sales and discounts.
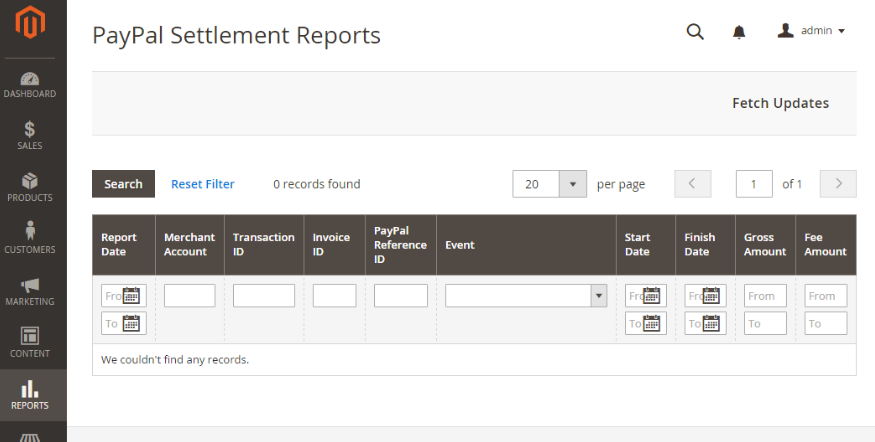
Step [7] – To Generate Sales Paypal Settlement Report
It is being filtered by date, merchant account, transaction ID, invoice ID, or PayPal reference ID. The report includes the type of event, such as a debit card transaction, the start and finish dates, gross amount, and related fees.
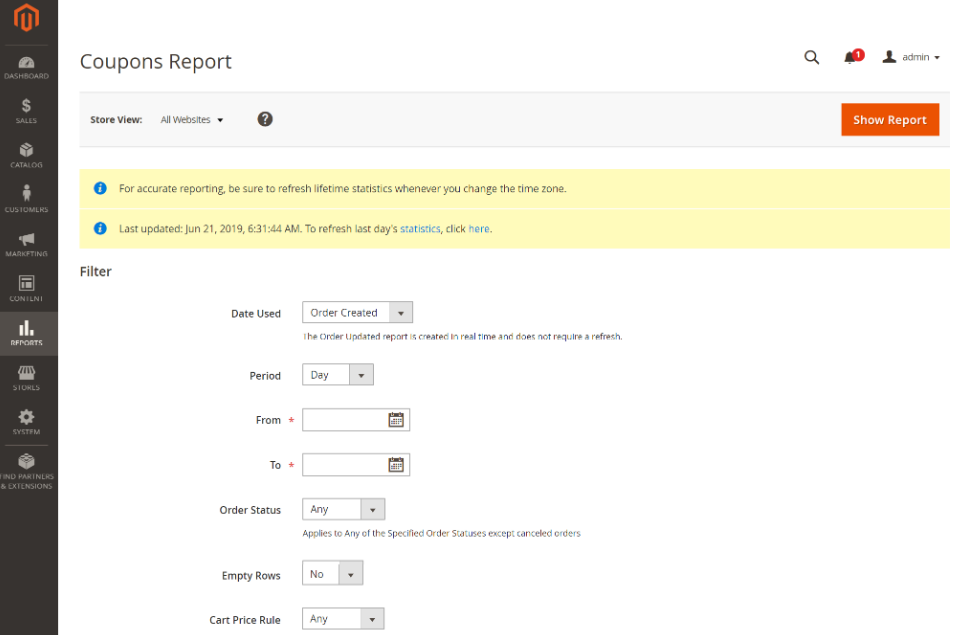
The following below steps need to find out Coupons Reports
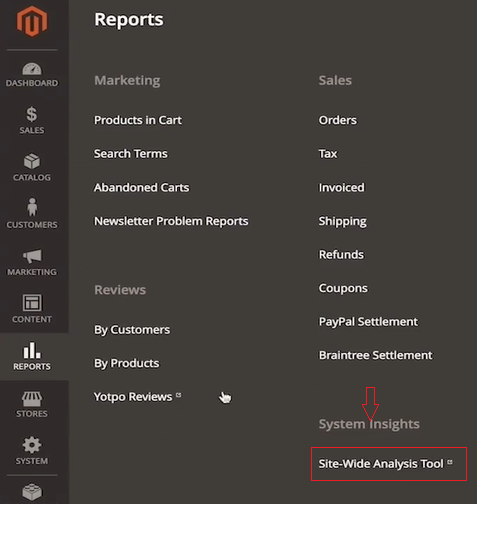
Step [1] – In Admin Panel, Go To Reports > Sales > Coupons
Step [2] – If you store have multiple store views, set Store View in the upper-left corner to establish the scope of the report.
Step [3] – To refresh the sales statistics for the day, click the Last Updated message at the top of the workspace. Then, click to select the Coupons checkbox and click Refresh.
Step [4.2] – Set Date Used to one of the following:
[a] Order Created [b] Order Updated
The Order Updated report is created in real-time and does not require a refresh.
Step [4.3] – To define the period of time covered by the report, set Period to one of the following:
Day Month Year Step [4.4] – To define the date range of the report, enter the From and To dates in M/D/YY format.
Step [4.5] – To print a report for a specific order status, set Order Status to Specified and choose the order status from the list.
Step [4.6] – To omit rows without data from the report, set Empty Rows to No.
Step [4.7] – To define coupon activity included in the report, do one of the following:
[a] To include all coupon activity from all price rules, set Cart Price Rule to Any. [b] To include only activity related to a specific price rule, set Cart Price Rule to Specified and select the cart price rule in the list. Step [5] – Finally click on Report Button
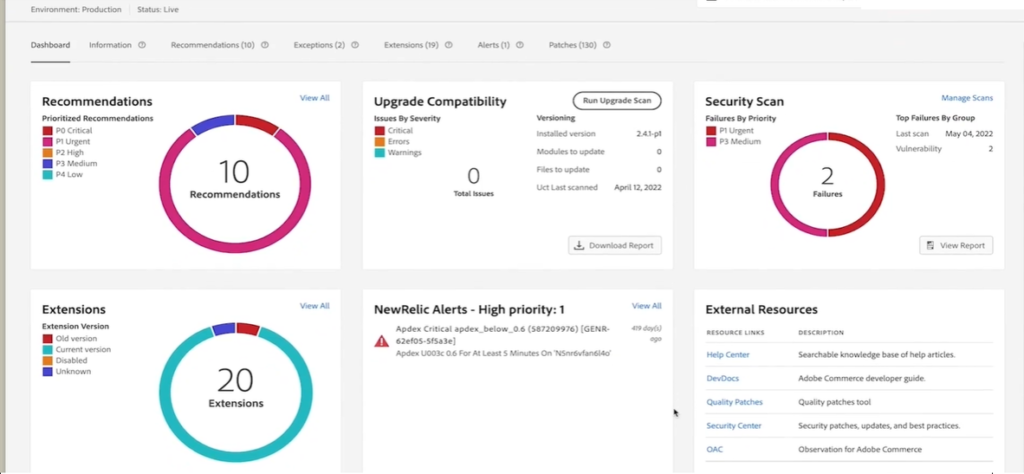
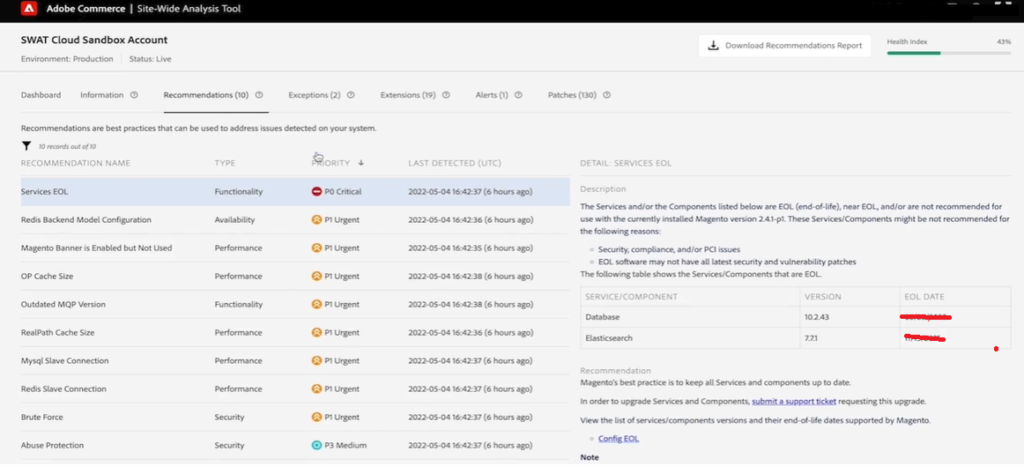
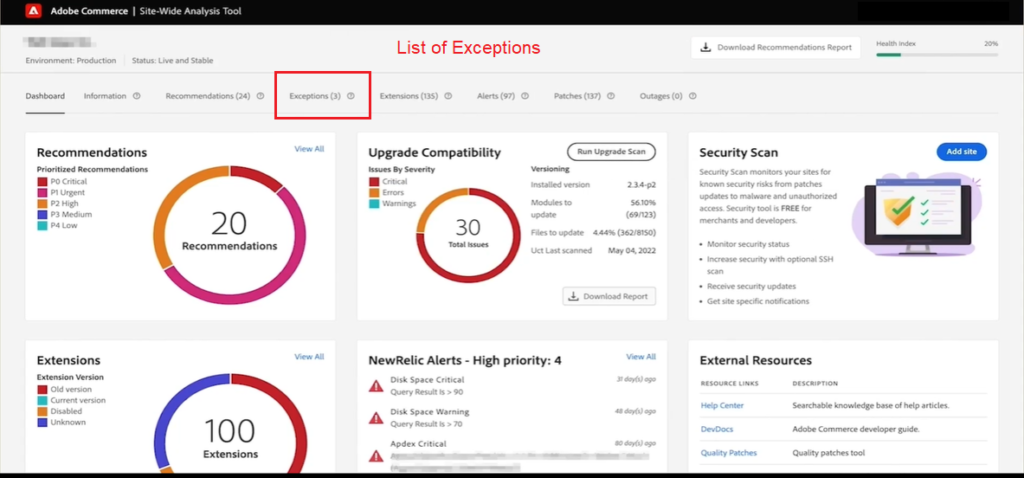
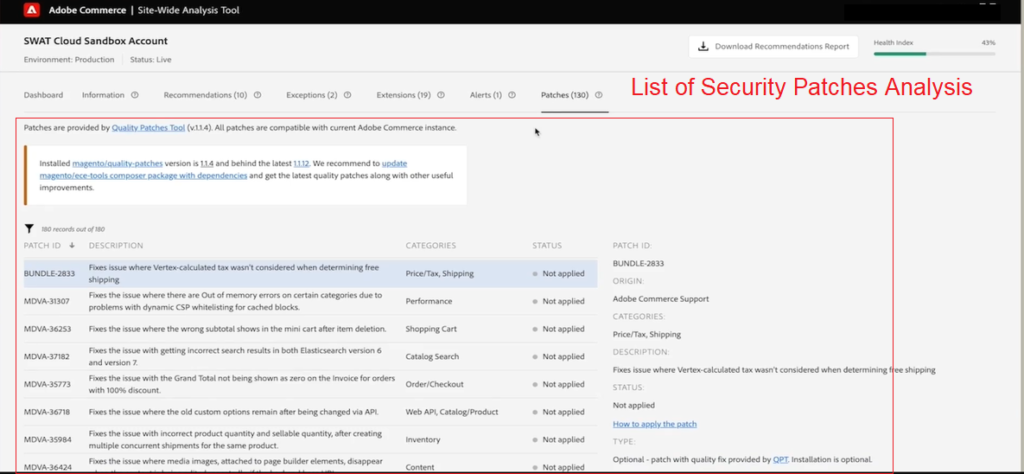
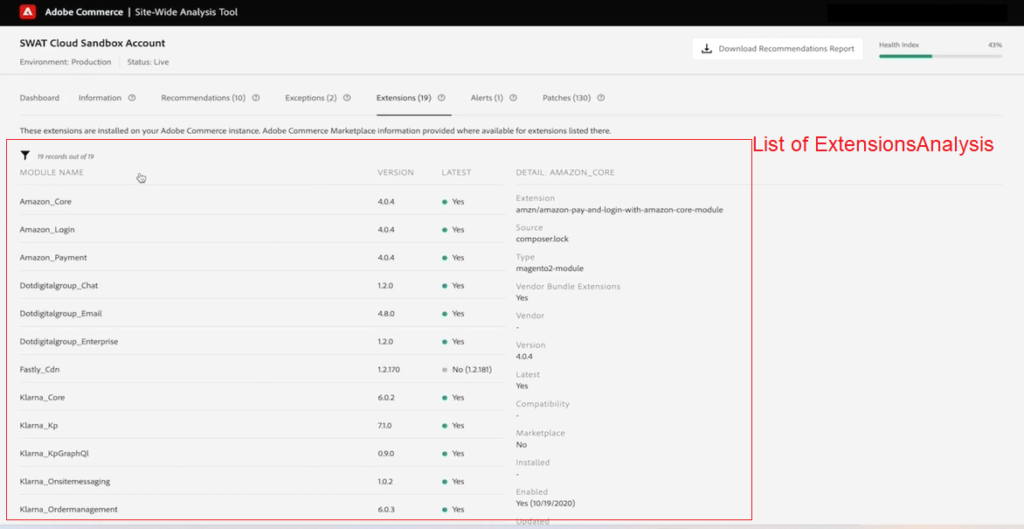
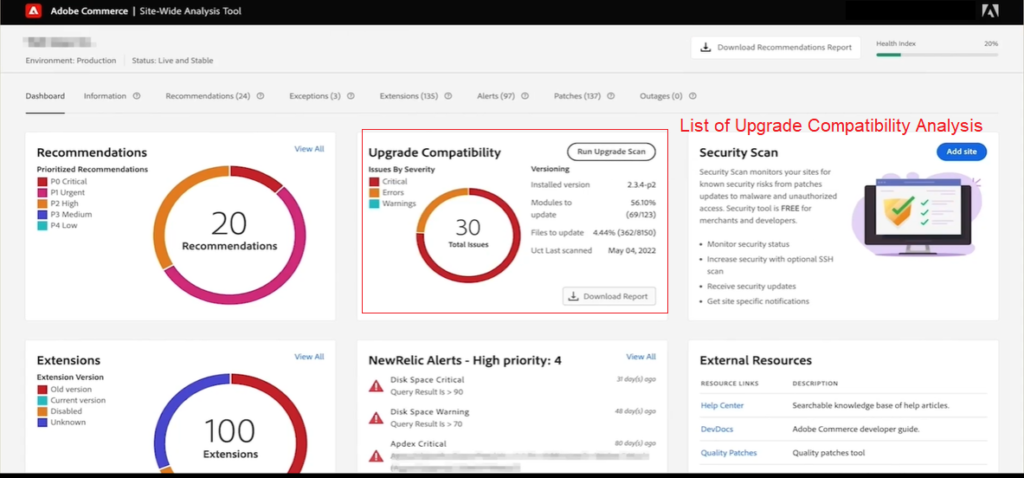
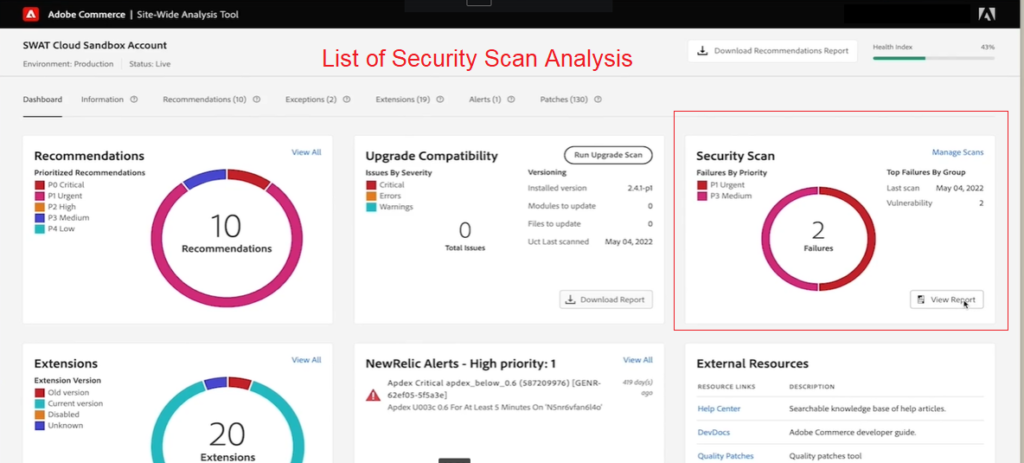
Adobe Commerce supports Site-Wide Analysis Tool (SWAT) & It is 24/7 Real-Time Performance to provides Reports & Recommendation to ensure performance, security, availability & operability of running site/store & monitoring provides multiple reports & advice to identify potential issues and better visibility into site health, safely, safety & application configurations. It helps reduce resolution time & improve site speed , stability and performance.
“Adobe Commerce supports Site-Wide Analysis Tool (SWAT) 24*7 monitoring tool to check Store / Site Health”
The Controlling the Assault of Non-Solicited Pornography and Marketing (CAN-SPAM) Act to set a national standard for the regulation of spam email or t solve the problem of unwanted commercial electronic mail messages.
The primary purpose of which is the commercial advertisement or promotion of a commercial product or service, including email that promotes content on commercial websites
8 CAN-SPAM Compliance or Principles
There are following below 8 CAN-SPAM Compliance or Principles
Step [1] – Do not Use Unclear Email Header Information The email address you send “FROM” and “REPLY TO” must all be accurate
Step [2] – Do not Use Email Misleading Subject Lines Make sure your subject lines reflect the message that is being opened
Step [3] – Include Your Location/Address In Your Emails you must valid physical postal address in your emails
Step [4] – Unsubscribe The Users In A Timely Manner in Emails You have 10 days to unsubscribe the user, which should be plenty of time to remove them from your lists and mark them as unsubscribe.
Step [5] – Tell People How To Opt-Out Of Your Messages in Emails General guidance is that the opt-out should be within one click from the email. Don’t put up barriers and give them a simple way to unsubscribe.
Step [6] – Disclose Your Message As An Advertisement in Emails You must be aware that the FTC often requires messages to be labeled as advertisements and email is no exception.
Step [7] – Know Who Is Responsible (By Third Party Email Services) in Emails If you are using a third party Email Services, you must be responsible to comply with the law as the sender of the email message.
Step [8] – Penalties For Violation Of CAN-SPAM Act in Emails if any CAN-SPAM violations by companies / users, Penalties law by CAN-SPAM