Cross-site scripting, or XSS, is a security vulnerability that can be found in web applications. This vulnerability allows attackers to inject malicious code/styles into a web page viewed by users. Hackers trying to attack in HTML code to attack / harm files
PHTML templates An ‘Escaper’ class is provided for .phtml templates and PHP classes responsible for generating HTML. It contains HTML sanitization methods for a variety of contexts.
The following code sample illustrates XSS-safe output in templates:
<?php
/*
* John_Country
* @category Adobe Commerce Region / State List By Country ID
* @package Country Form
* @copyright Copyright (c) 2023 - Mage2DB.com
* @Email johndusa1021@gmail.com
* @version 1.0.0
*/
namespace John\Country\Model;
use Magento\Directory\Model\Country;
use Magento\Directory\Model\CountryFactory;
class Country
{
/**
* @var Country
*/
public $countryFactory;
public function __construct(
CountryFactory $countryFactory
) {
$this->countryFactory = $countryFactory;
}
/**
* Region / State List By Country ID
*
* @return string
*/
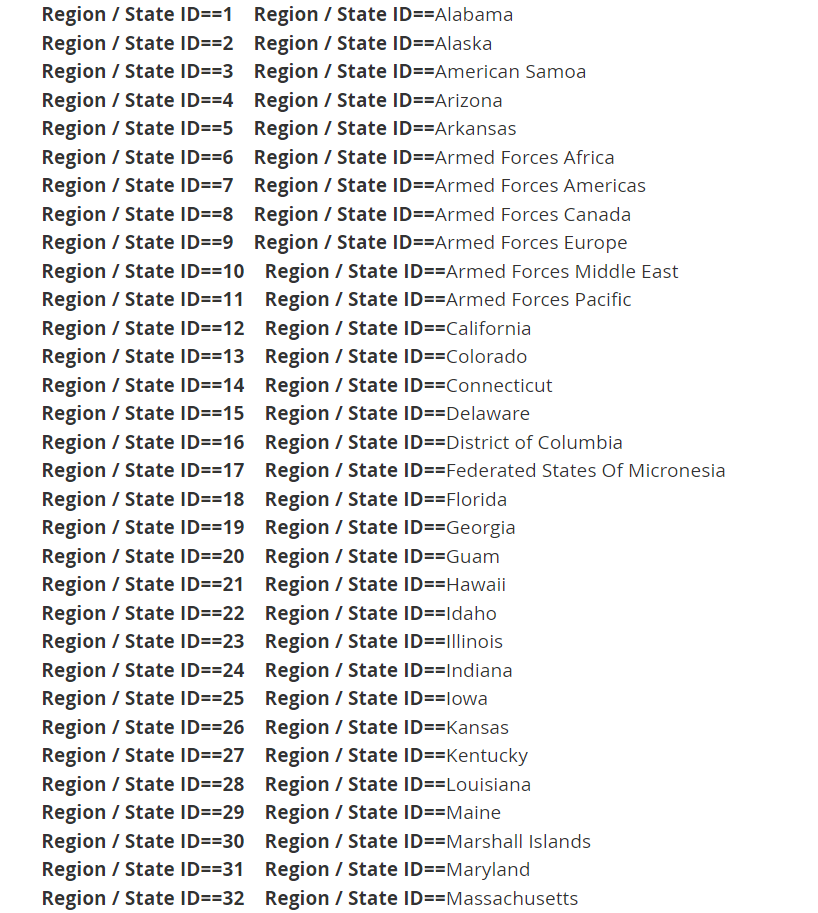
Public function getregionsOfCountry($countryCode) {
$regionCollection = $this->countryFactory->create()->loadByCode($countryCode)->getRegions();
$regions = $regionCollection->loadData()->toOptionArray(false);
return $regions;
}
}
Step [2] – if you have written above code in your Custom Block, call this Block in your custom template.
<?php
/*
* John_Customercompanycreation
* @category Adobe Commerce Region / State List By Country ID
* @package Customerregister Form
* @copyright Copyright (c) 2023 - Mage2DB.com
* @Email johndusa1021@gmail.com
* @version 1.0.0
*/
?>
<?php
$countryCode="US";
echo"<BR><B>Country=</b>".$block->getCountryName($countryCode);
foreach($block->getregionsOfCountry($countryCode) as $key=>$regionlist):
if($key>0):
echo"<BR><b>Region / State ID==".$regionlist['value']." "."Region / State ID==</b>".$regionlist['title'];
endif;
endforeach;
?>
<?php
/*
 * John_Country

 * @category   Adobe Commerce Region / State List By Country ID
 * @package    Country Name
 * @copyright  Copyright (c) 2023 - Mage2DB.com
 * @Email      johndusa1021@gmail.com
 * @version    1.0.0
 */
namespace John\Country\Model;

use Magento\Directory\Model\Country;
use Magento\Directory\Model\CountryFactory;

class Country
{
/**
* @var Country
*/
public $countryFactory;

public function __construct(
    CountryFactory $countryFactory
) {
    $this->countryFactory = $countryFactory;
}

/**
 * country full name
 *
 * @return string
 */
public function getCountryName($countryId)
{
    $countryName = '';
    $country = $this->countryFactory->create()->loadByCode($countryId);
    if (!empty($country)) {
        $countryName = $country->getName();
    }
    return $countryName;
}

}
Step [2] – if you have written above code in your Custom Block, call this Block in your custom template.
<?php
/*
 * John_Country

 * @category   Adobe Commerce Region / State List By Country ID
 * @package    Country Name
 * @copyright  Copyright (c) 2023 - Mage2DB.com
 * @Email      johndusa1021@gmail.com
 * @version    1.0.0
 */
?>
<?php
 $countryCode="US";

 echo"<BR><B>Country=</b>".$block->getCountryName($countryCode);
?>
The following below code need to put in your custom module controlller
Here We are creating
[1] – Adobe Commerce B2B Customer Account
[2] – Adobe Commerce B2B Company Account
<?php
/*
 * John_Customercompanycreation

 * @category   Adobe Commerce B2B Customer Company Account Creation
 * @package    Customerregister Form
 * @copyright  Copyright (c) 2023 - Mage2DB.com
 * @Email      johndusa1021@gmail.com
 * @version    1.0.0
 */
namespace John\Customercreation\Controller\Index;

use Magento\Backend\App\Action\Context;
use Magento\Framework\Controller\ResultFactory;
use Magento\Framework\App\Action\HttpPostActionInterface as HttpPostActionInterface;
use Magento\Framework\App\RequestInterface;
use Magento\Store\Model\StoreManagerInterface;
use Magento\Framework\Controller\Result\RedirectFactory;
use Magento\Framework\Message\ManagerInterface as MessageManagerInterface;
use Magento\Customer\Model\CustomerFactory;
use Magento\Company\Api\CompanyRepositoryInterface;
use Magento\Company\Api\Data\CompanyInterface;
use Magento\Framework\Api\DataObjectHelper;
use Magento\Customer\Api\CustomerRepositoryInterface;

class Index extends \Magento\Framework\App\Action\Action
{
    /**
     * @var \Magento\Framework\App\RequestInterface
     */
    protected $request;

    /**
     * @var \Magento\Store\Model\StoreManagerInterface
     */
    protected $storeManager;

    /**
     * @var John\Customerregister\Helper\Data
     */
    protected $helper;

    /**
     * @var \Magento\Framework\Controller\Result\RedirectFactory
     */
    protected $resultRedirectFactory;

    /**
     * @var \Magento\Framework\Message\ManagerInterface
     */
    protected $messageManager;

    /**
     * @var \Magento\Customer\Model\CustomerFactory
     */
    protected $customerFactory;


    /**
     * @var \Magento\Company\Api\CompanyRepositoryInterface
     */

    protected $companyRepository;

    /**
     * @var \Magento\Company\Api\Data\CompanyInterface
     */

    protected $companyInterface;

    /**
     * @var \Magento\Framework\Api\DataObjectHelper
     */

    protected $objectHelper;

    /**
     * @var CustomerRepositoryInterface
     */
    protected $customerRepository;

    /**
     * @param Action\Context $context
     * @param \Magento\Framework\App\Cache\TypeListInterface $cacheTypeList
     * @param \Magento\Framework\App\Cache\StateInterface $cacheState
     * @param \Magento\Framework\App\Cache\Frontend\Pool $cacheFrontendPool
     * @param \Magento\Framework\View\Result\PageFactory $resultPageFactory
     * @param \Magento\Company\Api\CompanyRepositoryInterface $companyRepository
     * @param \Magento\Company\Api\Data\CompanyInterface $companyInterface
     * @param \Magento\Framework\Api\DataObjectHelper $objectHelper
     */

    public function __construct(
        \Magento\Framework\App\Action\Context $context,
        \Magento\Framework\View\Result\PageFactory $resultPageFactory,
        RequestInterface $request,
        StoreManagerInterface $storeManager,
        RedirectFactory $resultRedirectFactory,
        MessageManagerInterface $messageManager,
        CustomerFactory $customerFactory,
        CompanyRepositoryInterface $companyRepository,
        CompanyInterface $companyInterface,
        DataObjectHelper $objectHelper,
        CustomerRepositoryInterface $customerRepository
    ) {
        parent::__construct($context);
        $this->resultPageFactory = $resultPageFactory;
        $this->request = $request;
        $this->storeManager = $storeManager;
        $this->resultRedirectFactory = $resultRedirectFactory;
        $this->messageManager = $messageManager;
        $this->customerFactory = $customerFactory;
        $this->companyRepository = $companyRepository;
        $this->companyInterface = $companyInterface;
        $this->objectHelper = $objectHelper;
        $this->customerRepository = $customerRepository;
    }

    /**
     * Flush cache storage
     *
     */
    public function execute()
    {
        try {
            /* start: To Save Data in Customer_Entity Database Table -- Customer Registration Process*/
            $websiteId = $this->storeManager->getWebsite()->getWebsiteId();

            $firstName = "John";
            $lastName = "Doe";
            $email = "smith@mage2db.com";
            $password = "R@]*H7~>giXo16Cxv5+n%Mt";

            // instantiate customer object
            $customer = $this->customerFactory->create();
            $customer->setWebsiteId($websiteId);

            if ($customer->loadByEmail($email)->getId()) {
                //echo 'Customer with the email ' . $email . ' is already registered.';
                $message = __(
                    'There is already an account with this email address "%1".',
                    $email
                );
                // @codingStandardsIgnoreEnd
                $this->messageManager->addError($message);
            } else {
                try {
                    // prepare customer data
                    $customer->setEmail($email);
                    $customer->setFirstname($firstName);
                    $customer->setLastname($lastName);

                    // set null to auto-generate password
                    $customer->setPassword($password);

                    // set the customer as confirmed
                    // this is optional
                    // comment out this line if you want to send confirmation email
                    // to customer before finalizing his/her account creation
                    $customer->setForceConfirmed(true);

                    // save data
                    $customer->save();

                    // send welcome email to the customer
                    $customer->sendNewAccountEmail();

                    /* Finish: To Save Data in Customer_Entity Database Table -- Customer Registration Process */
                    /*Start: To Get Customer ID By Email*/
                    $customerData = $this->customerRepository->get($email);
                    $customerId_latest = (int) $customerData->getId();

                    /*Finish: To Get Customer ID By Email*/
                    /* Starts To Save Customer Company Details -- Customer Registration Process -- Once Customer Account Created */
                    /* To Create Customer Company require Customer entity_id , that only done after customer account Creation */
                    /* Customer entity_id  here using as super_user_id*/

                    if (isset($customerId_latest) &&  !empty($customerId_latest) ):

                        $companyRepo = $this->companyRepository;
                        $companyObj = $this->companyInterface;
                        $dataObj = $this->objectHelper;

                        $company = [
                            "company_name" => "Google",
                            "company_email" => "info@mage2db.com",
                            "street" => ["D-101, New York"],
                            "city" => "New York",
                            "country_id" => "US",
                            "region" => "CA",
                            "region_id" => "12",
                            "postcode" => "10001",
                            "telephone" => "9999999999",
                            "super_user_id" => $customerId_latest,
                            "customer_group_id" => 1,
                        ];

                        /*Super ID getting from customer_entity table*/
                        /*Once Customer Created, it ID as super_user_id for Company account*/
                        $this->objectHelper->populateWithArray(
                            $this->companyInterface,
                            $company,
                            \Magento\Company\Api\Data\CompanyInterface::class
                        );

                        $this->companyRepository->save($this->companyInterface);
                    endif;
                    /*Finish To Save Customer Company Details -- Customer Registration Process -- Once Customer Account Created*/

                    $this->messageManager->addSuccess(
                        __(
                            "Customer Company account with email %1 created successfully.",
                            $email
                        )
                    );

                    $url = $this->urlModel->getUrl("*/*/add", [
                        "_secure" => true,
                    ]);
                    $resultRedirect->setUrl($this->_redirect->success($url));

                    //$resultRedirect->setPath('*/*/');
                    return $resultRedirect;
                } catch (StateException $e) {
                    $url = $this->urlModel->getUrl(
                        "customer/account/forgotpassword"
                    );
                    // @codingStandardsIgnoreStart
                    $message = __(
                        'There is already an account with this email address. If you are sure that it is your email address, <a href="%1">click here</a> to get your password and access your account.',
                        $url
                    );
                    $this->messageManager->addError($message);
                } catch (InputException $e) {
                    $this->messageManager->addError(
                        $this->escaper->escapeHtml($e->getMessage())
                    );
                    foreach ($e->getErrors() as $error) {
                        $this->messageManager->addError(
                            $this->escaper->escapeHtml($error->getMessage())
                        );
                    }
                } catch (LocalizedException $e) {
                    $this->messageManager->addError(
                        $this->escaper->escapeHtml($e->getMessage())
                    );
                } catch (\Exception $e) {
                    //$this->messageManager->addException($e, __('We can\'t save the customer.'));
                }
            }
            // Finish: To Save Data in Customer_Entity Database Table
            //Finish: To save Customer Company Details
        } catch (LocalizedException $e) {
            $this->messageManager->addErrorMessage($e->getMessage());
        } catch (\Exception $e) {
            $this->messageManager->addErrorMessage(
                __("Something went wrong, please try again.")
            );
        }

        $this->resultPage = $this->resultPageFactory->create();
        return $this->resultPage;
    }
}
Once script run the following set of email by Customer
Step [1] – Customer Registration welcome email ::
Customer smith@mage2db.com getting email from Adobe Commerce B2B Store Owner Email Johndusa1021@gmail.com
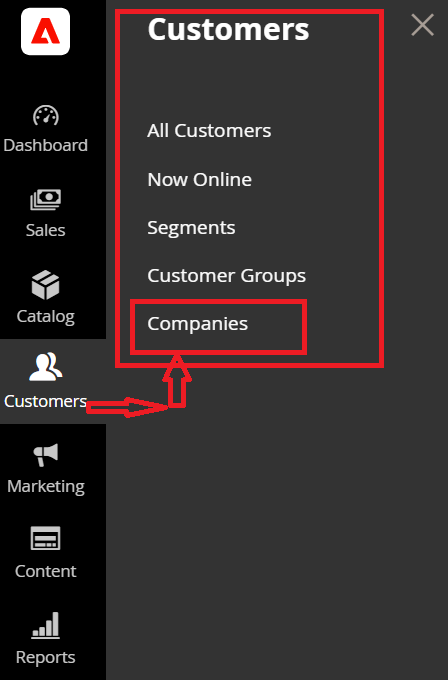
Step [2] – Go To Adobe Commerce B2B admin
Left Side Menu –> Customers –> Customers –> Companies
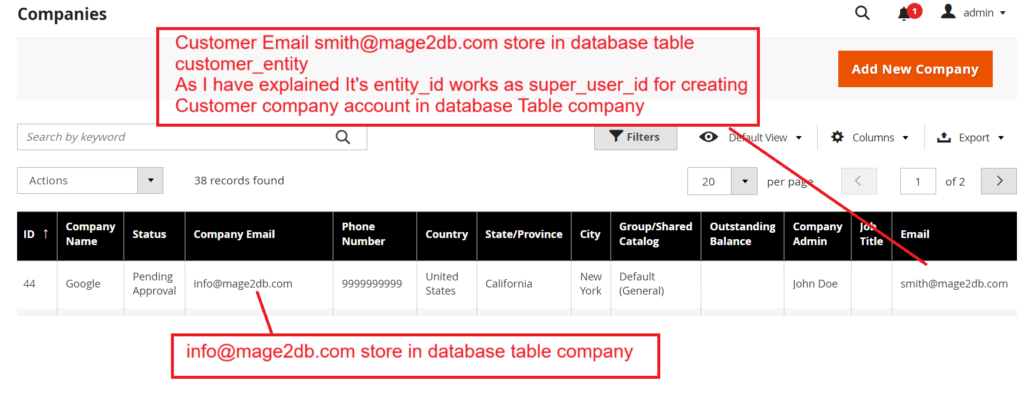
Step [3] – Once clicked on companies –> display listing of all customer companies listing
By Default newly created company disabled,
As below screenshot newly created company Google as Pending Approval Stage
[3.1] – Customer Email smith@mage2db.com store in database table customer_entity As I have explained It’s entity_id works as super_user_id for creating Customer company account in database Table company
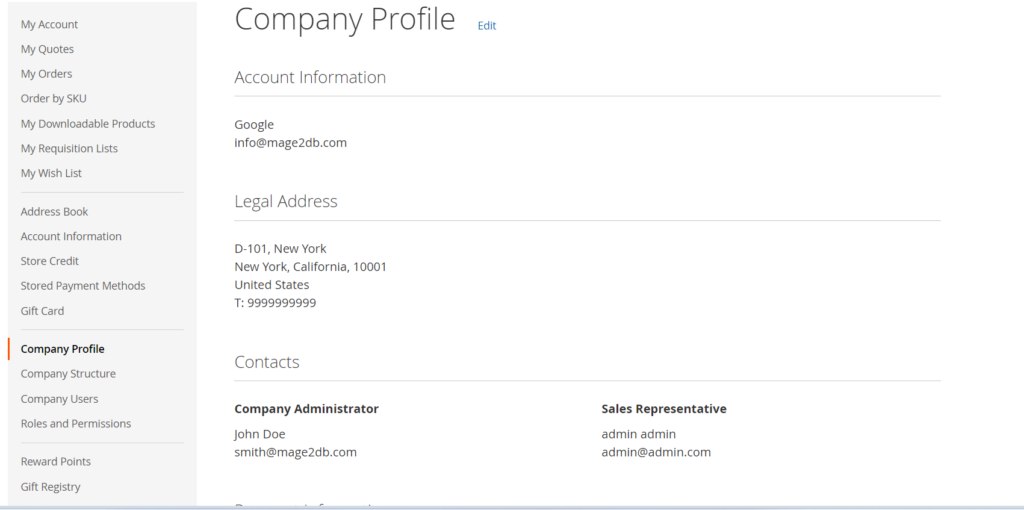
[3.2] – info@mage2db.com store in database table company
Here we have created Both Adobe Commerce B2B Customer Account & Customer Company account
First Created Adobe Commerce B2B Customer Account, once got customer created account entity_id from Database Table customer_entity
Once got entity_id from Database Table customer_entity , we are using that entity_id as super_user_id during Adobe Commerce B2B Customer Company account creating
Note:: if you want to create only Adobe Commerce B2B Customer Company account
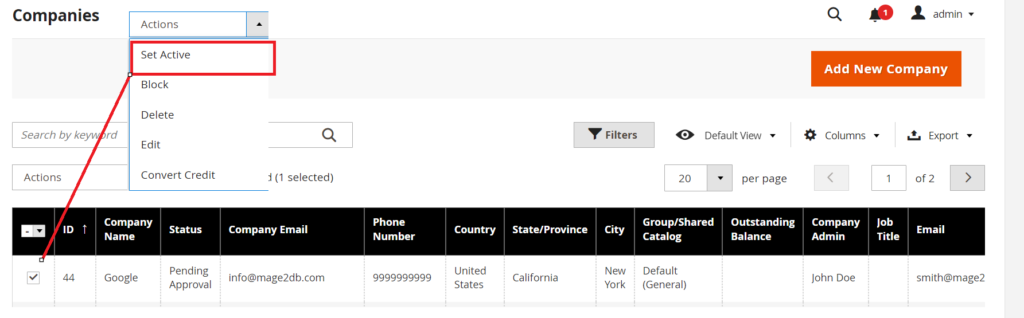
[3.3] – As Here Newly created company Google Pending Approval Condition ,
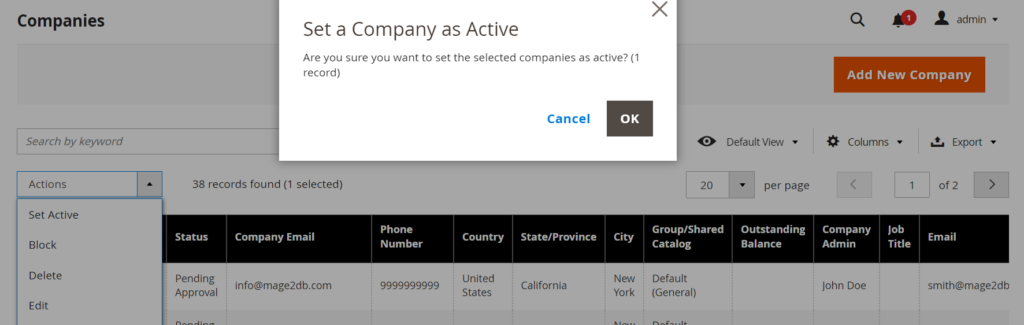
Admin must be activate –> Checked Company Google Row –-> Select Set Active From Actions Drop Down Menu
Clicked on OK to activate Company Google
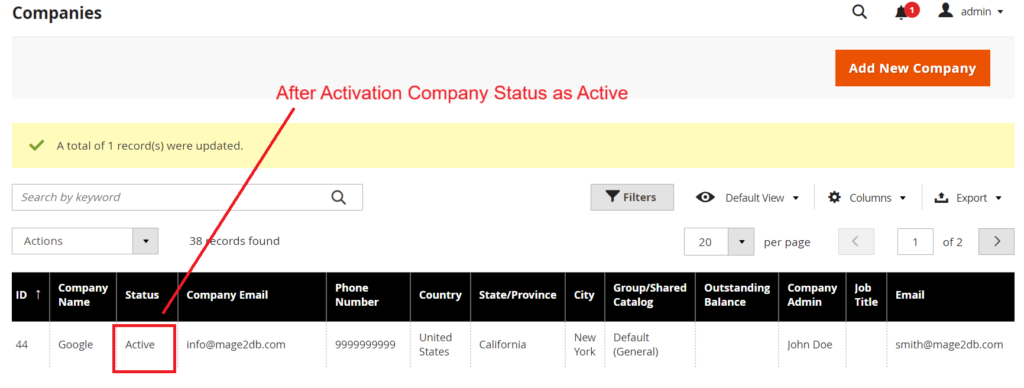
After Activation Company Status as Active
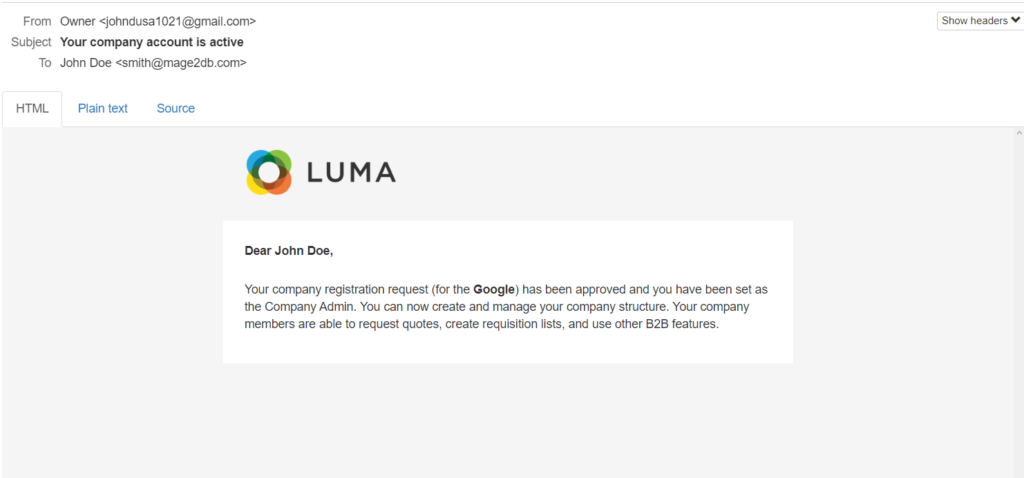
Step [4] – After activation Company
Customer will be getting email on his registered email
Here Customer smith@mage2db.com
got email from Adobe Commerce B2B Store Owner johndusa1021@gmail.com
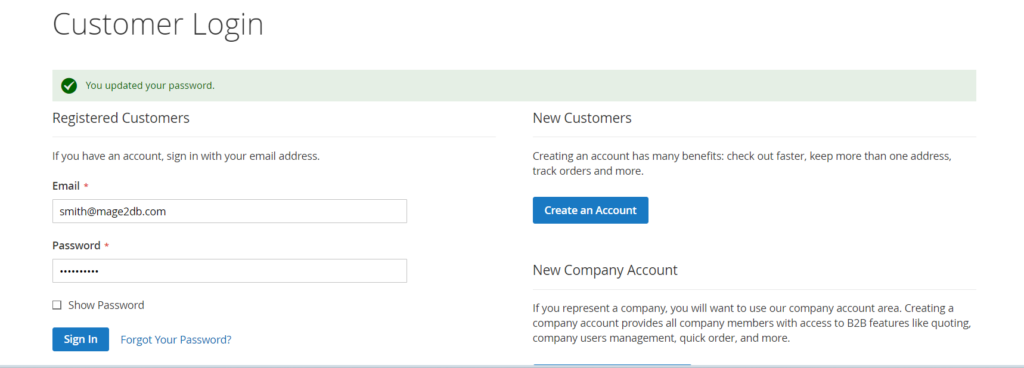
Step [4] – Finally Customer smith@mage2db.com can login
[4.1] – Once Logged In, Customer smith@mage2db.com can view his Dashboard
[4.2] – Once you clicked on Customer Profile , you can see Company Email with Legal Address
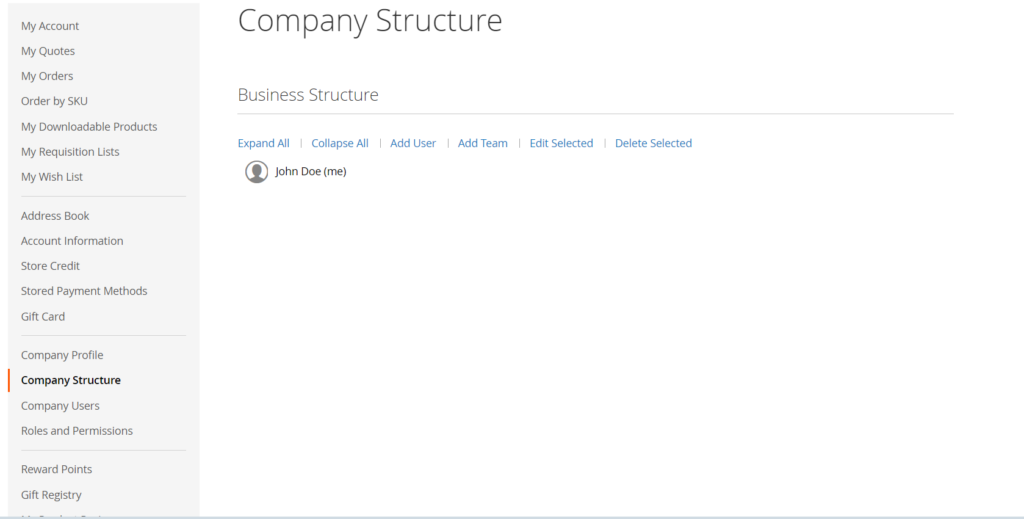
[4.3] – Once clicked on Company Structure , you can see Company Structure
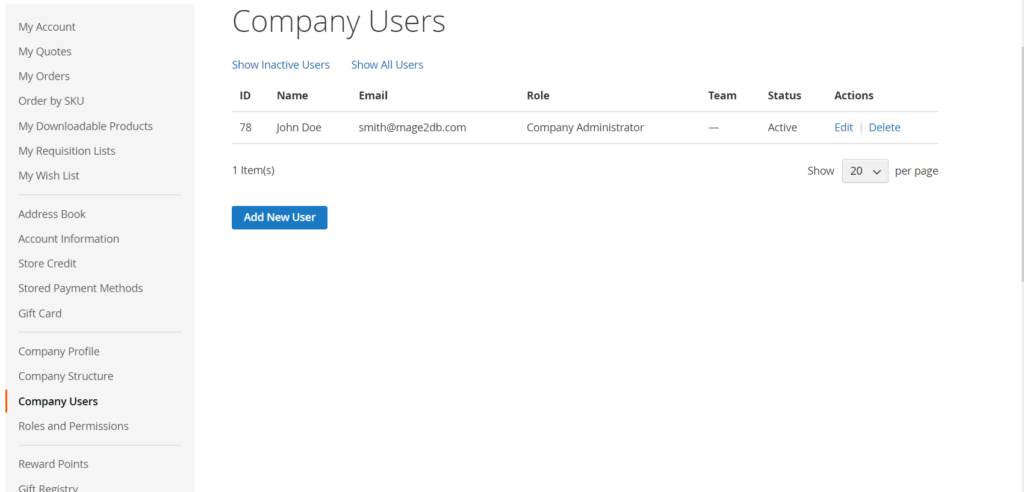
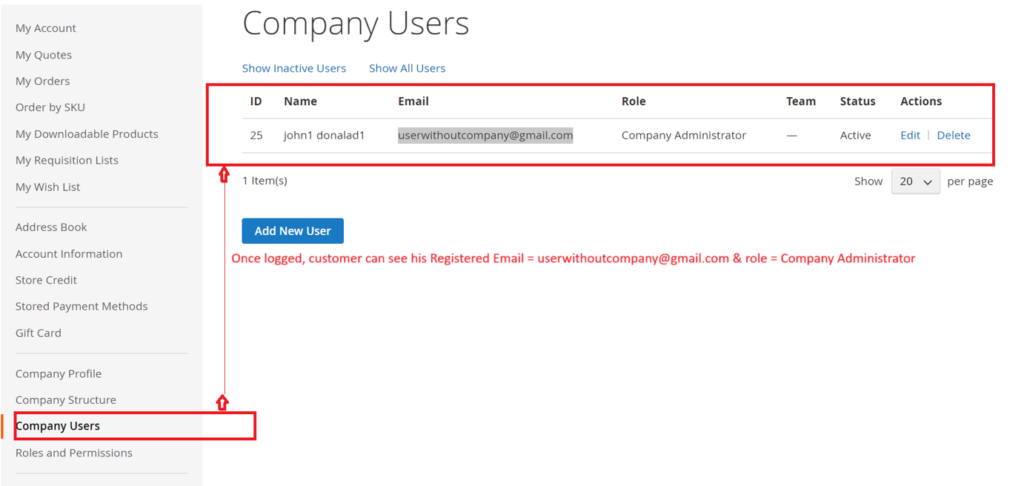
[4.4] – Once clicked on Company Users, you can see John Doe (smith@mage2db.com) as Company administrator
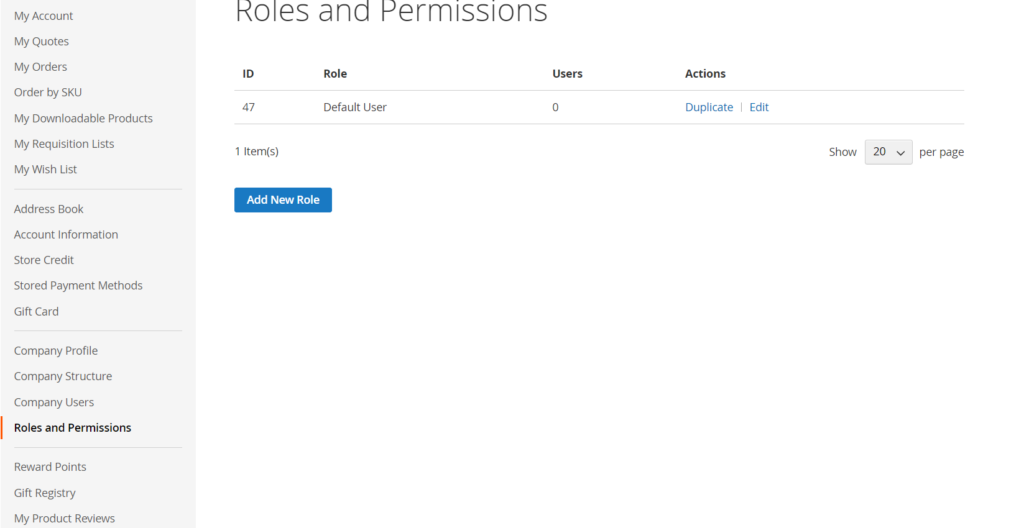
[4.5] – Once you clicked on Roles and Permissions –> Default Roles
You can create new Role as per your Business Need.
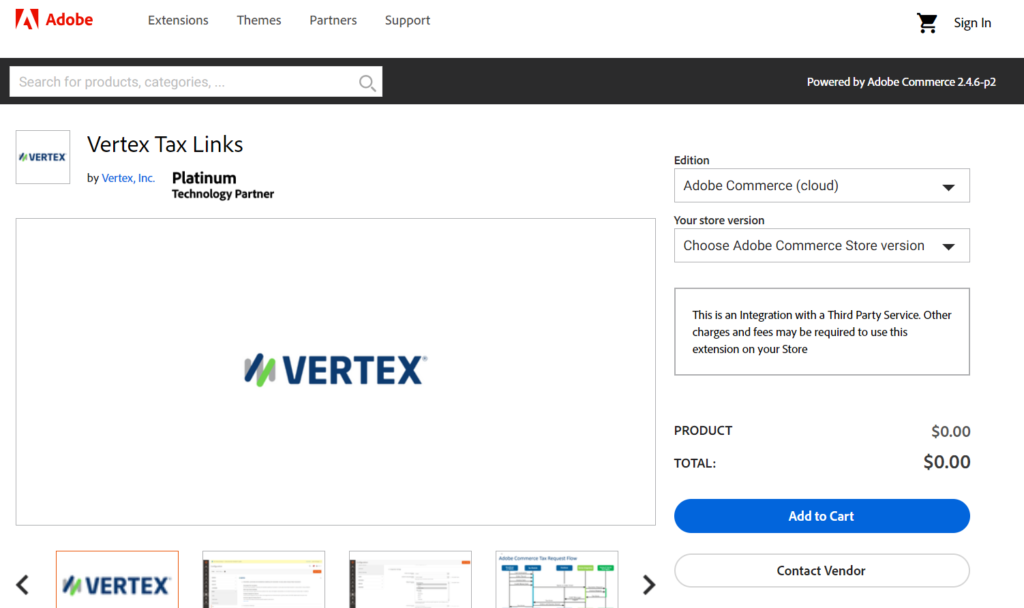
In Adobe Commerce to reduce streamline tax determination and compliance by automating tax calculations for every transaction—all backed by the global leader in tax technology
But these Sales Taxation Calculation changes time to time for every country & its region based , due to this we have to install Adobe Commerce API based Sales Taxation and accurate sales extension so that time to time country & its region-based Sales Taxation Calculation to be reflected in our system to generate correct country & its region-based Invoice with correct tax.
Vertex centralizes all the rates and rules required for product taxability and accurate sales and use tax calculation. No need to manage constantly changing tax content manually
The following below code need to put in your custom module controlller
Here We are considering customer account has been already created in Adobe Commerce B2B & it entity_id=25, that is using here as super_user_id=25 & email = userwithoutcompany@gmail.com
<?php
/*
 * John_Customercompanycreation

 * @category   Adobe Commerce B2B Customer Company Account Creation
 * @package    Customerregister Form
 * @copyright  Copyright (c) 2023 - Mage2DB.com
 * @Email      johndusa1021@gmail.com
 * @version    1.0.0
 */
namespace John\Customercreation\Controller\Index;

use Magento\Backend\App\Action\Context;
use Magento\Framework\Controller\ResultFactory;
use Magento\Company\Api\CompanyRepositoryInterface;
use Magento\Company\Api\Data\CompanyInterface;
use Magento\Framework\Api\DataObjectHelper;

class Index extends \Magento\Framework\App\Action\Action
{
    //protected $_modelDataFactory;

    /**
     * @var \Magento\Framework\App\Cache\TypeListInterface
     */
    protected $_cacheTypeList;

    /**
     * @var \Magento\Framework\App\Cache\StateInterface
     */
    protected $_cacheState;

    /**
     * @var \Magento\Framework\App\Cache\Frontend\Pool
     */
    protected $_cacheFrontendPool;

    /**
     * @var \Magento\Framework\View\Result\PageFactory
     */
    protected $resultPageFactory;

    /**
     * @var \Magento\Company\Api\CompanyRepositoryInterface
     */

    protected $companyRepository;

    /**
     * @var \Magento\Company\Api\Data\CompanyInterface
     */

    protected $companyInterface;

    /**
     * @var \Magento\Framework\Api\DataObjectHelper
     */

    protected $objectHelper;

    /**
     * @param Action\Context $context
     * @param \Magento\Framework\App\Cache\TypeListInterface $cacheTypeList
     * @param \Magento\Framework\App\Cache\StateInterface $cacheState
     * @param \Magento\Framework\App\Cache\Frontend\Pool $cacheFrontendPool
     * @param \Magento\Framework\View\Result\PageFactory $resultPageFactory
     * @param \Magento\Company\Api\CompanyRepositoryInterface $companyRepository
     * @param \Magento\Company\Api\Data\CompanyInterface $companyInterface
     * @param \Magento\Framework\Api\DataObjectHelper $objectHelper
     */

    public function __construct(
        \Magento\Framework\App\Action\Context $context,
        \Magento\Framework\App\Cache\TypeListInterface $cacheTypeList,
        \Magento\Framework\App\Cache\StateInterface $cacheState,
        \Magento\Framework\App\Cache\Frontend\Pool $cacheFrontendPool,
        \Magento\Framework\Message\ManagerInterface $messageManager,
        \Magento\Framework\View\Result\PageFactory $resultPageFactory,
        \Magento\Company\Api\CompanyRepositoryInterface $companyRepository,
        \Magento\Company\Api\Data\CompanyInterface $companyInterface,
        \Magento\Framework\Api\DataObjectHelper $objectHelper
    ) {
        parent::__construct($context);
        $this->_cacheTypeList = $cacheTypeList;
        $this->_cacheState = $cacheState;
        $this->_cacheFrontendPool = $cacheFrontendPool;
        $this->resultPageFactory = $resultPageFactory;
        $this->_messageManager = $messageManager;
        $this->companyRepository = $companyRepository;
        $this->companyInterface = $companyInterface;
        $this->objectHelper = $objectHelper;
    }

    /**
     * Flush cache storage
     *
     */
    public function execute()
    {
        $companyRepo = $this->companyRepository;
        $companyObj = $this->companyInterface;
        $dataObj = $this->objectHelper;

        $company_email = "company@mage2db.com";

        $company = [
            "company_name" => "John",
            "company_email" => "$company_email",
            "street" => ["100 Big Tree Avenue"],
            "city" => "New York",
            "country_id" => "US",
            "region" => "CA",
            "region_id" => "12",
            "postcode" => "1001",
            "telephone" => "9999999999",
            "super_user_id" => 25,
            "customer_group_id" => 1,
        ];

    //Here We are considering customer account has been already created & it entity_id=25
   //It is using here as super_user_id=25
  //Customer Registered Email userwithoutcompany@gmail.com

        $dataObj->populateWithArray(
            $companyObj,
            $company,
            \Magento\Company\Api\Data\CompanyInterface::class
        );

        try {
            // save customer company details address
            $companyRepo->save($companyObj);

            $this->_messageManager->addSuccess(
                __(
                    "Customer account with email %1 created successfully.",
                    $company_email
                )
            );
        } catch (Exception $e) {
            $this->_messageManager->addException(
                $e,
                __('We can\'t save the customer address.')
            );
        }

        $this->resultPage = $this->resultPageFactory->create();
        return $this->resultPage;
    }
}
Once customer’s company created, need to be by using his registered email
[1] – Customer Registered Email / Password = userwithoutcompany@gmail.com / what you have set
[2] – Once logged, customer can see his Registered Email = userwithoutcompany@gmail.com & role = Company Administrator
[3] – Here, we have created customer registered account by using
Email = userwithoutcompany@gmail.com
Once Customer account created by userwithoutcompany@gmail.com
We have done Customer Company Account Programmatically
Company Email = company@mage2db.com
Finally Email = userwithoutcompany@gmail.com has Company Administrator His Company Email=company@mage2db.com