TDD (Test-Driven Development), BDD (Behavior-Driven Development), and ATDD (Acceptance Test-Driven Development) are all software development practices focused on improving code quality and ensuring that the software meets its requirements.
1. Test-Driven Development (TDD):
- Focus: Code functionality.
- Process:
- Write a Test: Developers write a unit test for a small piece of functionality that doesn’t exist yet.
- Run the Test: The test will fail because the functionality hasn’t been implemented.
- Write Code: Write the minimum amount of code necessary to make the test pass.
- Refactor: Improve the code without changing its behavior, ensuring all tests still pass.
- Repeat: Continue the cycle for each new piece of functionality.
- Type of Tests: Unit tests, which focus on testing individual components or methods in isolation.
- Primary Audience: Developers.
Goal: TDD aims to ensure that the code meets the developer’s expectations for functionality. It helps in creating a robust, well-structured, and bug-free codebase.
2. Behavior-Driven Development (BDD):
- Focus: Behavior of the system as understood by stakeholders.
- Process:
- Define Scenarios: Collaborate with stakeholders (e.g., product owners, business analysts, and testers) to define behavior scenarios using natural language.
- Write Tests: Write tests based on these scenarios using BDD frameworks like Cucumber, SpecFlow, or Gherkin, which support natural language syntax (Given, When, Then).
- Run Tests: Initially, the tests will fail because the behavior hasn’t been implemented.
- Implement Code: Write the code to make the tests pass, implementing the desired behavior.
- Refactor: Improve the code while keeping all tests passing.
- Type of Tests: Higher-level tests, often integration or end-to-end tests that validate the system’s behavior as a whole.
- Primary Audience: Developers, testers, and non-technical stakeholders.
Goal: BDD bridges the communication gap between technical and non-technical team members, ensuring that the software behaves as expected from a user’s perspective.
3. Acceptance Test-Driven Development (ATDD):
- Focus: Meeting acceptance criteria defined by stakeholders.
- Process:
- Define Acceptance Criteria: Collaborate with stakeholders to define acceptance criteria for each user story.
- Write Acceptance Tests: Write acceptance tests based on these criteria before implementing the functionality.
- Run Tests: Run the tests to see them fail initially since the feature isn’t implemented yet.
- Implement Code: Write the code necessary to pass the acceptance tests.
- Refactor: Improve the code, ensuring all acceptance tests still pass.
- Type of Tests: Acceptance tests that validate whether the software meets the agreed-upon requirements.
- Primary Audience: Product owners, business analysts, testers, and developers.
Goal: ATDD ensures that the software meets the business requirements and provides value to the stakeholders by focusing on fulfilling the acceptance criteria for each user story.
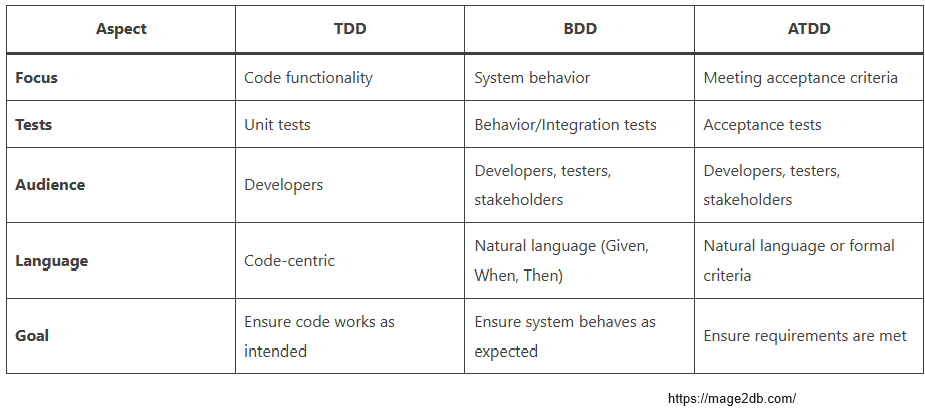
Comparison:
| Aspect | TDD | BDD | ATDD |
|---|---|---|---|
| Focus | Code functionality | System behavior | Meeting acceptance criteria |
| Tests | Unit tests | Behavior/Integration tests | Acceptance tests |
| Audience | Developers | Developers, testers, stakeholders | Developers, testers, stakeholders |
| Language | Code-centric | Natural language (Given, When, Then) | Natural language or formal criteria |
| Goal | Ensure code works as intended | Ensure system behaves as expected | Ensure requirements are met |
Conclusion:
- TDD is about ensuring that the code works correctly from a developer’s perspective.
- BDD focuses on ensuring that the system behaves as the stakeholders expect, fostering better communication and understanding.
- ATDD is centered on meeting the defined acceptance criteria, ensuring that the software fulfills its business requirements.
Each practice has its strengths, and they can be combined or used in different contexts depending on the team’s goals and the nature of the project.