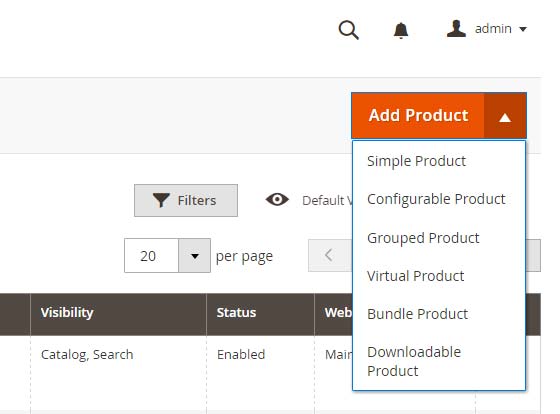
How Many Product Types in Magento Open Source & Adobe Commerce 2.x

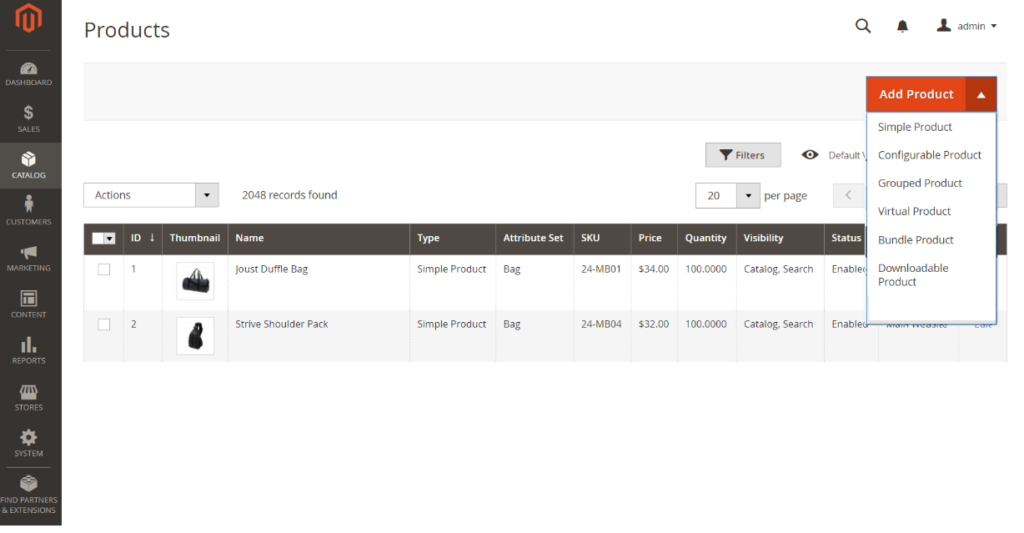
There are 7 Products Types in Magento 2

  1. Simple Product
  2. Configurable Product
  3. Grouped Product
  4. Bundle Product
  5. Virtual Product
  6. Downloadable Product
  7. Gift Card Product

[1] – Simple Product ::

The Simple Product is a physical item, most popular product type of a store, this product do not have attribute (selectable variations) as size, color, weight etc.
This product has a single SKU (Stock Keeping Unit)

[2] – Configurable Product ::

The configurable product is a combination of simple products, each simple product has its own attribute (size, color, weight etc) & SKU as well as own stock Inventory.

Example ::

Why Need Configurable Product

customers browse products in any store & getting multiple similar products, they will get annoyed & negatively rankings effect on search engine (Google, Yahoo, Bing etc.), that is why need to create configurable product.

Here Total products variations =12, if not creating configurable product, need to show 12 products on store, its not good presentation of products.

Total Simple Products Variations is 12 = One Configurable Product

[3] – Grouped Product ::

Grouped Product is a combination of multiple single(standalone) product, each product characteristics or are related to each other and presented on one page.

These single(standalone) product as Simple Product or Virtual Product or Downloadable Product etc.

These single(standalone) products are often related to each other and grouped by theme, season, or business purpose.

Each single product from Grouped Product can be purchased separately or group.

Example::
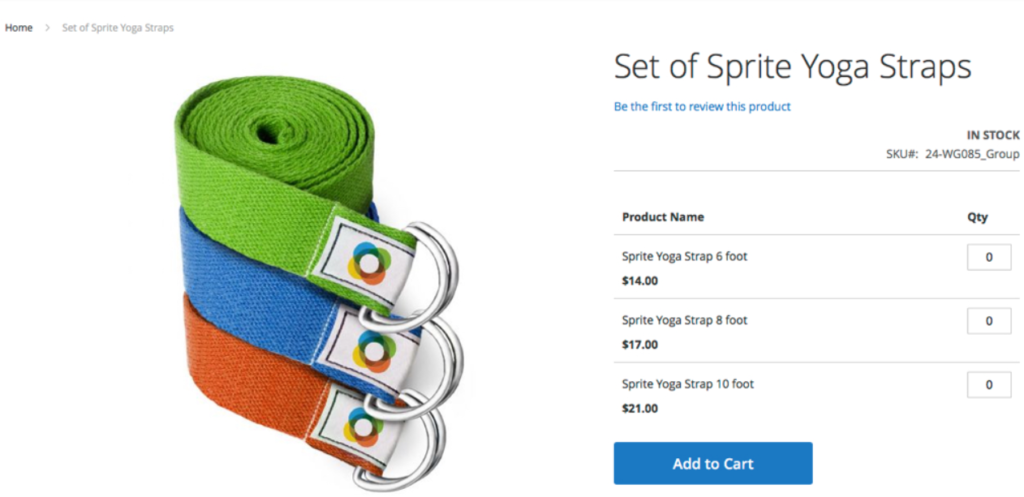
Customer can purchase grouped product Set of Sprite Yoga Traps

There are three set of Sprite Yoga Traps with various foot & prices

Customers can purchase any set of Sprite Yoga Traps as their need

[a] Sprite Yoga Traps 6 foot – 14.00 US$

[b] Sprite Yoga Traps 8 foot – 17.00 US$

[c] Sprite Yoga Traps 10 foot – 21.00 US$

Why Need Grouped Product

Customers can shop all their needed products at once instead of visiting separate product detail pages for shopping, This improve customers satisfaction and keep confident coming back to your store as well as Store business growth, That is why need to create Grouped Product

[4] – Bundle Product ::

Bundle Product is combination of various Simple products or Virtual Product and can be customized as per their need while shopping.

Magento 2, other product types have a button Add to cart in common, while in case bundle products have a different button named Customize and Add to Cart, This enables customers to customize the product using a list of options before adding to the cart.

Example ::
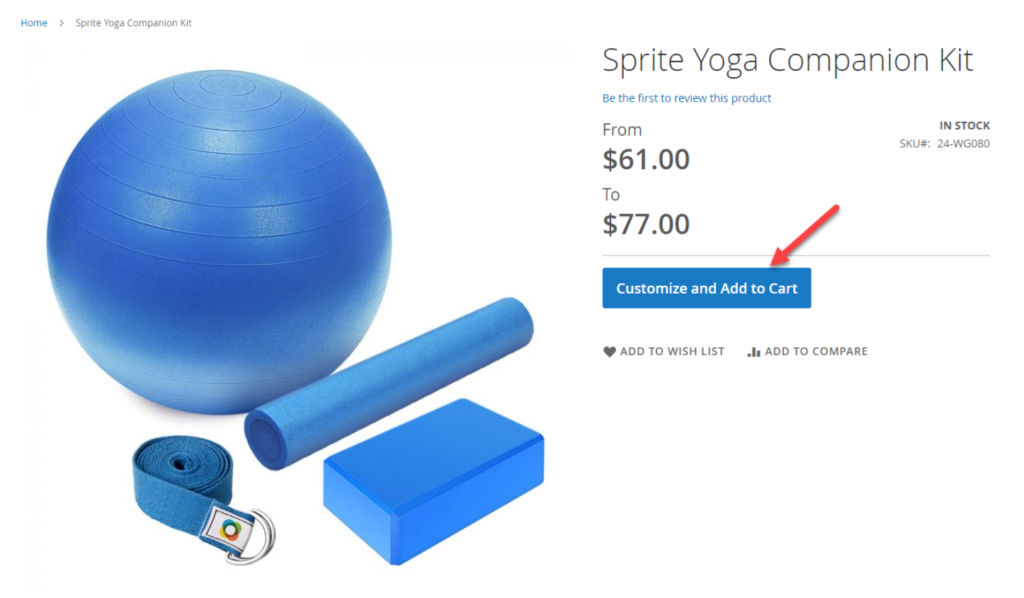
This bundled product Customize Spite Yoga Companion Kit appears with four individual items as

  • Sprite Stasis Ball
  • Sprite Foam Yoga Brick
  • Sprite Yoga Strap
  • Sprite Foam Roller.

Each product has several options for customers to select (product variations)

[5] – Virtual Product ::

Virtual Product do not have physical or digital entries. There are multiple products as non-tangible items such as memberships, services, warranties, or subscriptions and digital downloads of books, music, videos, OTT (Netflix, Amazon Prime Video) etc.. These products cannot be shipped or downloaded from the link. This is a great way to sell services or intellectual products such as warranties, subscription or updates.

Example ::

[6] – Downloadable Products ::

Downloadable Product have downloadable counterpart. There are multiple products as Software, eBooks, E-Learning, Fonts, Courses, Graphics & digital art, Video Game, MP3, MP4, Tickets etc. Downloadable product does not allow selecting a shipping method at checkout, simply because shipping is not needed and client receives purchased entity right away.

Example ::

[7] Gift Card (Adobe Commerce):: Gift Card products are applicable by Adobe Commerce.

“A Gift Card is a form of payment that can be used to do shopping at online stores or physical stores.”

Adobe Commerce 2.x supports three Gift Card

  1. Physical Gift Cards [Printed Gift Cards]:: [Printed Gift Cards] to be mailed(Posted) recipients street address or postal address or shipping address or physical mail not by Email ID
    Physical Gift Cards can be mass produced in advance and embossed with unique codes.
  2. Virtual Gift Cards:: A Virtual Gift Card has “No Stock Quantity” and is always “In Stock Quantity”. It is always required recipients Email ID.
  3. Combined Gift Card = It is combination of Physical Gift Card & Virtual Gift Card

Adobe Commerce 2.x allow 7 Type Products including Gift Card Products
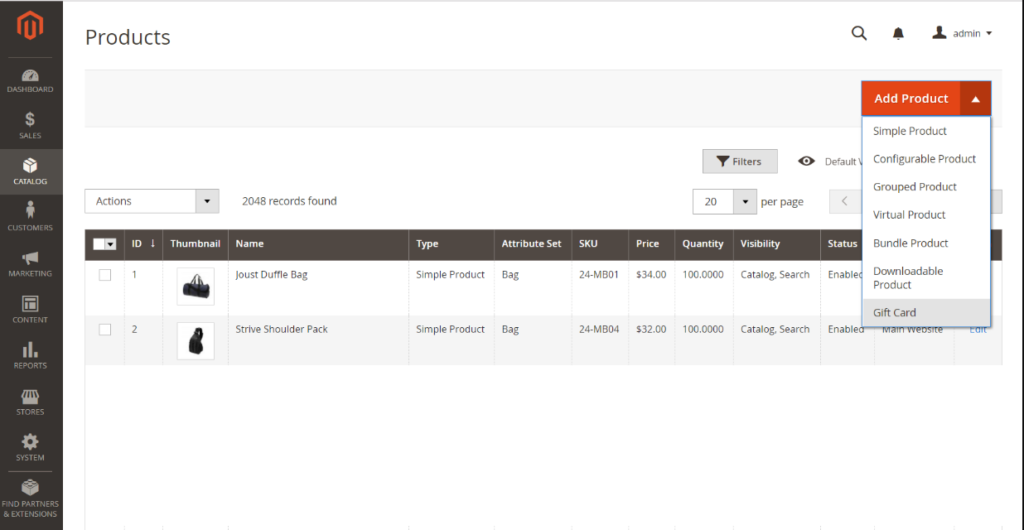
Magento Open Source 2.x allow 6 Type Products
Difference Between Virtual and Downloadable Products

How To Set CSRF Token in Magento 2.x

There are following below Admin setting to do CSRF Token in Magento 2

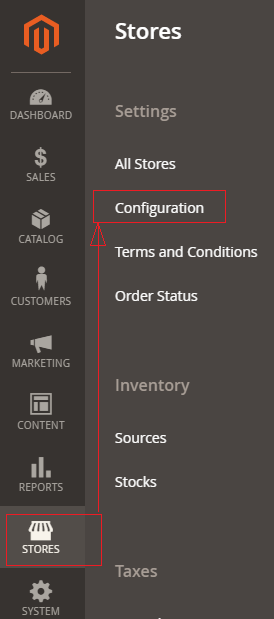
Step [1] – Go To STORES > Configuration, redirects on configuration.

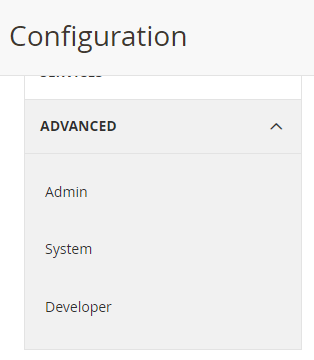
Step [2] – Left Panel Advanced -> Admin, redirects on [Right Panel]

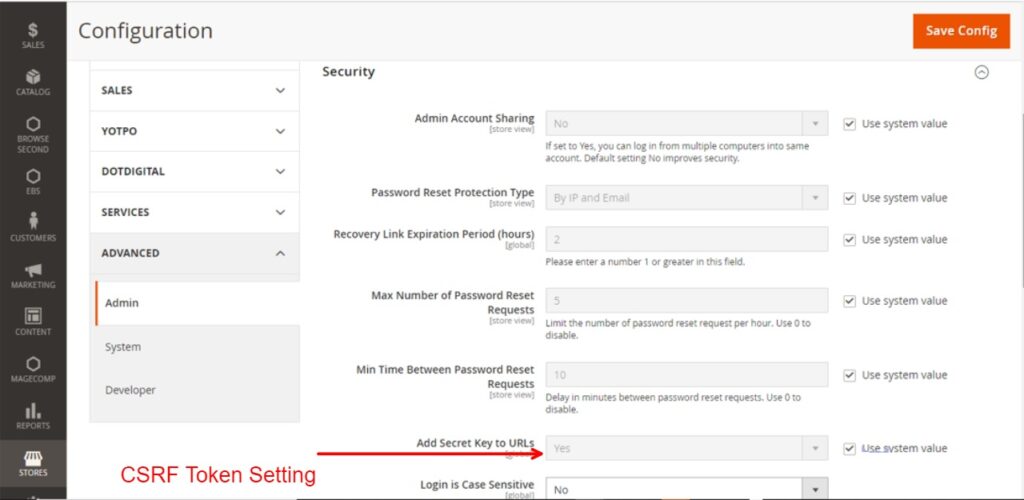
Step [3] – Right Panel (Security) need to set as below

set Add Secret Key to URLs to Yes

Step [4] – Finally CSRF Token setting has been integrated.

Magento 2 CSRF Token Settings Video

HTTP Security Headers Checker Tool

https://www.site2info.com/sitesecurity.php

All Website HTTP Security Headers
Protect Website Against Vulnerability Attack, Hacker Attack, Virus Attack

Magento 2 All Database Tables [500 & more Tables]


HTTP Security Headers Checker Tool – Security Headers Response


How to add Feature-Policy Security Header


How to add X-Content-Type-Options Security Header


How to add Expect-CT Security Header


How to add X-Frame-Options Security Header


How to add X-XSS-Protection Security Header


How to add Referrer Policy Security Header


Referrer Policy Header Security


Magento 2 Admin Security


How to add HTTP Strict Transport Security (HSTS)


How To Set CSRF Token in Magento 2


What is CSRF and CSRF Token

What is CSRF and CSRF Token

Cross-site request forgery (CSRF or XSRF) , also know as One Click Attack, is a web security vulnerability that allows an Attacker / Hacker to attack on web application & to induce authenticated users to perform actions that they do not intend to perform. 

Cross Site Request Forgery = Cross Site + Request Forgery

Cross-Site Request Forgery Working Model

Attackers using multiple social engineering technique to attack by using CSRF or XSRF, This technique working as The victim into clicking a URL that having maliciously crafted or set of maliciously crafted , unauthorized request for a specific Web application, Then user’s browser sending this maliciously crafted or set of maliciously crafted request to a targeted Web application. The request also includes any credentials information to the particular website (user session or cookies). Id use as from of an active session with a targeted Web application, the application response this new request as an authorized request submitted by the authorized user.
Finally, The attacker successfully exploited the Web application infected with CSRF vulnerability.

There are multiple below cases, to attack CSRF

  • Submitting or deleting a record Form
  • Submitting a transaction Form
  • Purchasing a product Form
  • Changing a password Form
  • Sending a message Form
  • Contact Form

Application Prevent Against Cross-Site Request Forgery Attack

Preventing CSRF Attack, requires the inclusion of an unpredictable token in the body or URL of each HTTP request. Such tokens should at a minimum be unique per user session as well as be unique per request.

  • Properly validate submission form before the relevant action is executed
  • The preferred option is to include the unique token in a hidden field. The unique token can also be included in the URL itself, or a URL parameter.
  • Check Referrer field of each request.
  • Use Captcha on all critical page.

CSRF is a common form of attack and has ranked several times in the OWASP Top Ten (Open Web Application Security Project).

Magento 2 CSRF Token Settings Video

HTTP Security Headers Checker Tool

https://www.site2info.com/sitesecurity.php

All Website HTTP Security Headers
To Protect Website Against Vulnerability Attack, Hacker Attack, Virus Attack

Magento 2 All Database Tables [500 & more Tables]


HTTP Security Headers Checker Tool – Security Headers Response


How to add Feature-Policy Security Header


How to add X-Content-Type-Options Security Header


How to add Expect-CT Security Header


How to add X-Frame-Options Security Header


How to add X-XSS-Protection Security Header


How to add Referrer Policy Security Header


Referrer Policy Header Security


Magento 2 Admin Security


How to add HTTP Strict Transport Security (HSTS)


How To Set CSRF Token in Magento 2


What is CSRF and CSRF Token

Why Magento 2.s Prohibited The Direct Use of The ObjectManager

Magento 2 prohibits the direct use of the ObjectManager in code because it hides the real dependencies of a class

Magento 2.x Coding Standard Rules / Regulations

The main reason, the Object Manager directly is that direct use of the Object Manager causes the extension not to be installable in compiled production mode.

Never call the object manager directly because the Magento 2 Framework handles this automatically

By 2017, The Magento 2 Marketplace runs a compile and install test on all extensions by using properly Magento 2 Coding Standard. If your extension uses the Object Manager directly, it will fail these tests and be rejected from the Marketplace until you resolve this problem and reupload.

How To Setup Magento 2.x Coding Standard

How To Create a Custom Log File in Magento 2.x

Magento 2 Logs having ecommerce store information records for the analysis purpose, as each functionality of ecommerce store either working fine or not, Its both status store in log files One of the most common examples of such events is the error log.
Logs file store path

Magento 2 Root Directory /Var/log/

log folder contains the common log files as below

  1. system logs — [Magento2 Root//Var/log/system.log]
  2. exception log — [Magento2 Root//Var/log/exception.log]
  3. debug logs — [Magento2 Root//Var/log/debug.log]
  4. connector logs — [Magento2 Root//Var/log/connector.log]
  5. install logs — [Magento2 Root//Var/log/install.log]

How To Create Custom Log File in Magento 2

There are following below steps need to follow to create Magento 2 custom log file.

Step [1] – Create registration.php file under your module [ Namespace / ModuleName ]

File Path=Mage2db/John/registration.php

Add below content in this file.

<?php
\Magento\Framework\Component\ComponentRegistrar::register(
    \Magento\Framework\Component\ComponentRegistrar::MODULE,
    'Mage2db_John',
    __DIR__
);

Step [2] – Create module.xml file under your module [ Namespace / ModuleName ]

File Path=Mage2db/John/etc/module.xml

Add below content in this file.

<?xml version="1.0"?>
<config xmlns:xsi="http://www.w3.org/2001/XMLSchema-instance" xsi:noNamespaceSchemaLocation="urn:magento:framework:Module/etc/module.xsd">
<module name="Mage2db_John" setup_version="1.0.0" />
</config>

Step [3] – Create routes.xml file under your module etc directory. Add below content in this file.

File Path=Mage2db\John\etc\frontend\routes.xml

<config xmlns:xsi="http://www.w3.org/2001/XMLSchema-instance" xsi:noNamespaceSchemaLocation="../../../../../../lib/internal/Magento/Framework/App/etc/routes.xsd">
   <router id="standard">
       <route id="john" frontName="john">
         <module name="Mage2db_John" />
       </route>
   </router>
</config>

Step [4] – Create di.xml file under your module etc directory. Add below content in this file.File Path=Mage2db\John\etc\di.xml

<?xml version="1.0"?>
<config xmlns:xsi="http://www.w3.org/2001/XMLSchema-instance" xsi:noNamespaceSchemaLocation="../../../../../lib/internal/Magento/Framework/ObjectManager/etc/config.xsd">
    <type name="Mage2db\John\Logger\Handler">
        <arguments>
            <argument name="filesystem" xsi:type="object">Magento\Framework\Filesystem\Driver\File</argument>
        </arguments>
    </type>
    <type name="Mage2db\John\Logger\Logger">
        <arguments>
            <argument name="name" xsi:type="string">John</argument>
            <argument name="handlers" xsi:type="array">
                <item name="system" xsi:type="object">Mage2db\John\Logger\Handler</item>
            </argument>
        </arguments>
    </type>
</config>

Step [5] – Create Handler.php file under your module Logger directory. Here, Custom Log File path store.

Add below content in this file.

File Path=Mage2db\John\Logger\Handler.php

<?php
namespace Mage2db\John\Logger;
 
use Monolog\Logger;
 
class Handler extends \Magento\Framework\Logger\Handler\Base
{
    protected $loggerType = Logger::INFO;
 
    protected $fileName = '/var/log/mage2db_john_log_file.log';
}

Step [6] – Create Logger.php file under your module Logger directory. Add below content in this file.

File Path=Mage2db\John\Logger\Logger.php

<?php
namespace Mage2db\John\Logger;
 
class Logger extends \Monolog\Logger
{
}

Step [7] – Create Controller Index.php file under your module Controller Index directory, where custom logger costructor defined.

Here we have defined custom message to store Custom Log File.

Add below content in this file.

File Path=Mage2db/John/Controller/Index/Index.php

<?php
namespace Mage2db\John\Controller\Index;

use Magento\Backend\App\Action\Context;
use \Magento\Framework\Controller\ResultFactory;


class Index extends \Magento\Framework\App\Action\Action
{
	
    /**
     * @var \Magento\Framework\App\Cache\TypeListInterface
     */
    protected $_cacheTypeList;

    /**
     * @var \Magento\Framework\App\Cache\StateInterface
     */
    protected $_cacheState;

    /**
     * @var \Magento\Framework\App\Cache\Frontend\Pool
     */
    protected $_cacheFrontendPool;

    /**
     * @var \Magento\Framework\View\Result\PageFactory
     */
    protected $resultPageFactory;
	
    /**
     * Logging instance
     * @var \Mage2db\John\Logger\Logger
     */
    protected $_logger;
	
	
 /**
  * @param Action\Context $context
  * @param \Magento\Framework\App\Cache\TypeListInterface $cacheTypeList
  * @param \Magento\Framework\App\Cache\StateInterface $cacheState
  * @param \Magento\Framework\App\Cache\Frontend\Pool $cacheFrontendPool
  * @param \Magento\Framework\View\Result\PageFactory $resultPageFactory
  **/
    public function __construct(
       \Magento\Framework\App\Action\Context $context,
        \Magento\Framework\App\Cache\TypeListInterface $cacheTypeList,
        \Magento\Framework\App\Cache\StateInterface $cacheState,
        \Magento\Framework\App\Cache\Frontend\Pool $cacheFrontendPool,
        \Magento\Framework\Message\ManagerInterface $messageManager,
        \Magento\Framework\View\Result\PageFactory $resultPageFactory,
	\Mage2db\John\Logger\Logger $logger
		
    ) {
        parent::__construct($context);
        $this->_cacheTypeList = $cacheTypeList;
        $this->_cacheState = $cacheState;
        $this->_cacheFrontendPool = $cacheFrontendPool;
        $this->resultPageFactory = $resultPageFactory;
        $this->_messageManager = $messageManager;
	$this->_logger = $logger;
				
     }
    
    /**
     * Flush cache storage
     *
     */
    public function execute()
    {
		
$this->_logger->info("Mage2db.com created  custom module for Custom Log");
		
$this->resultPage = $this->resultPageFactory->create();  
        return $this->resultPage;
    }
}

Step [8] – Finally your custom Log with custom module has been created

Run the following below commands at your Magento 2 root directory

php bin/magento setup:upgrade
php bin/magento setup:static-content:deploy -f
php bin/magento indexer:reindex
php bin/magento cache:clean
php bin/magento cache:flush

Run below URL

https://mage2db.com/john/index/index

Change https://mage2db.com to your Base URL, Output as below

Custom Log File store path

Magento 2 Root Directory / var / log / mage2db_john_log_file.txt

[2021-12-07 19:59:58] John.INFO: Mage2db.com created  custom module for Custom Log [] []

How To Set Tier Price With Percentage Value Programmatically in Magento 2.x

There are following below steps to create custom module  to add or update tier price in Magento2

Here, we are considering as
Namespace / ModuleName = Mage2db/John

Magento 2 Custom Module

Step [1.1] – Create registration.php file under your module [ Namespace / ModuleName ]

File Path=Mage2db/John/registration.php

Add below content in this file.

<?php
\Magento\Framework\Component\ComponentRegistrar::register(
    \Magento\Framework\Component\ComponentRegistrar::MODULE,
    'Mage2db_John',
    __DIR__
);

Step [1.2] – Create module.xml file under your module [ Namespace / ModuleName ]

File Path=Mage2db/John/etc/module.xml

Add below content in this file.

<?xml version="1.0"?>
<config xmlns:xsi="http://www.w3.org/2001/XMLSchema-instance" xsi:noNamespaceSchemaLocation="urn:magento:framework:Module/etc/module.xsd">
<module name="Mage2db_John" setup_version="1.0.0" />
</config>

Step [2] – Create Index.php file under your module etc directory. Add below content in this file.

File Path=Mage2db/John/Controller/Index/Index.php

Here, we are using below core class to add tier or customer group price

Magento\Catalog\Api\Data\ProductTierPriceInterfaceFactory;
Magento\Catalog\Api\ScopedProductTierPriceManagementInterface;

<?php
namespace Mage2db\John\Controller\Index;

use Magento\Backend\App\Action\Context;
use \Magento\Framework\Controller\ResultFactory;
use Magento\Catalog\Api\Data\ProductTierPriceInterfaceFactory;
use Magento\Catalog\Api\ScopedProductTierPriceManagementInterface;

class Index extends \Magento\Framework\App\Action\Action
{
	
    /**
     * @var \Magento\Framework\App\Cache\TypeListInterface
     */
    protected $_cacheTypeList;

    /**
     * @var \Magento\Framework\App\Cache\StateInterface
     */
    protected $_cacheState;

    /**
     * @var \Magento\Framework\App\Cache\Frontend\Pool
     */
    protected $_cacheFrontendPool;

    /**
     * @var \Magento\Framework\View\Result\PageFactory
     */
    protected $resultPageFactory;
	
	/**
     * @var ScopedProductTierPriceManagementInterface
     */
    private $tierPrice;
 
    /**
     * @var ProductTierPriceInterfaceFactory
     */
    private $productTierPriceFactory;

    /**
     * @param Action\Context $context
     * @param \Magento\Framework\App\Cache\TypeListInterface $cacheTypeList
     * @param \Magento\Framework\App\Cache\StateInterface $cacheState
     * @param \Magento\Framework\App\Cache\Frontend\Pool $cacheFrontendPool
     * @param \Magento\Framework\View\Result\PageFactory $resultPageFactory
     */
    public function __construct(
       \Magento\Framework\App\Action\Context $context,
        \Magento\Framework\App\Cache\TypeListInterface $cacheTypeList,
        \Magento\Framework\App\Cache\StateInterface $cacheState,
        \Magento\Framework\App\Cache\Frontend\Pool $cacheFrontendPool,
        \Magento\Framework\Message\ManagerInterface $messageManager,
        \Magento\Framework\View\Result\PageFactory $resultPageFactory,
		ScopedProductTierPriceManagementInterface $tierPrice,
        ProductTierPriceInterfaceFactory $productTierPriceFactory
    ) {
        parent::__construct($context);
        $this->_cacheTypeList = $cacheTypeList;
        $this->_cacheState = $cacheState;
        $this->_cacheFrontendPool = $cacheFrontendPool;
        $this->resultPageFactory = $resultPageFactory;
        $this->_messageManager = $messageManager;
	$this->tierPrice = $tierPrice;
        $this->productTierPriceFactory =  $productTierPriceFactory;
		
     }
    
    /**
     * Flush cache storage
     *
     */
    public function execute()
    {
	$qty = 2.00;//Quantity must be float value
        $price = 300.00;//Price must be float value
        $customerGroupId = 4; //CustomerGroup ID
        $sku = 'product1021'; //put sku,to add tier price
/*As per your need all above values create dynamically */
        try {
            $tierPriceData = $this->productTierPriceFactory->create();
            $tierPriceData->setCustomerGroupId($customerGroupId)->setQty($qty)->setValue($price);

//Adding Discount Percentage Value
$percentage_value="8.00"; //must be float value
$extensionAttributes = $tierPriceData->getExtensionAttributes();
$extensionAttributes->setPercentageValue($percentage_value);
$tierPriceData->setExtensionAttributes($extensionAttributes);

$tierPrice = $this->tierPrice->add($sku, $tierPriceData);
        } catch (NoSuchEntityException $exception) {
            throw new NoSuchEntityException(__($exception->getMessage()));
        }
		
echo"Tier Price / Customer Group Price, with Quantity, Price, Discount Percentage Value has been updated for SKU=$sku";
exit();
		
  $this->resultPage = $this->resultPageFactory->create();  
        return $this->resultPage;
    }
}

Step [3] – Create routes.xml file under your module etc directory. Add below content in this file.

File Path=Mage2db\John\etc\frontend\routes.xml

<config xmlns:xsi="http://www.w3.org/2001/XMLSchema-instance" xsi:noNamespaceSchemaLocation="../../../../../../lib/internal/Magento/Framework/App/etc/routes.xsd">
   <router id="standard">
       <route id="john" frontName="john">
         <module name="Mage2db_John" />
       </route>
   </router>
</config>

Step [3] – Run URL https://mage2db.com/john/index/index

Change https://mage2db.com to your Base URL.

Finally Tier Price / Customer Group Price, with Quantity, Price, Discount Percentage Value, custom module has been created.

How To Create Events & Observer Using Custom Module in Magento / Adobe Commerce 2.x


How To Create Preference Using Custom Module in Magento / Adobe Commerce 2.x


How To Create Plugin Using Custom Module in Magento / Adobe Commerce 2.x


How To Get Base URL in Magento 2.x / Adobe Commerce 2.x


How To Create Custom Module in Magento 2.x / Adobe Commerce 2.x


How To Add Custom Block on Cart Page in Magento 2.x / Adobe Commerce 2.x


How To Create a Custom Log File in Magento 2.x / Adobe Commerce 2.x


How To Create Custom Controller in Magento 2.x / Adobe Commerce 2.x


How To Create a Custom Console Command in Magento 2.x / Adobe Commerce 2.x


How To Add Customer Groups Dropdown in Magento 2.x Admin Form and Grid By UI Component in Magento 2.x / Adobe Commerce 2.


How To Get all Customers Data in Magento 2.x / Adobe Commerce 2.x


How To Set Tier Price With Percentage Value Programmatically in Magento 2.x / Adobe Commerce 2.x


How To Add Tier Price Programmatically in Magento 2.x / Adobe Commerce 2.x


How To Add Websites Dropdown in Admin Form and Grid By UI Component in Magento 2.x / Adobe Commerce 2.x


Magento 2 All Database Tables [500 & more Tables]


How To Set Multi Shipping Settings In Magento 2


How To Set Origin Shipping in Magento 2


Difference Between Offline Shipping Method and Online Shipping Method


Magento 2 Online Customers Options


How To Apply Customer Group Price of Products in Magento 2


How To Add Customer Groups Dropdown in Magento 2 Admin Form and Grid By UI Component


How To Get all Customers Data in Magento 2


How To Create Customer Order in Magento 2 Admin Panel


Magento 2 Login As Customer Not Enabled


How To Configure Customer Account Sharing Options in Magento 2


Magento 2 Redirect To Customer Dashboard After Login


Which Magento 2 database table store customer shipping and billing address


How To Remove Sales Order Data & Customer Data in Magento 2


Which Magento 2 database table store customer’s Email Data


Which Magento 2 Database Table Store Customer Newsletter Data


Which Magento 2 database table store customer’s shipping and billing address


How To Remove Sales Order Data & Customer Data in Magento 2


Which Magento 2 Database Tables Store Customer Rating


Which Magento 2 Database Tables Store Customer Wishlist Products


Magento 2 Increase Customer Session Time


Which Magento 2 Database Table Store Patches

How To Create Custom Controller in Magento 2.x

There are following below steps need to follow to create custom controller in Magento 2.

We are creating Custom Module for Custom Controller.

Step [1] – Create registration.php file under your module [ Namespace / ModuleName ]

File Path=Mage2db/John/registration.php

Add below content in this file.

<?php
\Magento\Framework\Component\ComponentRegistrar::register(
    \Magento\Framework\Component\ComponentRegistrar::MODULE,
    'Mage2db_John',
    __DIR__
);

Step [2] – Create module.xml file under your module [ Namespace / ModuleName ]

File Path=Mage2db/John/etc/module.xml

Add below content in this file.

<?xml version="1.0"?>
<config xmlns:xsi="http://www.w3.org/2001/XMLSchema-instance" xsi:noNamespaceSchemaLocation="urn:magento:framework:Module/etc/module.xsd">
<module name="Mage2db_John" setup_version="1.0.0" />
</config>

Steps [3] – Create routes.xml file under your module etc directory. Add below content in this file.

File Path=Mage2db\John\etc\frontend\routes.xml

<config xmlns:xsi="http://www.w3.org/2001/XMLSchema-instance" xsi:noNamespaceSchemaLocation="../../../../../../lib/internal/Magento/Framework/App/etc/routes.xsd">
   <router id="standard">
       <route id="john" frontName="john">
         <module name="Mage2db_John" />
       </route>
   </router>
</config>

Step [4] – Create Controller Index.php file under your module Controller Index directory. Add below content in this file.

File Path=Mage2db/John/Controller/Index/Index.php

<?php

namespace  Mage2db\John\Controller\Index;

class Index extends \Magento\Framework\App\Action\Action
{
     public function execute()
     {
         echo 'Hello Mage2DB Magento 2 Learning & Knowledge & Troubleshooting';
         exit();
     }
}

All storefront controllers have to contain a public execute method. It is called when accessing the controller.
The storefront controllers are inherited from \Magento\Framework\App\Action\Action class.

Magento 2 Standard, use of the echo & exit () is totally prohibited here we have used only for Testing Purpose.

Step [5] – Finally your custom controller has been created

Run the following below commands at your Magento 2 root directory


php bin/magento setup:upgrade
php bin/magento setup:static-content:deploy -f
php bin/magento indexer:reindex
php bin/magento cache:clean
php bin/magento cache:flush

Run below URL

https://mage2db.com/john/index/index

Change https://mage2db.com to your Base URL, Output as below

 Hello Mage2DB Magento 2 Learning & Knowledge & Troubleshooting 

How To Create Events & Observer Using Custom Module in Magento / Adobe Commerce 2.x


How To Create Preference Using Custom Module in Magento / Adobe Commerce 2.x


How To Create Plugin Using Custom Module in Magento / Adobe Commerce 2.x


How To Get Base URL in Magento 2.x / Adobe Commerce 2.x


How To Create Custom Module in Magento 2.x / Adobe Commerce 2.x


How To Add Custom Block on Cart Page in Magento 2.x / Adobe Commerce 2.x


How To Create a Custom Log File in Magento 2.x / Adobe Commerce 2.x


How To Create Custom Controller in Magento 2.x / Adobe Commerce 2.x


How To Create a Custom Console Command in Magento 2.x / Adobe Commerce 2.x


How To Add Customer Groups Dropdown in Magento 2.x Admin Form and Grid By UI Component in Magento 2.x / Adobe Commerce 2.


How To Get all Customers Data in Magento 2.x / Adobe Commerce 2.x


How To Set Tier Price With Percentage Value Programmatically in Magento 2.x / Adobe Commerce 2.x


How To Add Tier Price Programmatically in Magento 2.x / Adobe Commerce 2.x


How To Add Websites Dropdown in Admin Form and Grid By UI Component in Magento 2.x / Adobe Commerce 2.x


Magento 2 All Database Tables [500 & more Tables]


How To Set Multi Shipping Settings In Magento 2


How To Set Origin Shipping in Magento 2


Difference Between Offline Shipping Method and Online Shipping Method


Magento 2 Online Customers Options


How To Apply Customer Group Price of Products in Magento 2


How To Add Customer Groups Dropdown in Magento 2 Admin Form and Grid By UI Component


How To Get all Customers Data in Magento 2


How To Create Customer Order in Magento 2 Admin Panel


Magento 2 Login As Customer Not Enabled


How To Configure Customer Account Sharing Options in Magento 2


Magento 2 Redirect To Customer Dashboard After Login


Which Magento 2 database table store customer shipping and billing address


How To Remove Sales Order Data & Customer Data in Magento 2


Which Magento 2 database table store customer’s Email Data


Which Magento 2 Database Table Store Customer Newsletter Data


Which Magento 2 database table store customer’s shipping and billing address


How To Remove Sales Order Data & Customer Data in Magento 2


Which Magento 2 Database Tables Store Customer Rating


Which Magento 2 Database Tables Store Customer Wishlist Products


Magento 2 Increase Customer Session Time


Which Magento 2 Database Table Store Patches

How To Apply Customer Group Price of Products in Magento 2.x

There are following below link define brief explanation “How To Apply Customer Group Price of products in Magento 2

How To Create Events & Observer Using Custom Module in Magento / Adobe Commerce 2.x


How To Create Preference Using Custom Module in Magento / Adobe Commerce 2.x


How To Create Plugin Using Custom Module in Magento / Adobe Commerce 2.x


How To Get Base URL in Magento 2.x / Adobe Commerce 2.x


How To Create Custom Module in Magento 2.x / Adobe Commerce 2.x


How To Add Custom Block on Cart Page in Magento 2.x / Adobe Commerce 2.x


How To Create a Custom Log File in Magento 2.x / Adobe Commerce 2.x


How To Create Custom Controller in Magento 2.x / Adobe Commerce 2.x


How To Create a Custom Console Command in Magento 2.x / Adobe Commerce 2.x


How To Add Customer Groups Dropdown in Magento 2.x Admin Form and Grid By UI Component in Magento 2.x / Adobe Commerce 2.


How To Get all Customers Data in Magento 2.x / Adobe Commerce 2.x


How To Set Tier Price With Percentage Value Programmatically in Magento 2.x / Adobe Commerce 2.x


How To Add Tier Price Programmatically in Magento 2.x / Adobe Commerce 2.x


How To Add Websites Dropdown in Admin Form and Grid By UI Component in Magento 2.x / Adobe Commerce 2.x


Magento 2 All Database Tables [500 & more Tables]


How To Set Multi Shipping Settings In Magento 2


How To Set Origin Shipping in Magento 2


Difference Between Offline Shipping Method and Online Shipping Method


Magento 2 Online Customers Options


How To Apply Customer Group Price of Products in Magento 2


How To Add Customer Groups Dropdown in Magento 2 Admin Form and Grid By UI Component


How To Get all Customers Data in Magento 2


How To Create Customer Order in Magento 2 Admin Panel


Magento 2 Login As Customer Not Enabled


How To Configure Customer Account Sharing Options in Magento 2


Magento 2 Redirect To Customer Dashboard After Login


Which Magento 2 database table store customer shipping and billing address


How To Remove Sales Order Data & Customer Data in Magento 2


Which Magento 2 database table store customer’s Email Data


Which Magento 2 Database Table Store Customer Newsletter Data


Which Magento 2 database table store customer’s shipping and billing address


How To Remove Sales Order Data & Customer Data in Magento 2


Which Magento 2 Database Tables Store Customer Rating


Which Magento 2 Database Tables Store Customer Wishlist Products


Magento 2 Increase Customer Session Time


Which Magento 2 Database Table Store Patches

What is Magento 2.x Tier Price

Tier prices are specific promotional technique to provide different set of discount on products, on the bases of product’s quantity, product’s discount applied.

Magento 2 store owner , apply this promotional technique , while customers are trying to purchase bulk products, normally this promotional technique for B2B business, on the special occasion B2C also apply to atrract more customers & generate more revenue

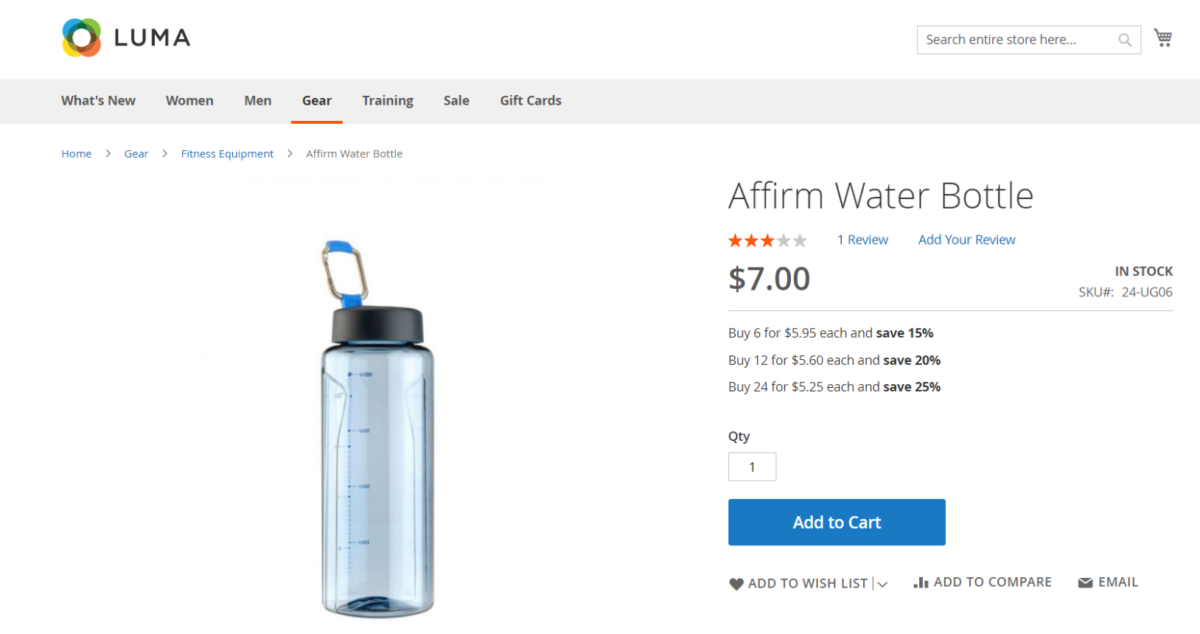
Example :: Here different set of discount applied of product (Affirm Water Bottle) as below

Step[1] – Tier Disocunt – 1

Buy 6 For $5.95 Each and Save 15%

Step[2] – Tier Disocunt – 2

Buy 12 For $5.60 Each and Save 20%

Step[3] – Tier Disocunt – 3

Buy 24 For $5.25 Each and Save 25%

Here three set of discount apply on the bases of quantity.