composer. json file to manage Magento 2 / Extensions installations and upgrades while The composer.lock file stores a set of exact version dependencies that satisfy all of the version constraints of every requirement for every package in the dependency tree of the project.
The composer.lock file is generated after your first composer install. It saves a copy of your dependencies/version that you can commit to your source control
composer.json is the list of required set of libraries and versions for your project.
It contains information such as the name of the project, version constraints for Magento and its dependencies, autoload configurations, scripts to execute during installation and updates, and other project-specific settings.
composer.lock is what set of extensions/modules/components are currently installed for your project. Compoer.lock is a file generated by Composer during dependency resolution and installation, It ensures that all developers working on the same project use the same versions of dependencies
The composer.json is the list of required libraries and versions of your project
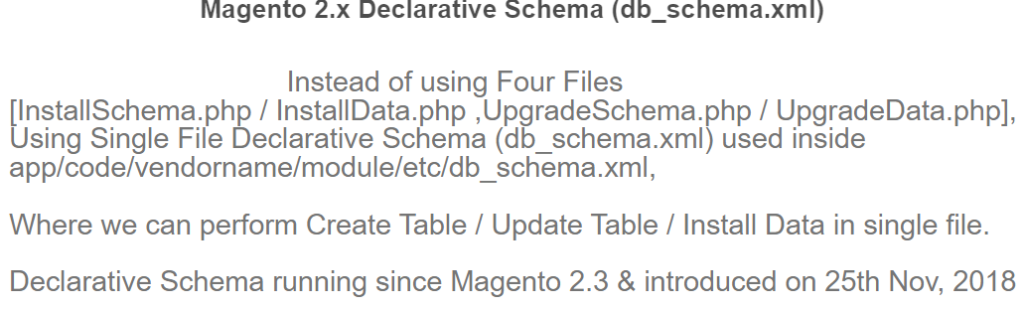
Before Release Magento 2.3 we are using in custom module development, Tables created by InstallSchema & upgraded by UpgradeSchema, similarly InstallData to install data in tables & UpgradeData to upgrade data in tables, this process was time-consuming
Once Release Magento 2.3 [ 25th Nov, 2018 ], introduced new concept of Database Creation is declarative schema
Replacement of [ InstallSchema / InstallData ,UpgradeSchema / UpgradeData] is declarative schema
“Instead of using Four Files [InstallSchema.php / InstallData.php ,UpgradeSchema.php / UpgradeData.php], Using Single File (db_schema.xml) used inside app/code/vendorname/module/etc/db_schema.xml”
There are following below steps need to follow to add Customer Groups drop down in Magento 2 Custom module Admin Entry Form & Grid Listing by using UI Component.
Here we are considering you have already created custom module by using UI Component.
Finally Customers drop down has been added in Magento 2 Admin Grid Entry Form as well as It’s corressponding value displaying in Magento 2 Admin Grid Listing by using UI Component.
CyberSource is a payment gateway. It is used by online payment and fraud management services for medium and large-sized merchants
Cybersource is an E-commerce credit card payment system management company. Customers process online payments, streamline online fraud management, and simplify payment security, It is introduced in Ecommerce market on December, 2016
There are following below steps need to follow to add websites drop down in Magento 2 Custom module Admin Entry Form & Grid Listing by using UI Component.
Here we are considering you have already created custom module by using UI Component.
Finally Website drop down has been added in Magento 2 Admin Grid Entry Form as well as It’s corressponding value displaying in Magento 2 Admin Grid Listing by using UI Component.
There are following below code , to call Store ID in Magento 2 by using Depdependency Injection.
<?php
namespace Mage2db\John\Block;
class Index extends \Magento\Framework\View\Element\Template
{
    protected $_storeManager;

    public function __construct(
        \Magento\Backend\Block\Template\Context $context,
        \Magento\Store\Model\StoreManagerInterface $storeManager,
        array $data = []
    )
    {
        $this->_storeManager = $storeManager;
        parent::__construct($context, $data);
    }

    /**
     * Get store identifier
     *
     * @return  int
     */
    public function getStoreId()
    {
        return $this->_storeManager->getStore()->getId();
    }

    /**
     * Get website identifier
     *
     * @return string|int|null
     */
    public function getWebsiteId()
    {
        return $this->_storeManager->getStore()->getWebsiteId();
    }

    /**
     * Get Store code
     *
     * @return string
     */
    public function getStoreCode()
    {
        return $this->_storeManager->getStore()->getCode();
    }

    /**
     * Get Store name
     *
     * @return string
     */
    public function getStoreName()
    {
        return $this->_storeManager->getStore()->getName();
    }

    /**
     * Get current url for store
     *
     * @param bool|string $fromStore Include/Exclude from_store parameter from URL
     * @return string
     */
    public function getStoreUrl($fromStore = true)
    {
        return $this->_storeManager->getStore()->getCurrentUrl($fromStore);
    }

    /**
     * Check if store is active
     *
     * @return boolean
     */
    public function isStoreActive()
    {
        return $this->_storeManager->getStore()->isActive();
    }
}
?>
echo"<BR> Store ID=".$block->getStoreId();
echo"<BR> Store Code=".$block->getStoreCode();
echo"<BR> Store Website ID=".$block->getWebsiteId();
echo"<BR> Store Name=".$block->getStoreName();
echo"<BR> Store URL=".$block->getStoreUrl();
echo"<BR> Store Active Yes / No=". $block->isStoreActive();
REST API (also known as RESTful API) is an application programming interface (API or web API) that conforms to the constraints of REST architectural style and allows for interaction with RESTful web services.
A Web API (or Web Service) conforming to the REST architectural style is a REST API
Magento 2 REST API identifies multiple functions which can be used to perform requests and receive responses
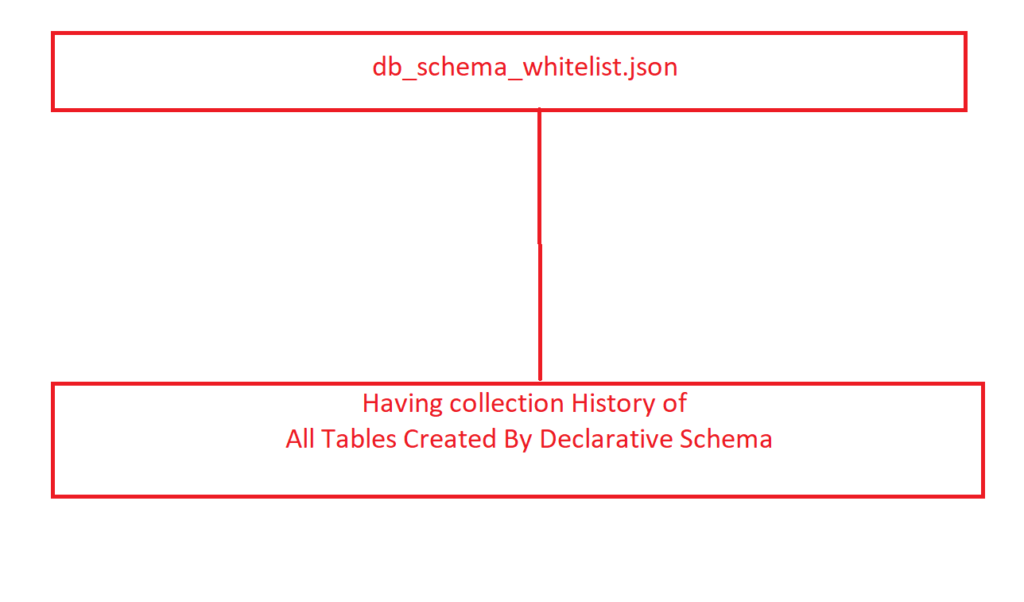
db_schema_whitelist.json file having history of all tables, columns, primary keys, foreign key, constraint keys combination etc, those are created by using the declarative schema.
There are two ways to generate db_schema_whitelist.json by following below methods
Step [1] – Manually To Create db_schema_whitelist.json
fint fromDefinition() method and then add debug code to find column name as below , we have addedd (debugging) code inside
/* Starts Add Code for Debug */ and /* Code End for Debug */
To find column name
public function fromDefinition(array $data)
    {
        $type = $data['type'];
        if (!isset($this->definitionProcessors[$type])) {

            /* Starts Add Code for Debug */

            echo "<pre>";
            print_r($data); exit();

            /* Code End for Debug  */

            throw new \InvalidArgumentException(
                sprintf("Cannot process definition to array for type %s", $type)
            );
        }

        $definitionProcessor = $this->definitionProcessors[$type];
        return $definitionProcessor->fromDefinition($data);
    }
Step [2] – Runsetup:upgrade command and you will get an array of column data in the console. so from this array, you will get the name of the column from your third party extension table.
Now from that table please change column’s data type “tinytext” to “text”
Module is backbone of Magento 2, Module having collection of Controllers, Models, Blocks, Helpers, Layouts, Templates, Plugins, Observer etc. These ineract with each other as well as ineract with Magento 2 exisiting functionalities in order to add a specific feature to a Magento 2 application.
There are following below steps need to follow to create Magento 2 custom module.
Step [1] – Nominate Module Name :: Syntax as below
Namespace_Modulename or Vendorname_Modulename
Namespace(Vendorname) always must be unique.
Step [2] – Create a new directory for the custom module
Syntax as below
Namespace / ModuleName or Vendorname / ModuleName
Step [3] – Create a module’s registration file :: This file name is registration.php & used to registered module.
Step [4] – Create a module’s naming configuration file :: This file name is module.xml & used to define module name ( Namespace_Modulename ) as well as store module into database table setup_module