
Month: January 2022
Which Magento 2 Database Table Store Amazon Data

The following below set of Magento 2 Database tables store Amazon data.
- amazon_customer
- amazon_pending_authorization
- amazon_pending_capture
- amazon_pending_refund
- amazon_quote
- amazon_sales_order
Magento 2 Inventory
How To Set Country & State & Locale in Magento 2
The Following below admin setting required to add Store Information in Magento 2 Store.
Step [1] – Go STORES > Configuration, redirects Configuration section.
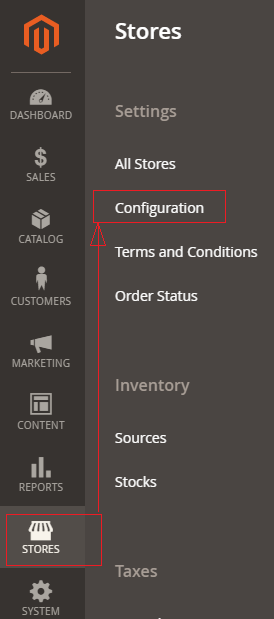
Step [2] – Left panel, choose GENERAL > General, redirects right Panel section
Country Options Section:
Once click on Country Options of Right Panel section, each field explained as below
- Default Country: Select default country as per your Business Store need.
- Allow Countries: Select countries, where you want to sell
- Zip/Postal Code: Select zip or postal code as per your Business Store need.
- European Union Countries: Select European Union countries, if you want to sell in European Union countries
- Top Destinations: Select Top Destinations countries as per your Business Store need.
State Options Section:
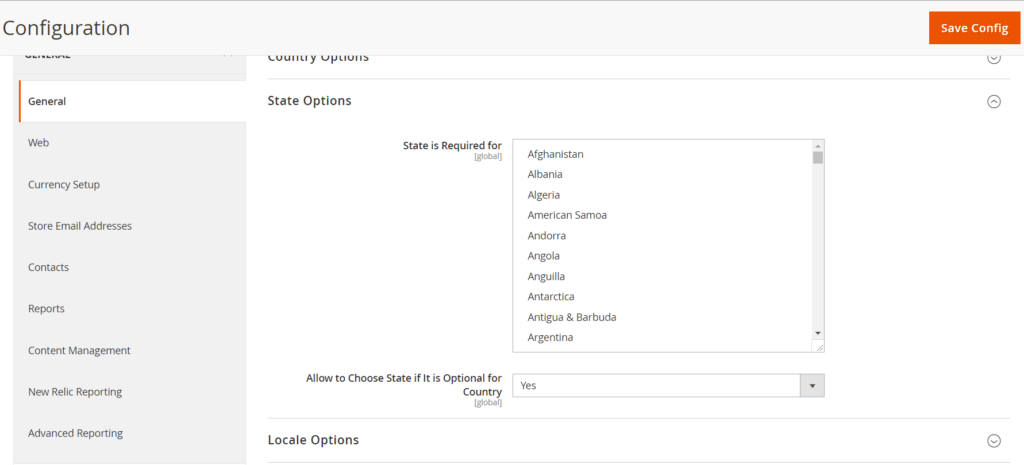
Once click on State Options of Right Panel section, each field explained as below
- State is Required for: Select state as per your Business Store need.
- Allow to Choose State if It is Optional for Country: Select state from optional country as per your Business Store need.
Locale Options:

Once click on Locale Options of Right Panel section, each field explained as below
- Timezone: Select Timezone as per your Business Store need.
- Locale: Select Locale as per your Business Store need.
- Weight Unit: Select Weight Unit as per your Business Store need.
- First Day of Week: Select First Day of Week as per your Business Store need.
- Weekend Days: Select Weekend Days as per your Business Store need.
How To Configure Store Information in Magento 2

The Following below admin setting required to add Store Information in Magento 2 Store.
Step [1] – Go STORES > Configuration, redirects Configuration section.
Step [2] – Left panel, choose GENERAL > General , redirects right Panel section
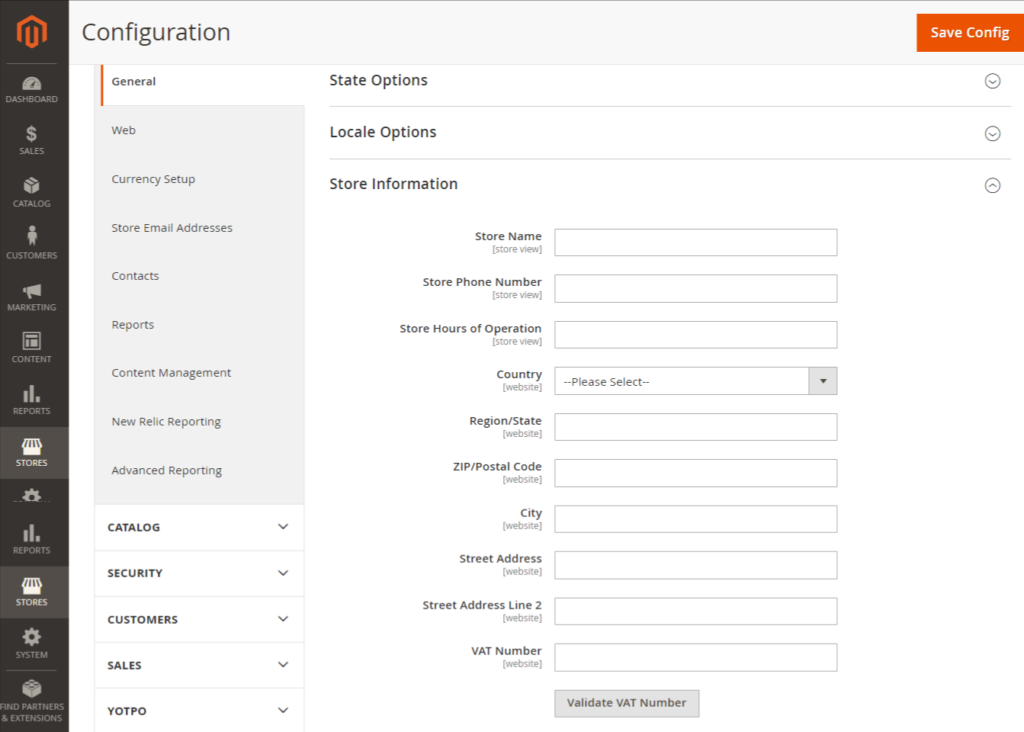
Once click on Store Information of Right Panel section, each field explained as below
- Store Name: Enter the name of your Business store
- Store Phone Number: Enter the phone number of your Business store
- Store Hours of Operation: Enter the working Hours of your Business store. For example, as Mon-Sat, 9 AM – 5 PM EST.
- Country: Select the country of your Business store location
- State: Select the state or region of your Business store location
- ZIP/Postal Code: Enter the zip or postal code of the city of your Business store location
- City: Enter the city of your Business store location
- Street Address: Enter the street address of your Business store location
- Street Address Line 2: Use this field if the address is too long
- VAT Number: Enter the VAT number of your Business store
Step [3] – Click on Save Config button & run CLI command Flush
How To Configure Quote Lifetime in Magento 2

The Following below admin setting required to add Quote Lifetime setting in Magento 2 Store.
Step [1] – Go STORES > Configuration, redirects Configuration section.
Step [2] – Go Sales > Checkout, redirects to right panel Shopping Cart section.
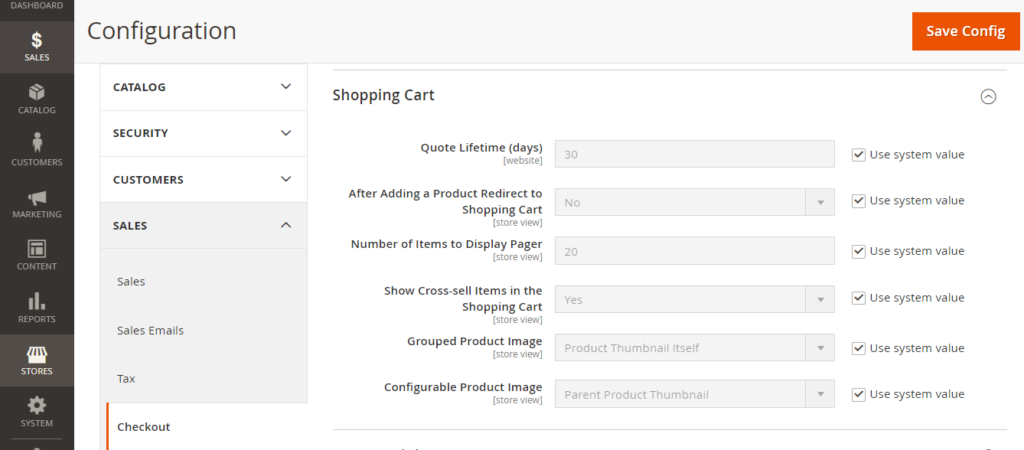
Each field of Shopping Cart section explained as below
- Quote lifetime (days): By default Quote Lifetime is 30 Days, as your business need, to modify it.
- After Adding a Product Redirect to Shopping Cart: Once customers add product to the cart & directly redirect to shopping cart page, need to enable After Adding a Product Redirect to Shopping Cart, by default No
- Number of items to display Pager: By default 20-page paging, as per your business, need to modify it.
- Show Cross sell items in the Shopping Cart: Cross-sell items displaying in the Shopping Cart page, by this option enable, as per your business need to modify it.
- Group Product image: Thumbnail for Groups products images can be set to display the image from either the “parent” product or the product variation.
- Configurable Product image: Thumbnail for Configurable products images can be set to display the image from either the “parent” product or the product variation.
Step [3] – Click on Save Config button & run CLI command Flush
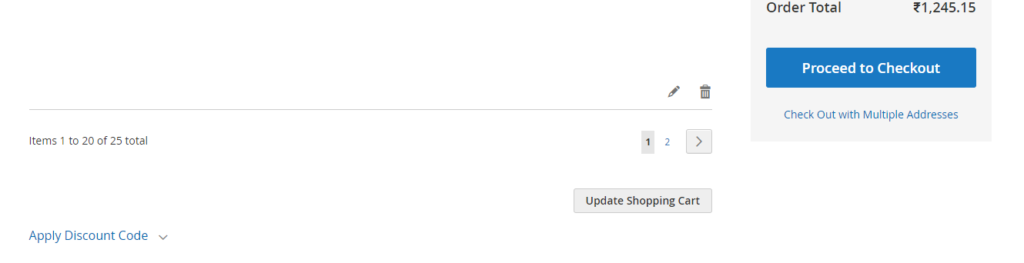
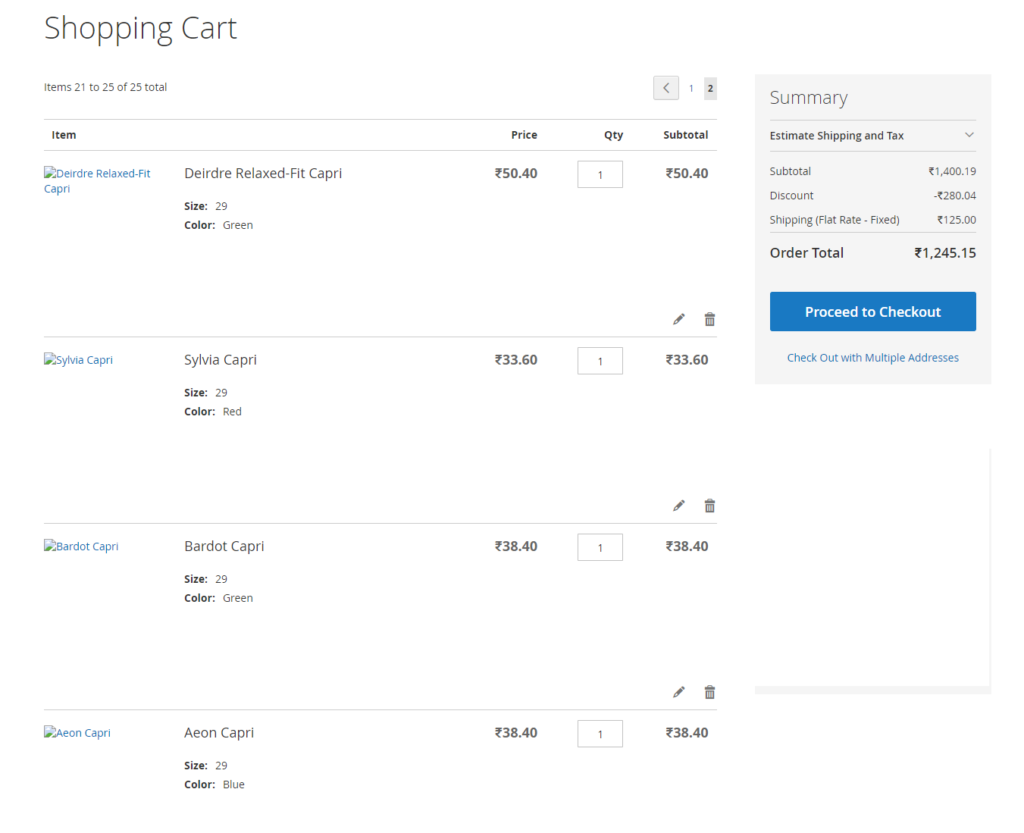
For Example::
I have added 25 Products in Shopping Cart & Cart Detail page display 20 Items at time First Page Paging & remaining 5 products at time Second Page Paging , because Number of items to display Pager =20

Above display all 20 [Items 1 to 20 of 25 total] Products out of 25, remaining 5 products would be display once click on Paging -2 [Items 21 to 25 of 25 total]
How To Configure Checkout Options in Magento 2
The Following below admin setting required to configure Checkout Options setting in Magento 2 Store.
Step [1] – Go STORES > Configuration, redirects Configuration section.
Step [2] – Go Sales > Checkout, redirects to right panel Checkout Options section.
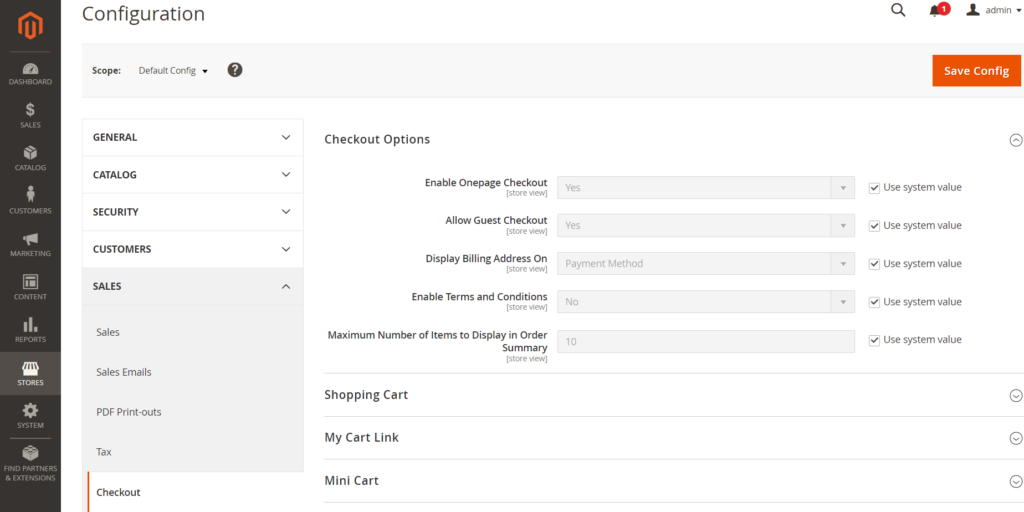
Each field of Checkout Options section explained as below
- Enable Onepage Checkout: Allow OnePage Checkout on checkout page, by default one page checkout selected.
- Allow Guest Checkout: Allow Guest User Checkout on checkout page, Guest user do not need to login to shop
- Display Billing Address On: Allow to display Billing Address either on Payment Method or Payment Page, by default Payment Method selected.

- Enable Terms and Conditions: Allow to enable Terms and Conditions on Payment Page, by default Terms and Conditions disabled.
- Maximum Number of Items to Display in Order Summary: Allow how many number of products display in Order Summary of Checkout Page
How To Configure The Mini Cart in Magento 2

The Following below admin setting required to configure Mini Cart section in Magento 2
Step [1] – Go STORES > Configuration, redirects Configuration section.
Step [2] – Go Sales > Checkout, redirects to right panel Mini Cart section.
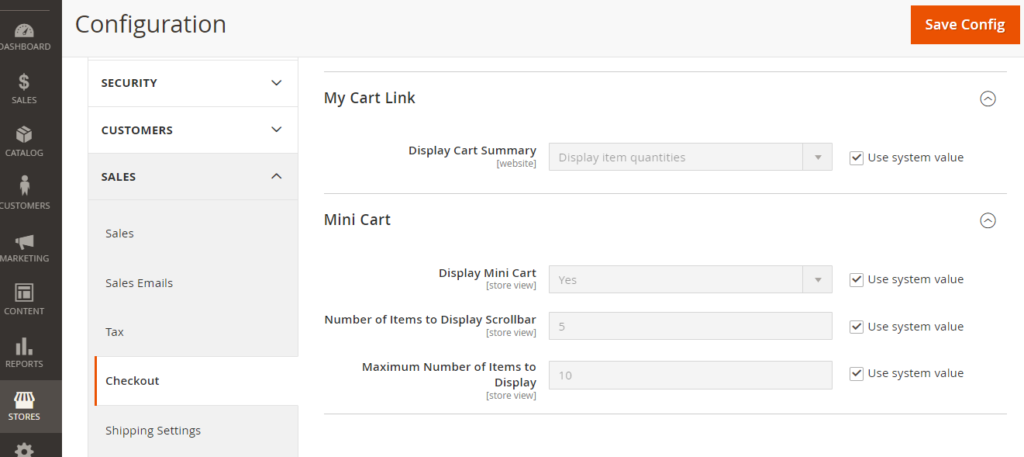
Each field of Mini Cart section explained as below
- Display Mini Cart: Represents Mini Cart at top right corner, by default enabled.
- Number of items to Display Scrollbar: Represents, how many number of products displayed while customer scrolling Mini Cart at top right corner by default number of products 5
- Maximum Number of Items to Display: Represents maximum number of products in Mini Cart, by default number of products 10
Step [3] – Click on Save Config button & run CLI command Flush
For Example::
I have added 25 Products in Shopping Cart, it display 10 Items in Mini Cart once scroll, because Maximum Number of Items to Display =10
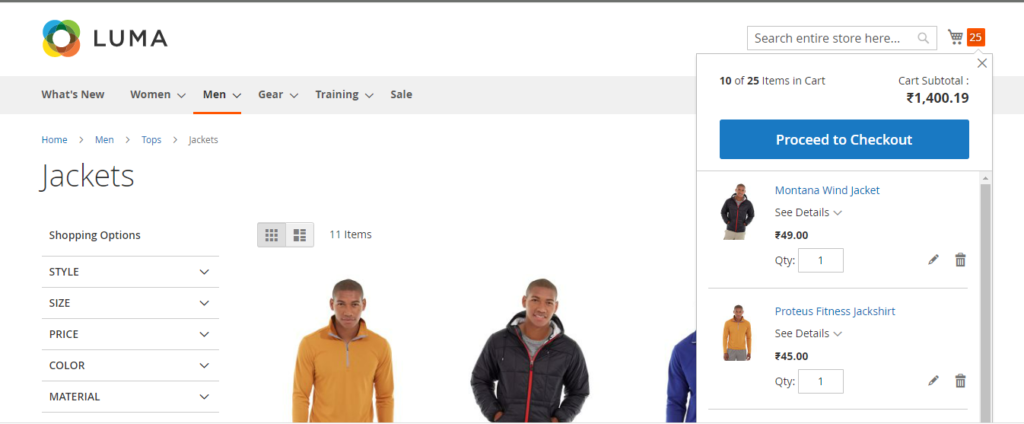
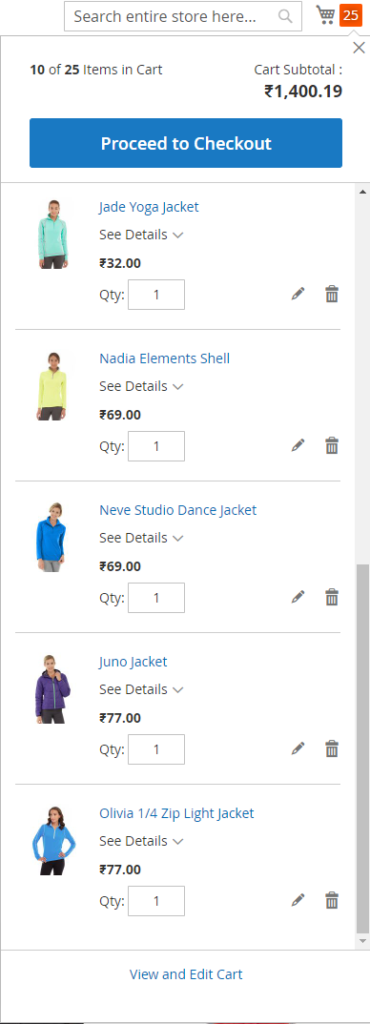
Once click on View and Edit Cart Link
How To Configure Payment Failed Email In Magento 2

The Following below admin setting required to configure Payment Failed Email in Magento 2
Step [1] – Go STORES > Configuration, redirects Configuration section.
Step [2] – Go Sales > Checkout, redirects to right panel Payment Failed Emails section.
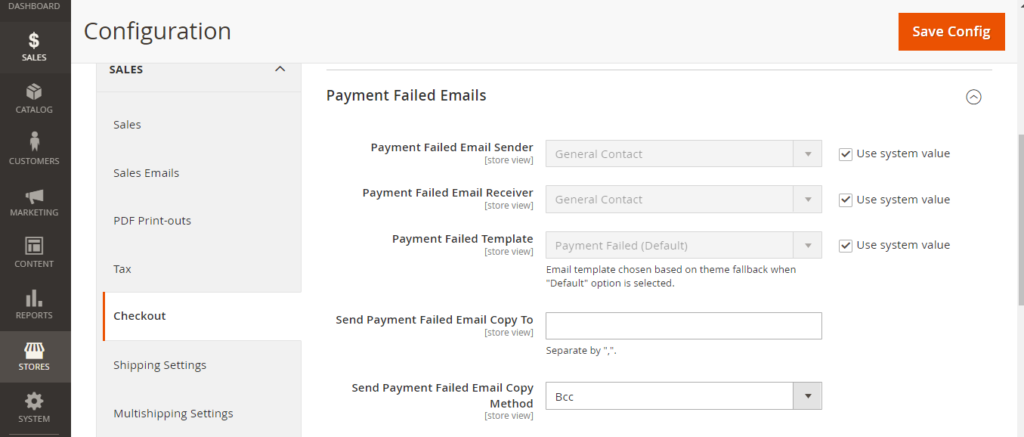
Each field of Payment Failed Emails section explained as below
- Payment Failed Email Sender: Represents Sender’s email, Once click drop down menu multiple contact displayed, choose any of them as per your Business need, by default General Contact selected
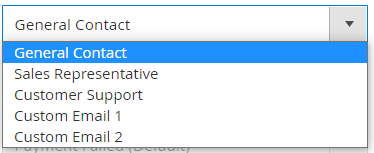
- Payment Failed Email Receiver: Represents Receiver’s email, Once click drop down menu multiple contact displayed, choose any of them as per your Business need, by default General Contact selected

- Payment Failed Template: Represents payment failed email template, choose any email template as per your Business need, by default Payment Failed Template selected
- Send Payment Failed Email Copy: Enter multiple payment email, each email separated with each other by comma (,)
- Send Payment Failed Email Copy Method: Method: Select either BCC or Separate Email
Step [3] – Click on Save Config button & run CLI command Flush