The following things ( Organization, Space, Content Model, Content Type ) below defined briefly
Organization:: An Organization is the first-level entity in Contentful and is typically associated with a company, team, or business
Example:If your business is a large corporation, the organization would represent the entire company, and you could have separate spaces for different departments or projects.
Space:: A Space is a self-contained area within an organization where content is created, managed, and published
Organization -> Space
Example:You might have one space for a corporate website, another for a mobile app, and a third for a product blog. Each of these spaces would have its own content and settings but belong to the same organization.
Content Model:: A Content Model defines the structure of content within a space. It outlines how content types are connected and what fields they contain, It consists of different content types, each representing a specific kind of content, and the fields
Organization -> Space ->Content Model
Example: In a content model for a blog, you might define content types for “Blog Post,” “Author,” and “Category,” with specific fields (such as title, body text, image, etc.) for each content type.
Content Type:: Content types are components of the content model and define which data type can be entered. It defines the fields and structure of a specific type of content
Organization -> Space ->Content Model -> Content Type
Example: For a blog site, you might have the following content types:
Blog Post:Fields could include title, body, author, publish date, and featured image. Author:Fields could include name, bio, and profile picture. Category:Fields could include category name and description.
How Organization, Space, Content Model, Content Type Interrelated
Organization contains Spaces, and within each space, you define your Content Models.
A Content Model is made up of multiple Content Types.
Each Content Type defines the structure for individual content entries (like a blog post, author, or product).
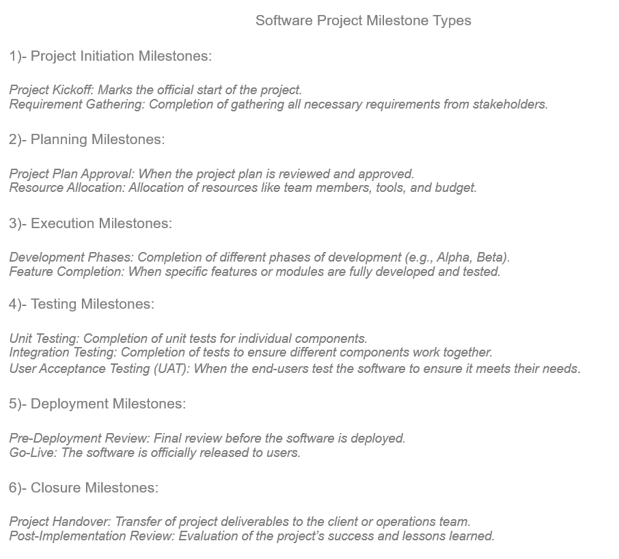
What Are Milestones in Software Projects? Milestones in software projects are significant points or events in the project timeline that mark the completion of major phases, deliverables, or decision points. They are used to track progress, assess project health, and provide checkpoints for stakeholders to evaluate whether the project is on track. Milestones are not tasks or activities themselves, but rather indicators that a set of related tasks has been completed.
Characteristics of Milestones: Significant Events: Represent critical points in the project, such as the completion of a key deliverable, the start or end of a phase, or a major decision point. Non-Duration: Unlike tasks, milestones do not have a duration; they simply mark the completion of an event. Measurable: Milestones are often tied to specific, measurable outcomes (e.g., “Prototype completed” or “Beta version released”). Critical for Stakeholder Communication: Serve as communication points with stakeholders to review progress and make decisions.
Common Examples of Milestones in Software Projects:
Project Kickoff: The official start of the project.
ProjectRequirements Completed: All project requirements have been gathered and approved.
Project Plan &Design Approval: Completion and approval of the software design.
Project Resource Allocation: Allocation of resources like team members, tools, and budget.
Project Development Milestones: Completion of major development phases (e.g., “Module A completed,” “Feature X implemented”).
Testing Phase Start/End: Beginning or completion of the testing phase, including unit testing, integration testing, and user acceptance testing (UAT).
Unit Testing: Completion of unit tests for individual components. Integration Testing: Completion of tests to ensure different components work together. User Acceptance Testing (UAT): When the end-users test the software to ensure it meets their needs.
Beta Release: The release of a beta version of the software for external testing or limited customer use.
Go-Live: The official launch of the software.
Project Closure: The formal conclusion of the project, including final documentation and retrospective. How to Set Milestones in Software Projects
Define Project Scope and Objectives: Start by clearly understanding the project’s goals, deliverables, and overall scope. Milestones should align with these objectives and represent critical achievements necessary to complete the project.
Break Down the Project into Phases: Divide the project into logical phases or stages (e.g., planning, design, development, testing, deployment). Identify key deliverables or outputs for each phase.
Identify Key Deliverables: For each phase, identify the major deliverables that must be completed. These deliverables often serve as natural milestones.
Set Milestones for Critical Decision Points: Identify points in the project where significant decisions must be made (e.g., design approval, go/no-go decision). Set milestones at these decision points.
Consult with Stakeholders: Engage with stakeholders (e.g., project sponsors, team members, clients) to ensure that the milestones reflect their expectations and are aligned with business objectives.
Ensure Milestones Are SMART:
Specific: Clearly define what the milestone represents. Measurable: Ensure that you can objectively verify when the milestone has been achieved. Achievable: Set realistic milestones that the team can reach. Relevant: Milestones should be directly related to the project’s goals. Time-bound: Assign a target date for each milestone.
Integrate Milestones into the Project Plan: Incorporate the milestones into the project timeline using project management tools like Gantt charts, which visually represent when each milestone is expected to occur.
Communicate Milestones to the Team: Ensure that the project team understands the significance of each milestone and what is required to achieve it.
Monitor and Adjust Milestones as Needed: Regularly track progress against milestones during project reviews. If project conditions change, adjust milestones accordingly to keep the project on track.
Celebrate Milestone Achievements: Recognize and celebrate when milestones are reached. This boosts team morale and provides a sense of accomplishment.
Tools for Tracking Milestones: Gantt Charts: Visualize project timelines and milestones.
Project Management Software: Tools like Jira, Trello, Asana, or Microsoft Project allow you to set, track, and update milestones.
Calendar Integration: Sync milestones with calendar tools to remind the team of upcoming key dates.
Importance of Milestones: Progress Tracking: Helps in assessing whether the project is on schedule. Risk Management: Early identification of delays or issues if milestones are not met. Stakeholder Communication: Provides clear points to report progress to stakeholders. Team Motivation: Milestones can serve as motivational goals for the project team.
Setting and tracking milestones effectively ensures that a software project remains aligned with its goals and timelines, helping to manage risk and maintain stakeholder confidence.
The following below between Microservices Architecture & Monolithic Architecture of Software
Topic
Monolithic Architecture
Microservices Architecture
Services
Monolithic architecture involves typical applications deployed as tightly coupled services
Microservices architecture involves Complex big applications deployed independently as loosely coupled services
Complexity
Simpler in the early stages but can become highly complex and unwieldy as the application grows, all developers responsible for single code base, if any modification required, entire application need to be deployed.
Designed for complex big project & distributed into multiple smaller application to do ease of coding & independently deployment(each single or smaller application).
Use Cases
Best suited for small to medium-sized applications with relatively simple business logic. It is for startups and projects in early stages where speed of development is critical, and the team is small.
Best suited for large, complex applications that require high scalability, frequent updates, and a distributed team structure. Commonly used by large enterprises and companies with complex business needs, like Amazon, Netflix, and Uber.
Testing
Testing can be more straightforward since everything is in one place. However, as the application grows, the complexity of testing increases, particularly with integration and end-to-end tests.
Testing is more complex as each service must be tested independently, as well as in integration with other services. Tools and strategies like contract testing, consumer-driven contracts, and test automation are often required.
Performance
Performance can be optimized more easily within a monolithic architecture because there’s no need for network communication between components.
Performance can be optimized more easily within a microservices architecture, the advantage of scaling individual components, the need for network communication between services can introduce latency and overhead. Optimizing performance requires careful design to manage inter-service communication efficiently.
Maintenance and Updates
Maintenance can become more challenging as the application grows. Updates, especially those involving major changes, can be risky because they affect the entire system
Maintenance is generally easier since individual services can be updated, replaced, or rewritten without affecting the entire system. However, maintaining multiple services can also introduce its own complexity, especially in managing service dependencies.
Fault Isolation
A failure in one part of the application can potentially bring down the entire system.
Since everything is interconnected, debugging and resolving issues can be more complex and riskier.
Failures are often isolated to individual services, minimizing the impact on the entire system.
For example, if the payment service fails, it doesn’t necessarily bring down the order management service.
1. What is Magento 2 and how does it differ from Magento 1?
Answer: Magento 2 is the latest version of the Magento eCommerce platform, offering improved performance, scalability, and new features compared to Magento 1. Key differences include:
Architecture: Magento 2 has a more modular codebase with a modern tech stack.
Performance: Improved indexing, caching, and optimized checkout process.
User Experience: Responsive design and better admin interface.
Database: Supports multiple databases for different functions (e.g., checkout, orders, and product data).
Extensions: Simplified integration with third-party extensions and APIs.
2. Can you explain the Magento 2 architecture?
Answer: Magento 2 architecture is based on a modular system, separating code into individual modules. The architecture includes:
Presentation Layer: Contains blocks, layouts, and templates.
Service Layer: Provides a set of interfaces and service contracts.
Domain Layer: Business logic, typically found in models.
Data Layer: Database access, repository pattern, and entities.
Integration Layer: APIs, web services, and external system integrations.
Dependency Injection (DI): Magento 2 uses DI to manage class dependencies, improving testability and flexibility.
Event-Observer and Plugins: Allows customization and extension of core functionalities.
3. What is Dependency Injection in Magento 2? How does it work?
Answer: Dependency Injection (DI) is a design pattern used in Magento 2 to manage object dependencies. It allows objects to be passed to other objects through constructors or setters, rather than creating instances directly. This increases flexibility and makes the system more testable.
How it works: Magento 2 uses an XML-based configuration to declare dependencies. The DI framework automatically injects the required dependencies when an object is instantiated.
4. How do you manage caching in Magento 2?
Answer: Magento 2 uses several types of caching to improve performance, including:
Configuration Cache: Caches system configuration.
Page Cache: Caches full page content (supports Varnish).
Block Cache: Caches individual blocks.
Collection Cache: Caches database queries.
Session Cache: Stores session data.
Caches can be managed through the Magento Admin Panel under “System > Cache Management” or via the CLI using bin/magento cache:enable/disable/clean/flush commands.
5. Explain the concept of Service Contracts in Magento 2.
Answer: Service Contracts are a set of PHP interfaces used to define the APIs (Application Programming Interfaces) of the business logic in Magento 2. They provide a stable API, ensuring backward compatibility and are designed to be used by modules, web services, or third-party developers.
Key Components:
Data Interfaces: Define the structure of the data (e.g., CustomerInterface, OrderInterface).
Service Interfaces: Define operations related to the business logic (e.g., CustomerRepositoryInterface, ProductRepositoryInterface).
6. What is the purpose of Composer in Magento 2?
Answer: Composer is a dependency manager used in Magento 2 to manage PHP libraries, modules, and dependencies. It helps in:
Dependency Management: Automatically installs and updates packages and libraries that Magento or its modules depend on.
Autoloading: Composer provides autoloading for classes, reducing the need to manually include files.
Version Control: Manages version control of dependencies, ensuring compatibility between modules and core Magento functionality.
7. How do you approach customization in Magento 2?
Answer: Customization in Magento 2 should follow best practices to ensure maintainability and upgradability:
Using Plugins: Allows you to modify the behavior of public methods in a class without overriding the entire class.
Observers: Listen to events and execute code when the event is triggered.
Overrides: Use carefully to avoid conflicts, usually by creating custom modules rather than directly modifying core files.
Layouts and Templates: Customizing the presentation layer using XML layout files and PHTML templates.
Service Contracts: Prefer using service contracts for business logic changes to maintain a stable API.
8. What are Magento 2 modules and how do you create one?
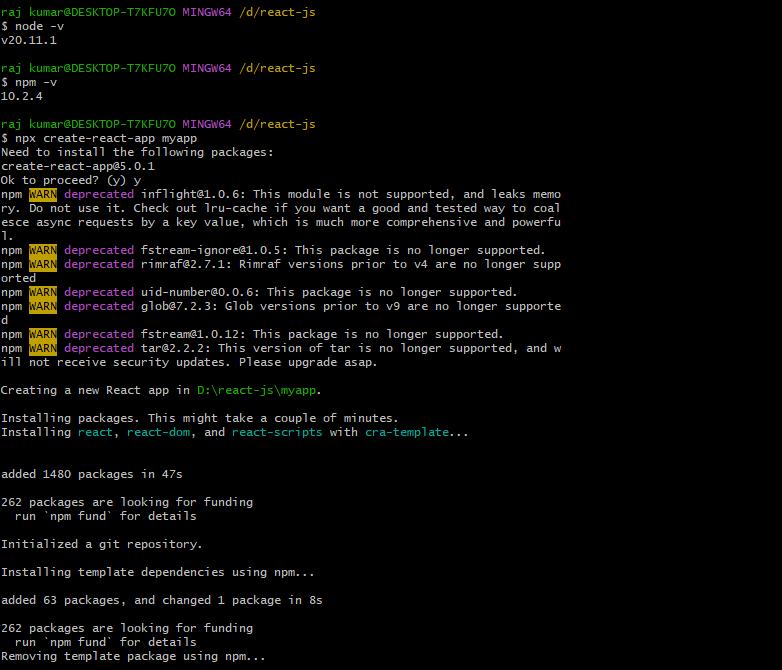
Answer: Magento 2 modules are the building blocks of a Magento application. They contain the code needed to add features or functionality. To create a module:
1. Create the module directory structure:
app/code/VendorName/ModuleName
2. Create the module’s registration.php file to register the module with Magento.
3. Create the module.xml file in etc folder to define module details.
4. Configure composer.json to manage dependencies.
5. Define necessary configurations in etc (e.g., routes, events, di.xml).
6. Run bin/magento setup:upgrade to install the module.
9. How do you manage security in a Magento 2 application?
Answer: Security in Magento 2 can be managed through:
Applying Patches: Regularly apply security patches provided by Magento.
Two-Factor Authentication (2FA): Enable 2FA for the admin panel.
Secure Admin URLs: Change the default admin URL and limit access by IP.
Use HTTPS: Enforce HTTPS for all frontend and backend operations.
Role-Based Access Control: Create specific user roles and permissions to limit access to sensitive areas.
Data Sanitization: Always sanitize user input and use Magento’s built-in methods to avoid SQL injection, XSS, and other attacks.
10. Explain the role of Magento 2 CLI.
Answer: Magento 2 Command Line Interface (CLI) provides a set of commands to perform various tasks, including:
Setup and Configuration: bin/magento setup:install, bin/magento config:set.
11. What is Varnish and how is it used in Magento 2?
Answer: Varnish is a web application accelerator (cache) used to improve website performance by caching content and serving it directly from memory. In Magento 2:
Full Page Cache (FPC): Varnish can be used as the FPC, reducing the load on the web server and speeding up page delivery.
Configuration: Varnish can be configured in Magento 2 under Stores > Configuration > Advanced > System > Full Page Cache.
Integration: Magento 2 provides VCL (Varnish Configuration Language) files to integrate Varnish, which can be customized according to the environment.
12. How do you optimize performance in Magento 2?
Answer: Optimizing performance in Magento 2 involves:
Caching: Use Varnish for FPC, enable Redis for session and cache storage.
Indexing: Set indexers to “Update on Schedule” for better performance.
Optimization Tools: Use tools like Minify HTML/CSS/JS and merge CSS/JS files.
CDN: Use a Content Delivery Network to deliver content faster to users.
Database Optimization: Regularly clean logs, optimize database tables, and use proper indexes.
Image Optimization: Compress images and use responsive images to reduce load time.
Server Configuration: Ensure proper server resources (CPU, memory), PHP version (7.4+), and enable OPcache.
13. What is the Magento 2 Layout XML and how does it work?
Answer: Layout XML in Magento 2 is used to define the structure and content of a page. It controls which blocks are displayed, in what order, and where.
Key Elements:
<block>: Defines a block of content.
<container>: Defines a container that can hold blocks.
<referenceBlock> and <referenceContainer>: Modify existing blocks/containers.
<remove>: Removes blocks or containers.
Usage: Layout XML is defined in module or theme specific XML files, such as default.xml, catalog_product_view.xml, etc.
14. How do you handle multi-store functionality in Magento 2?
Answer: Magento 2’s multi-store functionality allows you to manage multiple websites, stores, and store views from a single Magento installation.
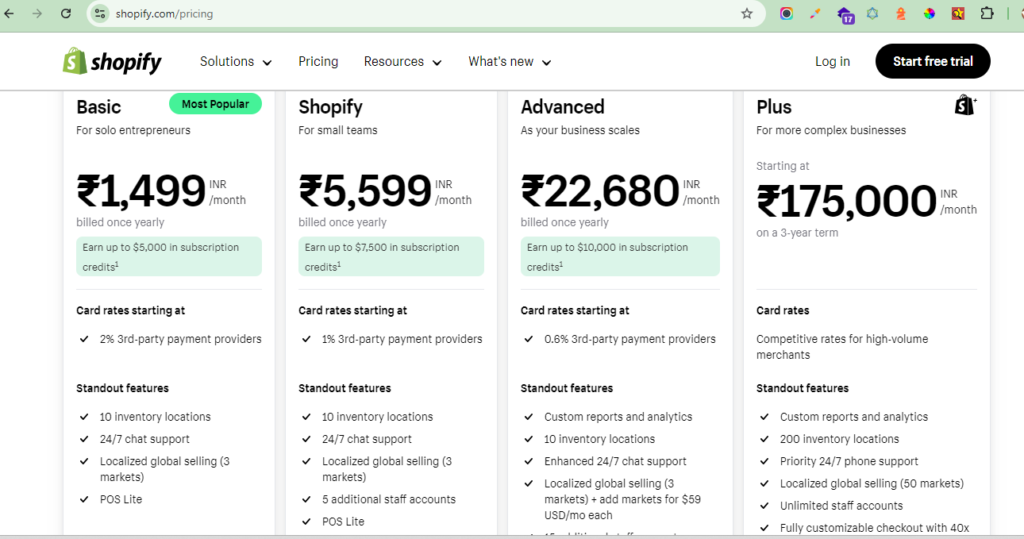
The following below list of difference between Shopify and Shopify Plus?
S.No.
Topic
Shopify
Shopify Plus
1
Target Audience
Ideal for small to medium-sized businesses or entrepreneurs who need a robust platform to build and manage an online store.
Designed for large enterprises or businesses experiencing rapid growth, requiring more advanced features, scalability, and customization.
2
Pricing
Pricing plans range from around $39 to $399 per month, depending on the features and support needed.
Pricing starts at around $2,000 per month, but it can vary based on specific business needs, customization, and transaction volume.
3
Features
Shopify: [a] -Standard features for setting up an online store. [b] -Basic customization options. [c] -Standard checkout experience. [d] -Access to the Shopify App Store for additional functionalities. [d] -Basic reporting and analytics
Shopify Plus: [a] -Advanced customization options, including access to the underlying code and APIs for deeper integration. [b] -Exclusive features like Shopify Scripts, which allow custom discount logic and checkout experiences. Shopify Flow for automating tasks and workflows. [c] -Dedicated IP address and SSL certificate. Unlimited staff accounts. [d] -Enhanced reporting and analytics tools. Priority support and a dedicated account manager. [e] -Multi-currency and internationalization options for global selling. [f]- Enhanced scalability to handle high volumes of traffic and transactions.
4
Support
Access to 24/7 customer support via chat, email, and phone.
Priority support with a dedicated Merchant Success Manager, who provides strategic advice, custom solutions, and support.
5
Scalability
Suitable for growing businesses, but with limitations as businesses reach a certain size or complexity.
Built for large-scale operations, capable of handling high traffic and transaction volumes, and offering the ability to expand into new markets quickly.
6
Customization and Integration
Customization is possible but more limited compared to Shopify Plus. Most users rely on pre-built themes and apps.
Offers deeper customization through access to the Shopify Plus Partner Program, which includes agencies and developers specialized in creating custom solutions. It also provides more advanced API access for integrations.
7
Checkout Process
Standard checkout process with some limitations on customization.
Fully customizable checkout, allowing businesses to create a unique and branded checkout experience.
8
App Integrations
Access to the Shopify App Store, but some enterprise-level apps may not be available or fully supported.
Access to advanced apps and integrations, including some that are exclusive to Shopify Plus users.
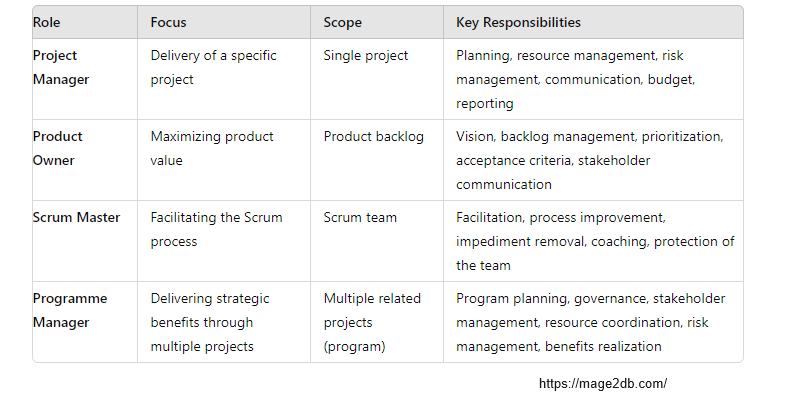
What is Role of Project Manager: The Project Manager is responsible for planning, executing, and closing projects. They ensure that the project is delivered on time, within scope, and within budget.
Responsibilities of Project Manager:
—
Project Planning: Define project scope, goals, deliverables, and timelines.
Resource Management: Allocate resources, manage the project team, and ensure the availability of necessary resources.
Risk Management: Identify potential risks, develop mitigation strategies, and monitor risks throughout the project lifecycle.
Communication: Serve as the main point of contact between stakeholders, ensuring clear and effective communication.
Budget Management: Manage the project budget, track expenses, and ensure the project stays within financial constraints.
Quality Assurance: Ensure the project deliverables meet the required quality standards.
Stakeholder Management: Engage with stakeholders to gather requirements, manage expectations, and provide updates on project progress.
Reporting: Monitor project progress and report on performance, including schedule, budget, and risks.
2. Product Owner:
Role of Product Owner: In Scrum, the Product Owner is responsible for maximizing the value of the product by managing the product backlog and ensuring that the team is working on the most valuable tasks.
Responsibilities of Product Owner:
Product Vision: Define and communicate the product vision and goals to the development team.
Product Backlog Management: Create, prioritize, and maintain the product backlog, ensuring that it is visible, transparent, and clear to all stakeholders.
Requirement Gathering: Work closely with stakeholders to gather requirements and translate them into user stories or product backlog items.
Prioritization: Prioritize the backlog items based on business value, customer needs, and strategic goals.
Acceptance Criteria: Define acceptance criteria for each user story or backlog item and ensure that the delivered product meets these criteria.
Stakeholder Communication: Act as the primary liaison between the development team and stakeholders, ensuring that the product meets the needs of the business.
Sprint Planning: Collaborate with the Scrum Master and development team during sprint planning to ensure that the highest-priority items are addressed.
3. Scrum Master:
Role of Scrum Master: The Scrum Master facilitates the Scrum process, ensuring that the team adheres to Scrum principles and practices. They act as a servant-leader, helping the team to remove impediments and improve processes.
Responsibilities of Scrum Master:
—
Facilitation: Facilitate Scrum ceremonies such as Sprint Planning, Daily Standups, Sprint Reviews, and Sprint Retrospectives.
Process Enabler: Ensure that the team follows Scrum practices and principles, coaching them on the framework when necessary.
Impediment Removal: Help the team identify and remove any impediments or obstacles that may hinder their progress.
Continuous Improvement: Encourage continuous improvement within the team by fostering a culture of reflection and adaptation.
Protecting the Team: Shield the team from external distractions and interruptions, allowing them to focus on their work.
Collaboration: Foster collaboration between the team and the Product Owner, ensuring that communication is clear and effective.
Coaching: Coach the development team, Product Owner, and the organization in agile practices, helping them to adopt and improve their use of Scrum.
4. Programme Manager:
Role of Programme Manager: The Programme Manager oversees multiple related projects (a program) to ensure they align with the organization’s strategic goals. They manage the interdependencies between projects and ensure that the program delivers the expected benefits.
Responsibilities of Programme Manager:
—
Program Planning: Define the program’s goals, objectives, and success criteria. Create a program roadmap and plan the timeline for the completion of various projects within the program.
Governance: Establish governance structures and processes to ensure effective decision-making, risk management, and accountability across the program.
Stakeholder Management: Engage with stakeholders at all levels to understand their needs, manage expectations, and communicate the program’s progress.
Resource Coordination: Coordinate resources across multiple projects, ensuring that resource conflicts are resolved and that the program has the necessary support to succeed.
Risk Management: Identify and manage risks that affect multiple projects within the program, developing strategies to mitigate those risks.
Benefits Realization: Ensure that the program delivers the expected benefits to the organization by aligning projects with the overall business strategy.
Financial Management: Oversee the program budget, ensuring that costs are controlled and that the program remains financially viable.
Performance Monitoring: Track the performance of the program and its constituent projects, ensuring that they remain on track and aligned with the program’s goals.